Tuesday, December 27, 2011

Granny Mahoney's Mince Pie


This recipe comes from my husband's great-grandmother, and it is at least 100 years old. This one does not have actual meat in it, but suet (beef fat). For those who want to make this a vegetarian pie, just omit the suet altogether and add 1 teaspoon of instant tapioca or cornstarch to thicken it.

If possible, It is better to make this a couple of weeks ahead so the flavors can age. According to the directions, you are supposed to stir it every other day, adding a spoonful of Brandy each time you do. The recipe was originally meant to make A LOT of mincemeat, which would be sealed in jars and left to age for months, each jar enough to make one pie. But for this post, I have cut it down to a one pie recipe:

3 lbs apples (mostly very firm apples, though you can have a variety)
1 large box seedless raisins - dark, or a mix of dark and golden
3/4 cup chopped suet
1 tsp salt
1/2 Cup candied orange peel
1/2 Cup candied lemon peel
1 whole lemon, cut in half
3/4 Cup Sugar
1/4 cup molasses
1 teaspoon cinnamon
1/2 teaspoon allspice
1/2 teaspoon cloves
1/4 teaspoon nutmeg
pinch of mace


Peel and core the apples, and chop them into chunks. Put HALF of the apples, and HALF of the raisins into a large pot with the orange and lemon peel, the sugar, molasses, salt, and spices. Squeeze the lemon over the fruit, getting as much juice out as you can. Then put the lemon into the pot to simmer with the fruits (you will take it out later). Simmer (covered) on low for one hour, stirring often. Add the remaining apples and raisins and simmer for two or more hours, stirring often to make sure the bottom doesn't get scorched. Test it to make sure the candied fruits have softened. At this point you can add more sugar and spices to taste. Simmer longer if necessary to soften everything up, then take it off the fire and let it cool to room temp. Put in an airtight container and add a spoonful of Brandy to the top. Add a lid and let it sit for two weeks, stirring every other day and adding another spoonful of Brandy. (I have made this just a few days ahead and it is fine, but it will be better if you can give it the full two weeks).

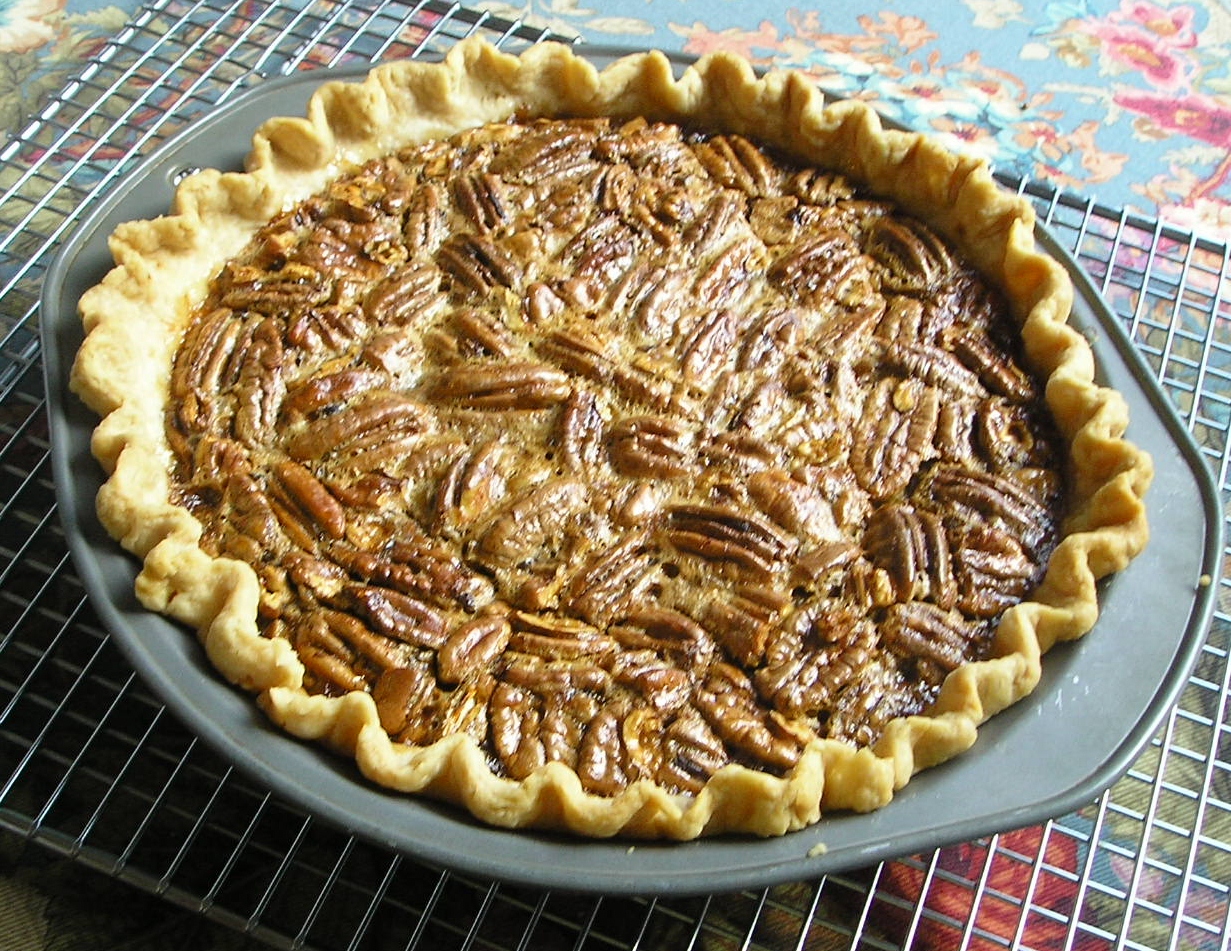
Roll out a two crust pie dough (I like to use old time lard crust for this) and fill with the mincemeat. Bake at 400 degrees for about 40 minutes, checking after 20 minutes to see if the edges need to be covered with foil. Let it sit for 1-2 hours before serving.

Old-Time Lard Crust


This is the same as the flaky crust, but it comes out sturdier, less tender, because of the lard. It also has a slightly "meaty" aroma and flavor, making it great for pot pies and mince pie.

2 Cups sifted All-purpose flour
1 tsp salt
2/3 Cup chilled Lard
2 Tbsp chilled butter
4 Tbsp Ice Water

*For a sweeter crust, you can take 1/4 cup flour out and replace it with 1/4 cup powdered sugar

Sift together Flour and Salt. Cut half of the shortening into the flour with a pastry blender, until it looks like the texture of cornmeal. Cut in the remaining shortening and butter until the dough is in pea-sized crumbs. Sprinkle on the water and blend in lightly with a fork. If needed to hold the dough together, you can add more water a scant teaspoon at a time. When you can gather up the dough in a ball, stop working it. Divide the dough in half, press circles between two sheets of waxed paper to make a disc. This makes chilling the dough faster and rolling it will be easier later. Put the dough in the fridge to chill for an hour or so before rolling. If not using it right away, put the dough in a large Ziploc bag and freeze it.

Then I just go ahead and roll my dough between the two pieces of waxed paper. You need to keep lifting and repositioning the paper when you do this, but it means that you add little or no extra flour to the dough.  It also makes transferring it from the board to the pie tin easier.

Tuesday, December 20, 2011

Spritz Cookies

These small butter cookies only seem to come out at Christmas time, and that's a shame. They are buttery, delicious, and such a fun cookie. Maybe people don't make them often because they are what I would call a "high maintenance" cookie - they require specific equipment and several steps to prep/make. But they are worth it, since they are so tasty and so festive! This particular recipe comes from the Better Homes and Gardens Christmas Cookie book:

3 1/2 Cups flour
1 tsp baking powder
1 1/2 cups butter
1 Cup sugar
1 egg
1 tsp vanilla
1/2 tsp almond extract
food coloring (optional)
Required tools: Manual or Electric Cookie Press (Spritz Cookie Maker)

Stir together flour and baking powder. In your kitchenaid mixer bowl, beat the butter until softened. Then add sugar and beat until fluffy. Add egg and extracts and beat well. Gradually add flour mixture until well-combined. DO NOT CHILL THE DOUGH so that it will pass easily through the cookie press. If desired, tint the dough different colors. Spray cookie sheet with cooking spray or lay down parchment. Press the dough through the cookie press in whatever shape you desire (follow directions for your particular model). Decorate with sugars and sprinkles if desired (I find it helps to brush them with a little water before sprinkling with decorations so they stick better). Bake at 375 for 6-8 minutes.

Monday, December 19, 2011

Retro Christmas Cookies

I usually send my family fancy decorated sugar cookies for Christmas, but this year I was short on decorating time. I still wanted to send cookies, though. So I decided to dig through my family's old cookie recipes and see if I could do something faster, yet still conjuring up the nostalgia of Christmases past. I came up with Rolled Oats Icebox cookies, Old fashioned Molasses, Butterscotch Walnut cookies, and Brandied Chocolate Balls. Making these old recipes was like visiting a time before I was born! You can find all of these recipes in the recipe page.

Sunday, December 18, 2011

Best Gingerbread Cutouts


When people say they don't really like gingerbread cookies, it's usually because they haven't had really good gingerbread cookies. Many recipes give you tough, hard cookies that are not very sweet or, in some cases, overly sugary. This recipe gives you a softer cookie that has a delicious balance of sugar and spice. Roll them on the thick side.

3 Cups All-purpose Flour
1/2 tsp salt
1/2 tsp Baking soda
1 tsp baking powder
1 1/2 tsp cinnamon
2 tsp ground ginger
1/2 tsp nutmeg
1/4 tsp ground cloves
1/2 Cup light molasses
1/2 Cup melted butter
1/2 Cup sugar
1 lightly beaten egg

Mix together dry ingredients in your mixer bowl. In a separate bowl, combine the molasses, sugar, and melted butter, then add to the dry mixture. Add the beaten egg last, and beat just until well-combined. Chill the dough at least one hour before rolling. Roll the cookies thick, then bake in a 350 oven for approximately 6-8 minutes, depending on the size of your shapes.


Simple Milk Icing: 1 Cup powdered sugar mixed with 1 teaspoon milk, stir well. Add more milk just a few drops at a time until you get the consistency you want. You don't want it too runny, it should be thick and when you run a knife through it, it should take 7-10 seconds for the icing to come together again, making the knife mark disappear. You can always add more powdered sugar if you thin it too much. Use a pastry bag to pipe on designs, or frost with a knife for simpler shapes.

Let the cookies dry overnight before packaging or stacking them. This icing takes longer to dry than royal icing, but it is tastier.


Friday, December 16, 2011

Gingerbread Houses - Tips and Ideas


'Tis the season for Gingerbread Houses! I love to build gingerbread houses, and the great thing is that you can make them as simple or as involved as you wish. This week I will posting some tips about building gingerbread houses from simple to complex. I will also include some professional tips for adding details that take it to the next level, for those who would like to take a house from simple to stunning. Here are some tips for success:

Dough:
  • Use a dough that is specifically for houses, not cookies. Cookie dough is meant to be softer. There are two kinds of gingerbread dough for houses - regular and construction grade. Regular Gingerbread Dough is tasty and suitable for building small houses and children's houses. It is easy to roll out and work with. Construction Grade gingerbread dough is tougher and harder to roll out, but it yields amazingly hard dough that will not warp after assembly. Construction grade is usually only used for large houses or competition houses (which may have to sit for a long time and are susceptible to humidity). 

  • Lay a piece of aluminum foil on your cookie sheet and roll your dough out right on that instead of rolling it on a board and then transferring it. (Transferring it can cause the dough to break or the shape to become askew.) If your dough spreads during baking, you can trim it with a sharp knife after it comes out, so your sides stay nice and straight.
  • Roll the dough thick (about 1/4"). For large houses, I bake it twice for extra hardness. The bigger the house, the more important it is that the dough be very firm. After initial baking, let the pieces sit for a day, then rebake them at 250 degrees for ten minutes to dry the dough out a little more.

Constructing the House:
  • If you aren't working with a pattern, build a model out of cardboard first. Tape it all together to see how the house will look.  Then use the pieces as a pattern to cut out your dough. You can do a search online for gingerbread house patterns if you do not want to design your own. Here is one good source for patterns: Gingerbread by Design


  • Build your house on a sturdy base. The larger the house, the sturdier it needs to be. Small houses can go on cardboard cake boards. Large houses require a wooden board of some kind (scavenge your own from your shed or buy pre-cut plywood squares at your local hardware store).

  • Assemble it with Royal Icing, which dries super-hard like glue: (Royal Icing recipe) For a professional look, Tint half of your Royal Icing the same shade of brown as your gingerbread dough and use that icing to assemble the house (so that the icing does not show through in the cracks):
                                           
  • You will still use white royal icing for the decorating, and for adding "snow."
  • It is generally easier to decorate the sides of your house - windows and walls - BEFORE assembling the house. It is easier to have a steady hand for piping if the walls are flat, and candies will dry without sliding downward like they sometimes do when you decorate after the house is assembled and walls are vertical.

  • Use soup cans to prop up walls while you wait for them to dry. You can also use soup cans or something similar to hold the edges of your roof up while drying.
  • Plah ahead to give yourself assembly time! Allow the assembled house to dry overnight (8 hours) before adding the roof on top. Then give your roof several hours up to overnight to dry before adding shingles or decorations on top. The larger the house, the longer you need to let it dry for structural integrity. For large houses, it can take up to 48 hours of assemble/dry/assemble phases. Very small houses can be completely decorated and assembled in one day, but plan ahead because they always take longer than you think they will!
Decorating Tips:
  • Get creative! Go around your grocery store looking for crackers, candies and cereal that could work as shutters, roof tiles, or accent pieces. Be open to using things other than candy. Remember that what you use for roof tiles will need to be pretty flat because shingles are stacked on top of each other. I have also seen gingerbread houses where the roof pieces are "embossed" or imprinted with a shingle design prior to baking. I have also seen pretty designs drawn on with royal icing. The important thing is to make the house yours, in your own personal style. I tend to make houses that are replicas of real buildings, so they are less whimsical than other gingerbread houses. That is my style, and everyone has their own. Many people prefer a gingerbread house that is whimsical and covered with a rainbow of different candies. I love those houses too, so explore your own design style.

  • Snow makes everything look nicer. You can cover up areas that don't look so good with icicles and snow. Dusting the entire house with a touch of confectioner's sugar when it is complete will give it a "just dusted with snow" look.
Take it to the next level:
  • Let there be light! It is not hard to add lights to the inside of your house. Buy a strand of battery operated christmas lights at any craft store. Put them inside (I prefer to have the side and front walls on before I place the lights, so I can tape down the strand while making sure I get the bulbs placed beneath the windows.) Make a little notch in the back wall to allow for the cord to go underneath it, then put the battery pack in back of the house. Depending on how opaque your windows are, the lights should give a nice warm glow to your house.


  • Candy Windows: Just cut the window holes when you are rolling out the dough. After baking your pieces and cooling them, you can pour crushed candy pieces into the window holes and bake at 350 for 5 minutes or so, just until they are thoroughly melted and no chunks remain (watch carefully to avoid overcooking). Let them sit until cool. If the house is lighted inside, the light will show through the windows a little, giving the gingerbread house a warm glow. You can use any hard candy (lifesavers, jolly ranchers) but sometimes candy windows melt out after several days. Brach's Butterscotch discs are the only ones I have found that never melt out, but they are more opaque than other candies, so it is a trade-off.


  • See-through windows: Gelatin sheets (aka "leaf gelatin") can be purchased at cake decorating stores or online. You will be able to see completely through the window, so you could place items in the window for viewing:


  • Landscaping: The area around the house looks nicer if there are trees, bushes, etc. You can use trees, fences, etc. to create visual interest, and bushes close to the house can be strategically placed to cover up areas of the house that may look unsightly.


  • Glitz it up! Your local Cake Decorating store or craft store will sell edible glitter which can be dusted lightly over the top of the house to give it sparkle and make the snow "glisten." The one I like best is something called "Disco Dust" - it is far more glittery than other powders.

    FYI - Disco Dust, Lustre Dust, and Metallic Gilding Dust all fall into the category of "Non-Toxic" which means that they won't make you sick, but are not classified as "Edible" by the FDA. So on items that WILL get eaten, do not use them in large quantities. Just something to keep in mind if you plan to eat your house. You only need a little anyway, and in truth, most gingerbread houses do not get eaten after they have been getting stale on display for weeks.


 Again, I have to give a plug to a great gingerbread website, Ultimate Gingerbread. Go visit this site for tons of ideas, how-tos, and gingerbread inspiration! The woman who runs the site, Loreta, is also very helpful if you have questions. She returns my emails promptly and gives helpful suggestions.

Have FUN!

Saturday, December 10, 2011

Old-fashioned Gingerbread


Gingerbread, the cake variety, is dense and spicy, and best served warm and fresh. I like it with just a dollop of whipped cream, but you could top it with a dusting of powdered sugar or a thin milk-and-sugar glaze. The important thing is not to frost it - that would distract from the cake itself, in all its spicy glory.

2 Cups All-purpose flour
1 1/2 teaspoons ground Ginger
1 teaspoon Cinnamon
1 teaspoon ground Cloves
pinch of freshly grated nutmeg
1 teaspoon salt
2 teaspoons baking soda
1 Cup Sugar
1 Cup dark Molasses
1 Cup Vegatable Oil
3 Eggs
1 Cup Boiling Water

Preheat Oven to 350 degrees. Line an 8x8 square pan with parchment.

Mix the flour, spices, salt, and baking soda in a large bowl and set aside. In your KitchenAid mixer, combine the Sugar, eggs, oil, and molasses until well-blended. Add the flour mixture on low until combined. Then add the boiling water last, again mixing on low until well-mixed (the batter will be thin). Bake at 350 for 40 minutes, or until the center is set and springs back when you touch it with your fingertip.

Saturday, November 26, 2011

Maple Pecan Pie


Pecan Pie is something you either love or you hate. But if you love it, adding maple makes it absolutely to die for. What I love about Pecan Pie is that it is one of the easiest pies to make - it is a single-crust pie and you just stir a few ingredients together and bake. Done.

1 recipe Flaky Pie Crust (use bottom crust only; you can freeze the other half of the dough)
3 Eggs
3/4 Cup Sugar
1/2 teaspoon salt
2 Tablespoons melted butter
1 Cup REAL maple syrup (Dark or Grade B if possible)
1 teaspoon vanilla extract
1 1/2 Cups chopped Pecans (you can use halves for a prettier look, but it slices nicer with chopped nuts)

Preheat oven to 375 degrees.

Pat the pie dough into the pan and crimp the edges. Dust with a touch of flour to keep the bottom crust from getting soggy. Do not prebake the crust.

In a large bowl, mix eggs, Sugar, salt, butter, vanilla and maple syrup together. Add pecans and stir to coat. Pour into the pie shell and Bake 40-50 minutes until the center is set and not jiggly.

Tuesday, November 22, 2011

Bourbon Pecan Pie


Bourbon makes this southern favorite even more southern. I don't like to drink bourbon, but just a touch of it sure is delightful in desserts. What I love about Pecan Pie is that it is one of the easiest pies to make - it is a single-crust pie and you just stir a few ingredients together and bake. Done.

1 recipe Flaky Pie Crust (use bottom crust only; you can freeze the other half of the dough)
3 Eggs
1 Cup Sugar
1/2 teaspoon salt
2 Tablespoons melted butter
1 Cup Dark Karo Syrup
1 Tablespoon Bourbon, plus a touch more to drizzle on the hot pie when it's done
1 1/2 Cups chopped Pecans (you can use halves for a prettier look, but it slices nicer with chopped nuts)

Preheat oven to 375 degrees.

Pat the pie dough into the pan and crimp the edges. Dust with a touch of flour to keep the bottom crust from getting soggy. Do not prebake the crust.

In a large bowl, mix eggs, Sugar, salt, butter, Bourbon and Karo syrup together. Add pecans and stir to coat. Pour into the pie shell and Bake 40-50 minutes until the center is set and not jiggly. Drizzle a touch of Bourbon on top of the pie when it comes out of the oven (not too much - you don't want to lose that carmelized crust and make it soggy!) The alcohol will evaporate with the heat, but the flavor will stay.

Eggnog Pie


This is one of the recipes I came up with after tinkering with cream pie recipes to enter in an annual dairy cook-off. The eggnog really works well in a cream pie, and it is something new and different for those festive holiday parties.

1 recipe Graham Cracker Crust (refrigerated, not baked)
2 Cups good quality Eggnog (I like Hood brand)
1/2 Cup Flour
1/4 Cup Sugar
1 teaspoon salt
3 egg yolks
1 Tablespoon Butter
1 Tablespoon Brandy or Dark Rum (for a no-alcohol version, use 2-3 teaspoons of artificial Rum Extract)
Whipped cream and nutmeg for topping (homemade whipped cream is best for this pie)

Put the Flour, Sugar, Salt and Eggnog into the top of a double boiler. Stir over boiling water about ten minutes until the mixture thickens. Remove from the heat. In a small bowl, beat egg yolks lightly. Add just a teaspoon of the hot mixture to the yolks, stirring well to temper the eggs. Add another spoonful, stir, then spoon the eggs into the hot mixture. Return to heat and cook until it thickens a little more (about three more minutes). Remove from the heat and add the butter and Rum/Brandy. (If using rum extract, use 2 teaspoons to start and then taste it to see if you prefer more). Cool this mixture to room temp, stirring occasionally to avoid getting a skin on it. Spoon it into the refrigerated pie shell and chill for two hours or overnight. Serve with whipped cream and a dusting of nutmeg on top.

Friday, November 4, 2011

'Tis the season for GINGERBREAD!

There is nothing like gingerbread this time of year, and I absolutely love it in all its forms. Gingerbread cake served warm with a dollop of whipped cream is pure heaven. Gingerbread cookies served with hot cocoa are a delight to kids and grown-ups alike, and gingerbread houses are a fun challenge to undertake. This month, as I make all three (Including entering two local gingerbread house contests) I will share recipes and tips for all things GINGERBREAD!


Saturday, October 22, 2011

Maple Spice Cake


Nutmeg, Cinnamon and Clove mix with a touch of maple in this surprisingly light cake. Spice cakes are often dense, so this one makes a nice change. Top it with a simple maple buttercream and a dusting of freshly ground nutmeg.

2 Cups All-purpose Flour
1/4 cup cornstarch
1/2 Cup White Sugar
1/2 Cup Maple Sugar * (See note below)
1 teaspoon baking powder
3/4 teaspoon baking soda
1 teaspoon salt
1/2 teaspoon ground cloves
1 teaspoon Cinnamon
1/2 teaspoon freshly ground nutmeg
3/4 cup shortening
1 1/4 Cups Buttermilk
3 Eggs
1/2 teaspoon maple extract

Preheat oven to 350 degrees. Grease a 9x13 pan and line with parchment (or you could use two 8" round pans for a layer cake.)

Mix dry ingredients in a kitchenaid mixer on low, until well blended. In a small bowl, lightly beat the eggs with the maple extract. Set aside. Add shortening and Buttermilk, on low, until moistened. Turn mixer up to medium and mix for one-and-a-half minutes to aerate the batter. Scrape the bowl down and add eggs in three small batches, mixing after each addition just enough to incorporate them. Scrape down the bowl again to make sure all the batter is mixed well, then pour into pan. Bake at 350 for about 25 minutes.

Maple Buttercream:
1 Stick Butter
2 Cups Confectioner's Sugar
1 Tbsp milk
1/2 teaspoon maple extract (can use more for stronger flavor)

Beat all ingredients in kitchenaid mixer with paddle attachment for two minutes. Add more milk, a couple of drops at a time, for a softer icing.

*Note: Maple sugar is available at specialty stores or online. The granules are a large grain, so you will need to put it through a food processor to get it finer before measuring. If you can't get maple sugar, no worries - just use brown sugar and then increase the maple extract to a whole teaspoon.

Thursday, October 20, 2011

Spiced Pumpkin Squares


These squares taste like pumpkin pie, but with a streusel topping and a gingersnap crust. Although they look like a bar cookie, you will need to serve them on a plate with a fork - the pumpkin pie filling makes them too soft to eat with your fingers.

1 recipe cracker crumb crust (use gingersnap cookies instead of crackers)
Line a 9x13 pan with parchment and then press the gingersnap crust mixture into the bottom of the pan. Bake at 350 degrees for ten minutes, then cool.

1 1/2 Cups cooked pumpkin (or one 15 oz can of cooked pumpkin - make sure you get canned pumpkin, NOT the canned pumpkin pie filling).
1 twelve ounce can of Evaporated Milk
1/2 Cup White Sugar
1/4 Cup Brown Sugar
1/2 tsp Salt
1/2 teaspoon freshly ground nutmeg
1/2 teaspoon ginger
1 tsp cinnamon
pinch of cloves (about 1/8 tsp)
1 tsp cornstarch
1/8 Cup Molasses
2 eggs

Streusel topping:
1/4 cup cold butter
1/4 Cup Flour
1/4 Cup rolled oats
1/2 cup packed brown sugar
1/2 tsp cinnamon
Combine in a food processor or by hand with a pastry blender. Set aside.

Turn oven up to 425 degrees.
Mix all dry ingredients together in a small bowl. In a large mixing bowl, beat eggs lightly. Add the pumpkin to the eggs, then mix in the spiced sugar mixture and the molasses. When it is mixed well, slowly pour the evaporated milk in, stirring to incorporate in gradually (The mixture will be thin). Pour over the cooled
crust and bake at 425 for 15 minutes. Take out and top with streusel topping. Turn the oven down to 350 and put the pan back in the oven (you don't have to wait for it to go back down to 350). Bake an additional 20 minutes or so, until the filling is set in the middle (check it at 15 minutes). Cool to room temperature before slicing into squares with a sharp knife dipped in hot water.

Spiced Pumpkin Pie


Some people like their pumpkin pie to have only a modest amount of spices, letting the pumpkin flavor really shine through. I, on the other hand, absolutely adore the autumn spice mixture of nutmeg, ginger, cinnamon and clove. To me, a pumpkin pie that really spices things up is sublime. And the addition of just a small amount of molasses gives this pumpkin pie even more depth of flavor. This recipe is something I developed after taking various elements from different pumpkin pie recipes I have loved over the years.

1 recipe flaky pie crust (you will use the bottom crust only - you can freeze the other half of the dough, or double this filling recipe and make two pies at once)

1 1/2 Cups cooked pumpkin (or one 15 oz can of cooked pumpkin)
1/2 Cup White Sugar
1/4 Cup Brown Sugar
1/2 tsp Salt
1/2 teaspoon freshly ground nutmeg
1/2 teaspoon ginger
1 tsp cinnamon
1/8 tsp ground cloves
1 tsp cornstarch
1/8 Cup Molasses
2 eggs
1 twelve ounce can of Evaporated Milk

Preheat oven to 425 degrees.

Roll out your crust, place it in the pie pan, and crimp the edges. Place it in the fridge until you are ready to fill it.

In a small bowl, mix together the sugars, salt, spices and cornstarch. In a separate mixing bowl, beat eggs lightly. Add the pumpkin into the eggs, then mix in the spiced sugar mixture and the molasses. When it is mixed well, slowly pour the evaporated milk in, stirring to incorporate it in gradually (The mixture will be thin).

Take your pie shell out of the fridge and place it on a cookie sheet incase of spillover. Pour the pumpkin filling into the pie shell and carefully move it into the oven. Bake at 425 for 15 minutes. Then turn the oven down to 350 and bake an additional 45-50 minutes, until the filling is set in the middle. (Check after 30 minutes to see if the crust is getting too brown - if it is, cover edges with tin foil.) The filling is set when you give it a gentle shake and it is only very slightly jiggly in the center.  If you want to be certain, you can insert a toothpick in the center and see if it is still liquidy. The filling will set more as it cools, so don't cook it until it is totally solid or it will be overdone.

Cool to room temperature before slicing with a sharp knife dipped in hot water. Optional: Serve with whipped cream.

Tuesday, October 4, 2011

Grandma B's Molasses cookies


My Great-Grandmother, known in our family as "Grandma B," was not a professional baker, but a home baker of ledgendary ability. Many recipes that were handed down to me came from her, including these old-fashioned molasses crinkle cookies.

These chewy, spicy cookies are a great comfort food that smells and tastes like clove, ginger, molasses and cinnamon. They are wonderful for a crisp Autumn day, or an ideal addition to those holiday cookie platters people put out at Christmas time. The dough can be made way ahead and frozen. You can even roll it into balls and freeze the balls, then all you have to do is thaw, roll in sugar, and bake.

1 1/2 Cups Shortening
2 Cups Sugar
1/2 Cup Molasses (dark or light - it's up to you)
2 eggs
4 Cups Flour
1 tsp salt
4 tsp baking soda
1 tsp cloves
1 tsp ginger
2 tsp cinnamon

Melt shortening in a medium saucepan on low heat. Cool a little. Add Sugar, Molasses, and Eggs (it is important to let the molasses cool a little so it doesn't curdle the eggs). Beat good. Have all dry ingredients mixed together in a separate bowl, then mix into the wet ingredients and stir until well blended (you can transfer it into a kitchenaid mixer to do this part if you'd like). Chill the dough for at least 2 hours, preferably overnight. Roll into balls about the size of a ping-pong ball. Roll the balls in sugar and bake at 350 degrees for about ten minutes, or until crackled on top and golden brown at the edges.


Monday, September 26, 2011

New England Apple Pie


Well, after several years of pie-making and much tinkering, I think I have found my own personal ideal apple pie. My father-in-law raved about it and my Mother-in-law had TWO slices, so I think this recipe's a keeper!

The only thing that makes it a "New England" Apple pie is using local New England varieties of apples - three different kinds (see apple notes below). As I am discovering, the kind of apples you use can make a HUGE difference in the end result, and using a few different kinds of apples makes for a more complex taste. For a real New England treat, make this pie with Cheddar Cheese Crust.

7-8 Cups mixed baking apples* peeled and sliced very thin
(2-3 different kinds of apples)
1/4 Cup White sugar
1/2 Cup Brown Sugar (if using only sweet apples, only use 1/4 cup brown sugar)
2 Tablespoons Cornstarch
1  1/2 tsp Cinnamon (half ceylon, half spicy cinnamon if possible)
1 tsp freshly ground nutmeg
pinch of ground cloves
1-2 Tablespoons butter (for dotting the pie filling)


Put the apples, cornstarch, sugar and spices into a bowl and let it macerate for at least 20-30 minutes (you can let it go much longer if you like). Roll out the pie crust, fitting the bottom crust into a pie plate. Dust the bottom of the pie crust with a little flour to help absorb juices. Spoon the apples into the crust, making sure to pat the slices down into the corners, so you are not leaving big gaps of air. Dot with butter, then cover with the top crust and crimp the edges together. Brush top with milk and a little cinnamon sugar. Cut air vents into the top crust.

Bake at 400 degrees for about 50 minutes, checking it after 25 minutes to see if the crust edge is getting too brown. If so, cover the edges with foil. After the pie is baked, let it sit for 3-4 hours to let it "set up." Depending on the juiciness of the apples, the pie may be a little runny, but letting it sit for three or more hours will help this. I let all my fruit pies cool completely to room temp before slicing. "Hot out of the oven" = Runny pie!
 
* A note on Apples: For this pie, I used some Gingergold and Honeycrisp, along with just a couple of firm Macintosh apples. (I wouldn't use many Macintosh because they mush up a lot, but one or two to add some variety of flavor is nice.) Basically, I think a good mix is some tart, firm apples and some sweeter, less firm apples. Cortland is a regular choice of mine for firm apples, especially since they are readily available at the grocery store as well as the orchards. Other good choices for pies are Jonathan, Jonagold, Baldwin, Empire, Rome Beauty, Gravenstein, Braeburn, and Pink Lady. If you use Golden Delicious (another grocery store staple) be sure to choose the very firm ones. Red Delicious are terrible for baking (and I personally don't like them for eating, either). I have also heard that Galas and Fujis aren't good for baking either, though I've never tried to bake with them myself. I do like Granny Smith, but I like to mix tart apples like those with some sweeter ones. Mix 'em up - it creates a more interesting flavor, and you don't get too much tart or too sweet.

Thursday, September 22, 2011

Brown Sugar Apple Pie


I don't stray too far from traditional recipes when it comes to apple pie. The only thing a little bit different about this one is that instead of a top crust, it has a thin layer of toasted brown sugar. It is not a streusel topping, which stays crumbly (and which I adore), but this topping melts a bit so that only a thin layer of brown sugar clings to the top. It is juicy and very fresh tasting, and begs for a scoop of good vanilla ice cream on top. Simply omit the topping and replace it with a top crust for an excellent regular apple pie.


Brown Sugar Apple Pie:
 
1 recipe Flaky Pie Crust
6 Cups mixed baking apples, sliced thin
 (it is good to use more than one apple variety)
1/2 Cup Brown Sugar
1 Tablespoon Cornstarch
1 tsp Cinnamon (half ceylon, half spicy if possible)
1 tsp freshly ground nutmeg
dash cloves

Topping:
2 Tablespoons Brown sugar
2 Tablespoons flour
2 Tablespoons butter

Roll the crust and lay the bottom crust in the pie pan, crimping the edges. Put the pie crust in the freezer for 20 minutes. Meanwhile, put the apples, cornstarch, sugar and spices into a bowl and let it macerate for at least 20 minutes. Take the crust out of the freezer and dust the bottom with a little flour. Spoon the apples into the crust, making sure to fill in the whole crust, not leaving big gaps of air.

Mix topping together in a small bowl, then sprinkle over the top. Bake at 425 degrees for 15 minutes, then reduce the oven temp to 375 and bake an additional 30-35 minutes. Let the pie sit for at least two hours to let it "set up." Depending on the juiciness of the apples, the pie may be a little runny. But letting it sit for two or more hours will help this.


Friday, September 16, 2011

Baking with Bourbon

This week is the Kentucky Bourbon Festival. While I don't like to drink Bourbon, I love to use it in Baking! Two great recipes that contain Bourbon are especially good in the Fall and Winter: Get ready to put Bourbon Pecan Pie on your Thanksgiving dessert table, or make Bourbon Balls for your Christmas party. Both of these recipes add the bourbon at the end, so it does not cook off and you really taste it. The bourbon is a surprising zing when you first take a bite, then after a moment it mellows and warms your tastebuds. See the recipe section to try these out, or send me your own ideas!

Thursday, August 18, 2011

Mayan Chocolate Cake


I LOVE the flavor combination of bittersweet chocolate with cinnamon and a touch of chili pepper. Although it is gaining popularity in recent years, this taste is actually not new at all. When the Mayans and the Aztecs made chocolate into a drink, it was spicy, not sweet.

I have seen spicy dark chocolate in the form of chocolate bars and fudge, and even ice cream. That got me thinking, Could it work as a cake? So I took my favorite chocolate layer cake recipe and tinkered a bit. Fair warning: this is not a cake for your typical chocolate lover (as my husband pointed out), this is for people who like to spice things up. The spices are noticable but not overwhelming, so adjust them to your own taste.

Cake:
1 3/4 Cups All-purpose Flour
3/4 Cup Cocoa Powder (if the special dark cocoa powder is available in your area, use that)
1 Cup Sugar
2/3 Cup firmly packed brown sugar
1 1/2 teaspoons Baking Powder
1 1/2 teaspoons Baking Soda
1 teaspoon salt
1 1/2 teaspoons Cinnamon (I use Penzey's Vietnamese Cinnamon, which is strong. If using a grocery store brand, use 2 teaspoons)
dash of Cayenne pepper (or freshly ground black pepper will work, with a slightly different taste)
1 Cup Milk
2 teaspoons Vanilla extract
2 Eggs
1 Cup of very strong, hot, freshly brewed coffee
2 oz chopped chocolate, the darker the better (go for a bar that is at least 60% cocoa or more)
1/2 Cup Vegetable Oil

Preheat oven to 350 degrees. Grease two 9" round pans and use parchment circles on the bottom of the pans. Put the chopped chocolate into the hot coffee and stir, letting it melt. Combine Milk and eggs in a small bowl with vanilla and beat lightly. Now in your mixer, combine the flour, sugars, cocoa powder, baking powder, baking soda, salt, and spices and mix on low speed until well-combined. Add the oil, mixing for about 30 seconds. Then add the milk/egg mixture and mix on low speed until moistened. Add the coffee/chocolate mixture on low speed beating just until it makes a consistent batter (it will be a little thin).
Bake for about 35-40 minutes, testing with a toothpick to make sure it is done in the middle.

Frosting:
1 stick (1/2 cup) butter, softened
3 oz chopped extra dark chocolate
1 Tablespoon dark corn syrup
3 Cups confectioner's sugar
1/4 cup cocoa powder
1/2 to 1 teaspoon cinnamon (depending on your taste)
dash of freshly ground black pepper
1 teaspoon vanilla
2 Tablespoons fresh coffee

Melt the dark chocolate in the microwave (heat it in 20 second intervals, stirring in between, so you don't burn it). In a mixing bowl, beat the butter, cocoa powder, sugar, and spices until well mixed. Add the melted chocolate, corn syrup, vanilla, and coffee. Beat on medium low until fluffy, adding more coffee or powdered sugar to get the consistency you desire.

Monday, August 15, 2011

Authentic Key Lime Pie


I love key lime pie, and the best thing about it is that it is one of the easiest pies to make. My friends in south Florida tell me that a truly authentic Key Lime Pie consists of three elements:

1) A Graham Cracker crust
2) Filling made only of egg yolks, Sweetened Condensed Milk, and Key Lime Juice
3) Fresh Whipped cream as a topping

I am sure that there is a great Key Lime Pie debate raging somewhere amongst the Floridians about meringue vs. whipped cream or whatever. But since I live in New England, I am just going to have to take my friends' word for it that this is the real thing. The fantastic recipe below comes from the Nellie & Joe's company, and it is super easy to make. When people ask me for the recipe, I tell them to just buy a bottle of Nellie & Joe's Key Lime Juice and follow the recipe on the bottle - it's the best recipe I've found. Bottled key lime juice is usually found in the juice aisle, the baking aisle, or sometimes even the drink mix section of your store. If you can't find it, check specialty stores. You really cannot get the same taste from regular limes, so it pays to look around and find the real thing. Sometimes you can find key limes in the store, and if you feel like squeezing them, more power to you!

Crust:
1 recipe Easy Cracker Crumb Crust, using Graham Crackers (I use the max amount of sugar for this pie because the filling is so tart)

Filling:
3 Egg Yolks
1 can Sweetened Condensed Milk (I prefer Carnation brand - some others can be slightly chalky)
1/2 Cup Key Lime Juice

Topping:
1 pint Heavy Cream
Extra sugar for sweetening the whipped cream (I usually use 2 Tablespoons)

Prepare the graham cracker crust and bake it at 350 for 10 minutes. Allow the pie shell to cool to room temp (but leave the oven on).

Beat the egg yolks, Key Lime juice, and sweetened condensed milk together until well blended. Pour into the pie shell and bake for 15 minutes more. Allow to cool to room temp and then refrigerate. Before serving, top it with homemade whipped cream (see below). If you have limes on hand, adding a little lime zest or lime twists as a garnish is nice.

To make whipped cream: Chill your cream along with the mixing bowl and whisk in the freezer for at least 25 minutes before you start. Pour the cream into the bowl and whip the cream with a balloon whisk until slightly thickened. Add desired amount of sugar, then whip some more until it is a forms thick peaks, being careful not to overwhip until it becomes clotty.

American Buttercream


This simple recipe is the frosting that most Americans remember from their childhood - it is one of the most common frostings our grandmothers used to make.

Pastry chefs generally disdain this frosting, sometimes calling it "faux buttercream" because it is not cooked like European buttercreams. BUT for all of their disdain, the pull of nostalgia can be strong indeed, since many Americans seem to prefer this to the others. Look at famous bakeries like Magnolia and Sprinkles, that have made a name for themselves using variations of this simple retro butter frosting. They have lines around the block for their cupcakes!

My own grandmother made the frosting recipe on the back of the Domino Sugar box, which called for 1 pound of confectioner's sugar to 1 stick of butter, but the modern consensus seems to be that increasing the butter to sugar ratio makes it tastier. Another change I made for my own recipe is that I like to beat mine in my mixer for several minutes (up to ten minutes sometimes), which makes it very fluffy. This frosting is also infinitely changeable - you can add chocolate, instant coffee powder, or various extracts to get different flavored frosting, so feel free to experiment!


4 Cups Confectioner's sugar (1 lb.)
1 Cup good quality Butter (I use salted butter for this since I like a little bit of salt)
2 tsp Vanilla extract
1 Tablespoon milk or heavy cream (use slightly more for a softer consistency)

Place the butter and sugar in a mixer and beat on low speed until combined. (If using a KitchenAid mixer, use the paddle attachment, not the whisk). Add vanilla and milk, then beat on low speed until it looks very fluffy. Be patient - I let this go in the mixer for 6-8 minutes. Mixing it for several minutes helps to make it fluffy and minimze the "grittiness" of the powdered sugar. If needed, add additional milk one teaspoon at a time until you get the consistency you want - thicker is better for piping swirls onto cupcakes; softer is better for frosting cakes.

Tuesday, August 2, 2011

Traditional Cream Scones


These are traditional old-fashioned tea scones, not the new-fangled giant things that are so laden with flavors and chunks that you can barely taste the biscuit part. The bonus is that they are SO easy to make. I prefer them with no raisins or other fruit, because I like a plain scone slathered with jam. If you have access to imported Devon cream, use that in place of butter on these. This recipe comes from one of my all-time favorite books, The Breakfast Book by Marion Cunningham.

2 Cups all-purpose flour
1 Tablespoon baking powder
1/2 teaspoon salt
1/4 cup sugar
1 1/4 cup heavy cream
Optional: 1/2 cup dried fruit (raisins, currants, cranberries, chopped apricots)

Glaze:
3 Tablespoons butter, melted
2 Tablespoons sugar

Preheat oven to 425 degrees. Use an ungreased cookie sheet.

Combine dry ingredients in a bowl and mix well with a fork. Add dried fruit if using. With your fork, stir in the cream and mix until the dough holds together in a sticky mass.


Lightly flour a board and transfer the dough to it. Knead the dough eight or nine times. Pat it into a circle about ten inches round (you want the dough to be kind of thick). For the glaze, spread the butter over the top of the dough then sprinkle sugar on top. Cut the circle into 12 wedges (I prefer circles, so I use a biscuit cutter or a 3" circle cookie cutter with fluted edge).


Place on the cookie sheet an inch apart, and bake for about 15 minutes until golden brown. These are best served shortly after baking, or at least the same day. These are not something you want to make a day ahead.

Serve with butter (or Devon Cream) and strawberry jam. For a "proper pot of tea" to go with them, see the recipe section.

Monday, July 25, 2011

Blueberry Custard Pie


This isn't a true custard pie (It does not contain eggs), but it has a layer of blueberries mixed with a dense layer of lightly sweetened cooked cream. It is not really creamy enough to be called a cream pie, hence the name. If you like blueberry pie but want to try something a little different, this might be just your thing.  It is very easy to make, but you have to use good fresh blueberries; frozen will not work well for this pie.

I want to give credit to the book that this recipe is adapted from, but I gave it away and cannot find the title on the internet. If anyone knows the name of the book let me know so I can give credit where credit is due (I think the title had "Dinner Parties" in it and it was an obscure book by a female chef/author).

1 recipe Pat-in-Pan pie crust
(You could also use a baked graham cracker or vanilla wafer crust for this)
3 cups fresh blueberries
2/3 Cup granulated sugar
1/4 cup all-purpose flour
1/4 teaspoon cinnamon
1/4 teaspoon nutmeg
pinch of salt
1/3 Cup milk
2/3 Cup heavy cream

Preheat Oven to 400.F

Wash and pick over the blueberries, removing stems and any mushy berries. Spread on a paper towel to dry, then pour them into the pie shell.

In a medium bowl, combine sugar, flour, cinnamon, nutmeg, salt. Add the milk and cream, whisking until smooth. Pour the mixture over the berries.


Bake 40-45 minutes or until set in the center. (You may want to check the pie after 25 minutes or so to see if the crust edge needs to be covered with foil).

Let cool on a wire rack until room temperature, then refrigerate for two hours or until well chilled.

Serve with whipped cream on top.


Double Berry Pancakes


These pancakes are so easy and so delicious! The name "Double Berry" comes from the fact that they are blueberry pancakes with homemade berry syrup. The syrup can be made ahead and stored in the fridge, just warm it slightly before serving.

1 recipe of batter for Homemade Pancakes
1 1/2 cups Blueberries
1/2 cup raspberries
1/2 cup water
1/2 cup sugar

Set aside 1/2 cup of blueberries to use in the pancakes. Put the other 1 cup of blueberries, the raspberries, water and sugar in a small saucepan. Simmer over low heat until the fruit breaks down and the mixture turns syrupy, about 15 minutes. Put the mixture through a strainer to get rid of seeds and large berry clumps. Set aside.

Heat a cast iron griddle over medium heat until a drop of water sizzles on the surface. Pour batter onto the griddle, spacing pancakes about an inch apart. Drop about five blueberries onto each pancake. When you see bubbles AND the edges are drying slightly, it is time to flip. Serve hot with a dusting of powdered sugar and the berry syrup on the side.

Pat-in-Pan crust

This pie crust is a real time-saver! It only works for single-crust pies; ones that will have a topping on them instead of a top crust. It is sturdy and less flaky, so it is ideal for pies that need a sturdier crust, such as apple or berry crumb pie.

1 1/2 cups all-purpose flour
1 1/2 teaspoons granulated sugar
1/2 teaspoon salt
1/2 cup canola oil
3 1/2 Tablespoons milk

In a 9-inch pie pan, combine all ingredients and stir with a fork until well blended. Then use your fingers to pat the dough into the pan firmly, working until you have covered the bottom and sides of the pan. Use your fingers to press it smooth and make an even rim along the edge. With a fork, prick the bottom of the crust to prevent bubbling. Bake as directed according to the recipe for whichever filling you are using.

Thursday, July 21, 2011

Butter vs. Shortening - The Great Pie Crust Debate

If you look at a lot of cookbooks like I do, you'll see that cooking, like anything else, is all about trends. In my adult life I have been surprised to realize that even things you would never think of as "trendy" DO in fact follow waves of what is "in" or "out." Politics, parenting styles, and yes, Cooking.

And so we come to the trends of Pie Crust. Lard used to be the chief ingredient in American pie crusts, (those recipes now exchange lard for shortening in most cases). Then somewhere along the way we decided that the French way of making pie crust was superior - all butter crust (i.e. Pate Brise).

Nowadays there is a great debate among bakers, pastry chefs, and pie lovers about what makes the best crust. All-butter, shortening, or a combination of both? Lately the trend is definitely leaning in the direction of all-butter crusts. Pastry chefs and home bakers alike will proudly proclaim that their pies are made with nothing but butter in the crust. When did shortening get a bad rap? Was it Martha Stewart, with her 1985 book Pies & Tarts (to which I often refer for recipe ideas) that made people want to go all-butter, all the time? Was it even earlier? Or is it due to the recent findings that shortening, which contains trans-fat, is actually unhealthier than butter?

I don't know what has made the pendulum swing so far in favor of butter, but I'll make a confession: I like a shortening crust better. I know, I know, I am probably in the minority here. But although I have tasted many a delicious pie with an all-butter crust, my personal preference is for the lighter, flakier shortening crusts. I can hear the pastry chefs wailing that butter crust can be flaky when it is done right. True. But light? Not as far as I have tasted. Butter crusts are usually denser and richer in flavor, which to most people is a good thing. But not to me. I also find that butter crusts usually shrink more in cooking than shortening crusts do (but of course that can be helped by chilling the pie before baking).

Actually, my own flaky crust recipe calls for both, and the ratio is about 2 parts shortening to 1 part butter. It is deliciously light and flaky. The flavor, which butter lovers may consider a little bit bland, does not overshadow whatever filling I put in it. My husband, who always used to leave the ends of his crust abandoned on the plate, enjoys every crumb of this crust. And I always get a ton of compliments on the crust when I bring a pie to an event: Flaky Pie Crust

Sunday, July 10, 2011

Homemade Ice Cream Cake


Homemade Ice cream cake is pretty easy to make. Take your favorite cake recipe(I used Sour Cream Yellow cake for this) and make a 6" or 9" round layer of it. You can use the leftover batter to make a few cupcakes, or make two layers and freeze one of them for later use. Line another round pan of the same size with plastic wrap. Take your favorite Ice cream flavor (Store-bought or homemade) and let it soften a bit. Then scoop it into the pan lined with plastic wrap, making sure to push the ice cream well into the corners. Put the pan into the freezer for a couple of hours to freeze again. Then unmold the ice cream, set it on top of the cooled cake layer, and re-cover the whole thing with plastic wrap. Let it sit in the freezer until you are ready to frost and decorate it. I used lightly sweetened homemade whipped cream to decorate this one, because the ice cream is so sweet that you don't need a heavy sweet frosting on top.