Well, this blog is called "Baking Outside the Box," so I am torn about posting recipes for Icebox "cakes". They are not baking, and they are not really from scratch, (or "outside the box") as this blog is supposed to be about. But they are SOOO good, and a nice alternative when you want to make a dessert but don't want to turn on your oven.
Although I had heard of Icebox cakes and pies, I had never made one. But my sister-in-law recently turned me on to this retro craze with her fantastic Eclair Cake, which was the simplest, yet most popular, dessert brought to a recent potluck party at my house. Yes, that cherry pie that took me hours to make? It was totally trumped by pudding and graham crackers! Ya gotta laugh.
Icebox "cakes" are usually made from some kind of cookie or cracker (i.e. graham crackers, Nilla wafers or chocolate wafers) layered with whipped cream, pudding, or both and then refrigerated overnight. The cream and the crackers meld together, turning the crackers soft and cake-like. Viola! A cool summer dessert with no baking required!
The most famous of these recipes is Nabisco's Chocolate Refrigerator Roll, with its iconic picture on the box of chocolate wafers (found in the cookie section of your local store). And if my sister-in-law agrees to let me post her Eclair Cake recipe here, you will find it in the recipe section.
Wednesday, July 6, 2011
Monday, July 4, 2011
Fourth of July Cherry Pie

Monday, June 27, 2011
Summer Strawberry Shortcake

Summer Strawberry Shortcake
June means that Strawberries are in season! And there is nothing better than farm-fresh strawberries for this recipe. So if you can, buy them from your local farmer's market rather than the grocery store. It takes an entire quart of strawberries but it is SO worth it. Everything is made from scratch here, and it makes such a difference. This fantastic recipe comes from the book Sky High - Irresistable Triple-Layer Cakes by Alisa Huntsman.
For cake:
5 TB unsalted butter at room temperature
3/4 c sugar
1 tsp vanilla extract
2 eggs
1 1/2 c cake flour
2 1/2 tsp of baking powder
1/4 tsp of salt
2/3 c buttermilk
For Strawberry Filling
2 pints strawberries (save a few whole ones for garnish)
1 tsp vanilla extract
1/2 c sugar
2 pints strawberries (save a few whole ones for garnish)
1 tsp vanilla extract
1/2 c sugar
For the whipped cream:
1 1/2 cups heavy cream
2 Tbsp granulated sugar
Wash, hull and cut up the strawberries. Put them in a bowl with the sugar and vanilla. Let them macerate in the fridge for at least one hour, stirring occcasionally.
In the meantime, make the cake: Preheat the oven to 350 degrees F. Grease the bottoms and sides of three 6-inch round cake pans. (Line the bottom of each with a round of parchment for best results).
In a large mixer bowl, cream the butter, 3/4 c of sugar, and the vanilla with an electric mixer until light and fluffy. Add eggs one at a time, scraping down the sides of the bowl after each addition.
Sift together the flour, baking powder, and salt. Add these dry ingredients to the batter, alternating with the buttermilk. (Start with the dry ingredients and end with the dry ingredients). Divide the batter amoung the three prepared pans/put in the pan.
Bake the cake layers for 20-25 minutes, or until a toothpick inserted in the center comes out clean. Allow to cool in the pan for ten minutes before inverting onto wire racks. Let the cake cool completely.
While the cake is cooling, place a mixing bowl and beater or wire whisk in the freezer. After they have chilled for a little while, take them out and whip the cream until it is thick enough to spread.
Assemble the layers like this: Cake, strawberries with juice, whipped cream. Repeat. Garnish with a few whole strawberries.
Friday, June 24, 2011
Fourth of July Desserts
There is nothing more fun than a Fourth of July cookout. For me, the hardest part is deciding which desserts to make! A red velvet cake? A flakey pie filled with locally-grown summer berries? A cool and summery icebox pie? A batch of patriotic sugar cookies? It's so hard to decide! Here are some ideas that can be made a day or more ahead. I will post recipes in the recipe section if you'd like to try them out. If you're having a potluck party like I am, maybe the best idea is to choose one dessert, and ask others to make something else.


Berry and cherry pie can be made with locally grown fruits this time of year, so they are the best choice. Because it is "All-American," Apple pie is always a favorite for July 4th, but since apples are not in season, you'd be forced to use imported (and likely bland) fruit. Resist the urge!
COOKIES


Cookies are festive and a great choice to make ahead. The best thing about them is that they are so portable - guests don't need a plate and a fork to eat them, leaving the other hand free to hold a beer, or play horseshoes.


There is something about a cake that shouts "celebration!" To quote a line from a kids' song I recently heard, "How can it be a party when there isn't a cake?!" A red velvet cake is perfect for July Fourth. I love the idea of using fresh strawberries and blueberries to add red and blue color. A perennial favorite of cake decorators is a sheet cake made to look like a flag, with blueberries as the stars and strawberries as the stripes.
Royal Icing
Royal Icing was traditionally made with egg whites, but many people are fearful of salmonella nowadays. I don't worry as much about salmonella as I do about the raw egg whites spoiling when left at room temperature for long periods of time. So I use Meringue Powder royal icing.
Royal icing is a common icing for sugar cookies because it dries hard and can be thinned to have a smooth consistency. It isn't necessarily the best tasting icing, but for decorating it is the most versatile. It also dries quickly, which is a plus if you need to stack them.
5 Tablespoons Meringue Powder
3/4 Cup warm water
1 tsp cream of tartar
2 lbs Confectioner's Sugar, sifted
In a mixing bowl, combine the water and meringue powder together. Whisk by hand for 30 seconds until frothy. Add the cream of tartar and whisk again for 10 seconds, then add the sugar and attach the paddle attachment of your electric mixer. At medium-low speed (I use #2 on the KitchenAid) beat for TEN minutes until thick, creamy, and it forms stiff peaks. This stiff icing is the ideal consistency for constructing Gingerbread Houses. You can thin it by adding small amounts of water to achieve a flow consistency for cookies and such. Flow consistency should be when you drag a knife through the frosting and it takes a few seconds for the icing to smooth out and the knife mark to disappear.
Basic Blue

Blueberry pie is one of the easiest to make, since you don't have to slice, dice and pit the fruit. During the summer, going to a local blueberry farm to pick your own berries will give you the best berries and is often cheaper than buying them in the store. You can use frozen berries in the off season with a pretty good result. My husband likes a no-frills basic blueberry pie, with no added flavors that distract from the berries, so here it is:
1 recipe Flaky Pie Crust
4 Cups fresh Blueberries
2/3 cup sugar
1/4 cup Minute Tapioca
1 Tablespoon butter, cut into small pieces
Optional: for very sweet berries, add up to 1 Tbsp lemon juice to increase tartness
Rinse the blueberries and pick them over to remove stems. Put the berries, sugar and tapioca in a large bowl. Stir the berries roughly - you actually want to break some up and release the juices. (Blueberries have an outer skin which prevents them from making their own juice in the sugar unless some of them are broken. They will create juice when cooking, but when you are using tapioca as a thickener, you need some juice for the tapioca to absorb before cooking).
Spoon berries into the pie shell and dot with butter. Cover with top crust and cut a few slits in the top to vent. Bake at 400 degrees for 40-50 minutes.
Cherry Pie

6 Cups Cherries, washed and pitted (see note at bottom about cherries)
3 Tablespoons Minute tapioca
2 Tablespoons Cornstarch
1 to 1-1/2 cups sugar, depending on the tartness of the cherries
1/4 teaspoon almond extract
1/2 teaspoon cinnamon
1/4 teaspoon salt
1 Tablespoon butter, cut into little pieces
Mix all ingredients together in a large bowl. Allow to mascerate for 20 minutes. Spoon the cherries and juice into the pie crust, dot the cherries with the butter, then cover with the top crust or a lattice crust. Bake at 400 degrees for 40-50 minutes.
A note about cherries:
When I first started making homemade cherry pies, I did not know there was a difference between cherries. I bought Bing cherries in the grocery store and wondered why my pies, while tasty, didn't have that tartness that a cherry pie should. Then I realized it was because I had not been using sour cherries a.k.a. "tart cherries." Why hadn't I seen them in the stores like the other cherries? Well, they can be very hard to find. These elusive cherries are only available for a short time in the summer, and you rarely see them at your local grocery store. (In fact, I read in Martha Stewart's pie book that she grows her own cherry trees just for this reason.) Look at Farmer's Markets or specialty stores like Whole Foods. If you still can't find them, you have two choices: You can look for frozen sour cherries, or use Oregon brand canned sour cherries in water. It is not a pie filling, just the cherries, so you still make your own filling. The last option is to use fresh sweet cherries and realize that your pie will be sweet, lacking that tart "true cherry pie" flavor.You can always try adding a bit of lemon juice to add tartness if you'd like.
Thursday, June 16, 2011
Real Strawberry Cake
.JPG)
This amazing Strawberry Scratch cake is from the book Sky High by Alisa Huntsman. This recipe adds strawberry puree to butter cake to give it a subtle berry flavor and pale pink color. I like to use a touch of pink decorator's coloring to highlight the color a bit, but it's up to you. The original recipe calls for a Strawberry Swiss Meringue Buttercream, but everyone raves about my Fresh Strawberry Buttercream so that is what I use. This would be wonderful for a pretty princess birthday cake, but equally as lovely for an adult occasion.
Real Strawberry Cake
4 1/2 cups cake flour
3 cups sugar
5 1/4 teaspoons baking powder
3/4 teaspoon salt
3 sticks (12 ounces) unsalted butter, at room temperature
1 1/2 cups pureed frozen strawberries*
8 egg whites
2/3 cup milk
Optional - 1 to 2 drops red food dye, if using (to make the pink color pop more)
1. Preheat the oven to 350»F. Butter three 9-inch round or 8-inch square cake pans. Line with parchment or waxed paper and butter the paper.
2. Put the flour, sugar, baking powder, and salt in a large mixer bowl. With the electric mixer on low speed, blend for 30 seconds. Add the butter and strawberry puree and mix to blend the ingredients. Raise the speed to medium and beat until light and fluffy, 2 to 3 minutes; the batter will resemble strawberry ice cream at this point.
3. In another large bowl, whisk together the egg whites, milk and red food dye, if using, to blend. Add the whites to the batter in two or three additions, scraping down the sides of the bowl well and mixing only to incorporate after each addition. Divide the batter among the three prepared pans.
4. Bake the cakes for 30 to 34 minutes, or until a cake tester or wooden toothpick inserted into the center comes out clean. Allow the layers to cool in the pans for 10 to 15 minutes. Invert and turn out onto wire racks and peel off the paper liners. Let stand until completely cooled before assembling the cake, at least an hour
*When fresh strawberries are truly in season, by all means use them instead of frozen.

Monday, June 13, 2011
Cake Trends: Back to Buttercream?
As a cake decorator, I love to see elaborate cakes decorated with fondant, gum paste, royal icing stringwork, and sculpted adornments. But as a baker, I have to say that there is something lost when one puts all their energy into making a visual piece of art - it often tastes more like art than food. I always used to take it as a compliment when someone would say my cookies were "too pretty to eat," but now I'm not so sure. When I see elaborate cakes on shows like "Cake Boss" and "Ace of Cakes" I am stunned by their appearance, but more often than not, I wouldn't want to eat them. The simple fact is that in order to build a cake that looks like a sculpture, you have to sacrifice some of the elements that make it tasty. The cake is heavy and dense; there is a lot of non-edible support inside; some of the decorations are often made from rice krispy treats (edible, yes, but let's face it - it's not cake). Finally, the cake is covered with fondant. Personally, I think fondant tastes fine when it is homemade. But more and more, I am hearing people say that they love the look but hate the taste of fondant. I often see it scraped off slices of cake and left sitting on the plate while the rest is eaten. Some people are asking for cakes decorated with buttercream instead. Is this the beginning of a new cake trend - forsaking fondant and getting back to buttercream? I don't know, but I guess I'd better brush up my piping skills!


Wedding Cake with Buttercream
(Birds, twigs etc are non-edible craft items)

Birthday cake covered with fondant
(Mushrooms are rice krispies covered in fondant)
Friday, May 20, 2011
Red Velvet Cake

Some people think that Red Velvet Cake is just chocolate cake with red food coloring, but that isn't quite true. It is a tangy buttermilk cake with just enough cocoa to give it a mildly chocolate flavor. This southern favorite seems mysterious, but really it is just as easy to make as any other scratch cake. The stunning red color and interesting flavor make this a very popular cake. It looks lovely on the Fourth of July when garnished with blueberries and strawberries.
Sunday, May 8, 2011
Margarita Pie

1 homemade Graham Cracker Crust (add a little extra sugar since this filling is tart)
1 Packet of unflavored gelatin
1/2 Cup Lime juice
1/4 Cup Tequila
1/4 Cup Triple Sec
1 Pint Heavy Cream
1 Cup Confectioner's Sugar
a few drops of green food color
Sprinkle gelatin over lime juice and dissolve it over hot water. When gelatin is thoroughly dissolved, add tequila and Triple Sec. Refrigerate. Meanwhile, Whip the cream in a chilled mixer bowl until it thickens a bit. Add the sugar, and continue beating until soft peaks form. Refrigerate. When gelatin mixture begins to thicken and take on a syrupy quality, fold it into the cream while adding the food coloring. Spoon the mixture into the pie shell and garnish with lime slices. Chill the pie in the refrigerator for another hour before serving. The filling will "set up" more as it chills.
Wednesday, May 4, 2011
Perfect Pancakes

You will never make pancakes from a box again after you've tried this easy and delicious recipe - it is SO good! The recipe comes from one of my favorite cookbooks, The Breakfast Book by Marion Cunningham. They come out fluffy and soft, and are especially good when cooked on a cast iron griddle.
2 Eggs
5 Tablespoons butter
1 Cup Milk
1 1/4 Cups All-Purpose Flour
1 Tablespoon Sugar
4 teaspoon Baking Powder
3/4 teaspoon salt
Beat the eggs in a mixing bowl until blended. Put the butter and milk in a large microwave-safe measuring cup or a glass bowl, and microwave until butter is melted. Set aside the milk/butter mixture and allow it to cool a little. Gradually add the milk mixture into the eggs, adding just a tiny amount at first (this is to temper the eggs, so if the liquid is still too hot, it does not cook the eggs).
In a separate bowl, stir the flour, sugar, salt and baking powder together until well mixed. Pour the egg mixture into the flour mixture and stir only until the dry ingredients are moistened. Don't overmix (If you've been using a KitchenAid mixer for the first part of this, STOP now and mix this last part by hand).
Heat Griddle until a few drops of water "dance" on it (I really prefer a cast iron griddle for pancakes). Lightly grease the surface with a touch of oil. Drop about 1/4 cup batter onto the griddle for each pancake. Cook until bubbles break the surface and the pancakes are just starting to turn dry at the edges. If bubbles form immediately, your griddle is probably too hot. Turn pancakes and cook about 30 seconds more on the second side.
For Blueberry Pancakes (or other fruit): Have the fruit cleaned and ready next to the griddle. After putting batter on the griddle, add pieces of fruit onto each pancake before turning it. (Fruit that is mixed into the batter often gets smashed up).
Topping Ideas:
I love to mix it up by serving different toppings with my pancakes. Here are some ideas:
- Real Maple Syrup
- Flavored Fruit Syrups (use real fruit syrups for best taste)
- Powdered Sugar dusted on top
- Fresh Fruit (bananas and berries are great)
- Caramelized apples or bananas (Slice fruit and place in a skillet with 1 Tablespoon of butter and 1 Tablespoon of brown sugar per 2 Cups of fruit. Cook until caramelized).
- Flavored Butters (mix 1 Tablespoon honey, real maple syrup, or fruit preserves to 1/4 cup softened butter and stir well)

Saturday, April 23, 2011
Shaker Lemon Pie

Shaker Lemon Pie is unusual as lemon pies go. Lemon Meringue Pie, Lemon Tart, and Lemon Chiffon pie all call for just the juice or the juice and zest to be made into a curd or a fluffy filling. Then the filling is topped with meringue, whipped cream, or nothing at all. But Shaker Lemon pie is actual slices of lemon baked with egg so it forms a kind of a custard, and topped with a pastry crust. Interesting. I found two recipes for this and the one I prefer is from the Joy of Cooking (Sorry, Martha Stewart, I tried yours and liked this other one better). IMPORTANT: The lemons have to macerate in the sugar for several hours, so plan ahead.
This will make an 8 or 9 inch pie. For larger pies or for deep dish, double the recipe:
1 dough recipe for a two-crust pie (see recipe section)
2 large Lemons
2 Cups Sugar
1 tsp salt
4 well-beaten eggs
Grate the zest from the lemons. With a very sharp knife, cut the white inner peel from the lemons and then slice them into paper-thin slices. Don't worry if the slices fall apart a bit - they won't stay in neat slices when mixed with the eggs anyhow. Remove all seeds. Combine the lemon slices with the sugar and let stand 2-24 hours (the longer the better). After letting the lemons sit several hours (or overnight) Preheat the oven to 425 degrees. Line a pie pan with the bottom crust of the dough. Add the beaten eggs to the lemons and stir well. Pour it into the pie crust. Cover with top crust and crimp the edges. Brush the top crust with milk and sprinkle a little sugar on top. Bake at 425 for ten minutes, then reduce heat to 325 and bake 45 minutes longer. (Cover the edges with tin foil if they start browning too much). Cool pie completely before slicing.
Monday, April 18, 2011
1922 Devil's Food Cake
This was one of my Great-Grandmother's recipes. When I came across it, there was something so intriguing about trying a cake recipe from 1922. The original recipe calls for lard, as you can see here, but I use shortening instead. Before you bake this, see my notes below on other possible adjustments that you might choose to make.
2 C Brown Sugar
1 C Lard (you can use shortening instead)
2 Eggs
1/2 Cup sour milk (instructions below)
2 tsp baking powder
1/2 C fresh hot coffee
2 C flour
1/2 C cocoa
1/2 tsp baking soda
Preheat oven to 350 degrees. Grease and flour two round 9" pans or one 9x13" pan.
For sour milk: Put 1-1/2 tsp white vinegar in a measuring cup then add milk to equal 1/2 cup. Let sit for five minutes.
Sift together the flour, cocoa powder, and baking powder in a large bowl and set aside. In a mixing bowl, cream the crisco and sugar together, then add eggs and mix well. Dissolve the baking soda in the sour milk and beat until frothy. Add the sour milk mixture to the sugar/egg mixture and beat to combine. Add the hot coffee a little at a time with mixer running on low. Gradually add the flour mixture to the wet ingredients in three shifts, mixing well after each addition of flour.
Note: I wanted to print this recipe as my great-grandmother made it, since I am a fan of retro recipes and I believe in preserving family recipes in their original form. However, while I love the flavor of this cake, I find it slightly dry, so I make a couple of minor adjustments to the recipe when I bake it: I use 3 eggs instead of two, and I increase the coffee to 3/4 Cup (instead of the 1/2 cup listed).
Saturday, April 16, 2011
Guinness Cake

After tinkering with a few different recipes for chocolate stout cake, this is what I came up with. It is delicious and versatile. You can leave off the icing and it will taste like a rich chocolate pound cake. Or bake it as a small layer cake instead of the bundt, frosting it with chocolate or vanilla buttercream. For a different flavor, I have substituted Coffee or Coca-Cola for the Guinness. Whenever I need a dense chocolate cake, this is my go-to recipe. It is actually better the day after you bake it, when the Guinness flavor has had time to mellow.
Icing
2 Cups confectioner's sugar
2 Tbsp butter, melted
2 Tbsp cup cocoa powder
2 Tbsp Guinness
Preheat oven to 350°F. Spray a bundt pan with baking spray.
Bring Guinness and butter to simmer in a pan over medium heat. When the butter is melted, take off heat and add cocoa powder. Whisk until mixture is smooth. Cool slightly.
Sift together the flour, sugar, baking soda, and salt in large bowl to blend. Set aside.
In a separate bowl, beat the eggs then stir in the sour cream to blend. Add the chocolate mixture to the egg mixture gradually and beat just to combine. Add flour mixture, stirring just until there are no large lumps of flour left. Pour into bundt pan. Bake cake until tester inserted into center of cakes comes out clean, about 45 minutes. Let it cool 10 minutes, then turn the cake out onto a rack to cool completely.
For icing, combine the sugar, cocoa, melted butter and Guinness and stir well until it is nice and smooth. Put into a microwave safe bowl and heat the icing for about 10 seconds to get it to a nice pouring consistency. Place the cooled cake on a rack and spoon the icing over the bundt cake. You can use as much or little as your taste desires.
Sugar 'N' Spice Muffins

These muffins are easy to make and so nice on a cold winter morning. They are a great item to bring to a potluck brunch party.
1/3 Cup Shortening
1/2 Cup Sugar
1 Egg
1 1/2 Cups All-Purpose Flour
1 1/2 tsp baking powder
1/2 tsp salt
1/2 tsp nutmeg (freshly ground if possible)
1/2 tsp cinnamon
dash of cloves
1/2 Cup Milk
Topping:
1 stick butter, melted
1/2 Cup sugar combined with 1 tsp cinnamon
Preheat oven to 350. Grease the muffin tins.
Beat the shortening, sugar, and egg in a mixing bowl. Mix together the flour, baking powder, salt, and spices, then add to the shortening mixture. Pour in the milk and beat until blended and smooth. Fill the muffin tins about 2/3 full. I usually only get 10 out of this recipe, but you can fill the cups less for a full dozen if you wish. Bake about 20 minutes, until slightly browned.
For the topping, have the butter melted in a bowl and the cinnamon sugar in a separate bowl. When the muffins have cooled enough to remove them from the tins, dip the tops of each muffin in the butter then the cinnamon sugar. Place on a rack to dry. These are best served fresh, but they will still be okay the next day (though slightly drier).
Easy Cracker-Crumb Crust

Store-bought Graham Cracker Crust is so awful, and making a real cracker crumb crust is so easy. Try different varieties of crackers and cookies to make your pie interesting. Graham cracker crusts are always a favorite, but for some very sweet pies (i.e. Butterscotch) you may want a Ritz cracker crust to give it a touch of saltiness. You can also match the flavor of the crust to the pie (i.e. chocolate cookie crust for chocolate cream pie, vanilla wafer crust for vanilla cream pie). I have also used gingersnaps, almond wafers, and crunchy Lemon cookies.
1 1/2 Cups Cracker or cookie crumbs (use a food processor to get the finest crumb)
*optional: 1/4 to 1/2 Cup confectioner's sugar (see note below)
6 tablespoons melted butter
Stir ingredients together until well blended. Pat into the pie pan gently at first, to position the crumbs as evenly as possible. Then go over it, pressing more firmly to really set the crumbs in place. If you prefer, you can put a sheet of plastic wrap over the top to make it easier to press firmly without the crumbs sticking to your hands. Another method: If you have a second pie pan of the same size, you can rest it inside the crust and press firmly.

About adding sugar to the crust:
For Graham Cracker Crust I usually add 1/4 Cup confectioner's sugar, more when making a crust from Ritz Crackers, and no sugar at all when using cookie crumbs for the crust.
Flaky Pie Crust

The recipe makes a two-crust 9" pie:
2 Cups sifted All-purpose flour
1 tsp salt
1/2 Cup chilled shortening
4 Tbsp chilled butter
4 Tbsp Ice Water
Sift together Flour and Salt. Cut half of the shortening into the flour with a pastry blender, until it looks like the texture of cornmeal. Cut in the remaining shortening and butter until the dough is in pea-sized crumbs. Sprinkle on the water and blend in lightly with a fork. If needed to hold the dough together, you can add more water a scant teaspoon at a time. When you can gather up the dough in a ball, stop working it. Pie Crust should be worked lightly, not kneaded like bread. Divide the dough in half, press circles between two sheets of waxed paper to make a disc. This makes chilling the dough faster and rolling it will be easier later. Put the dough in the fridge to chill for an hour or so before rolling. If not using it right away, put the dough in a large Ziploc bag and freeze it.
Then I just go ahead and roll my dough between the two pieces of waxed paper. You need to keep lifting and repositioning the paper when you do this, but it means that you add little or no extra flour to the dough. It also makes transferring it from the board to the pie tin easier.

Peel back one side of the waxed paper and put that side down into the pie pan. Then gently peel back the top sheet of waxed paper:

Gently push the dough into the corners of the pan:

If any part of the edges breaks, you can patch it with dough from an area that has too much:

If you are making a single-crust pie, proceed below. If you are making a double-crust pie, fill
the pie and then place the top crust over the filling. Then proceed with crimping directions below.
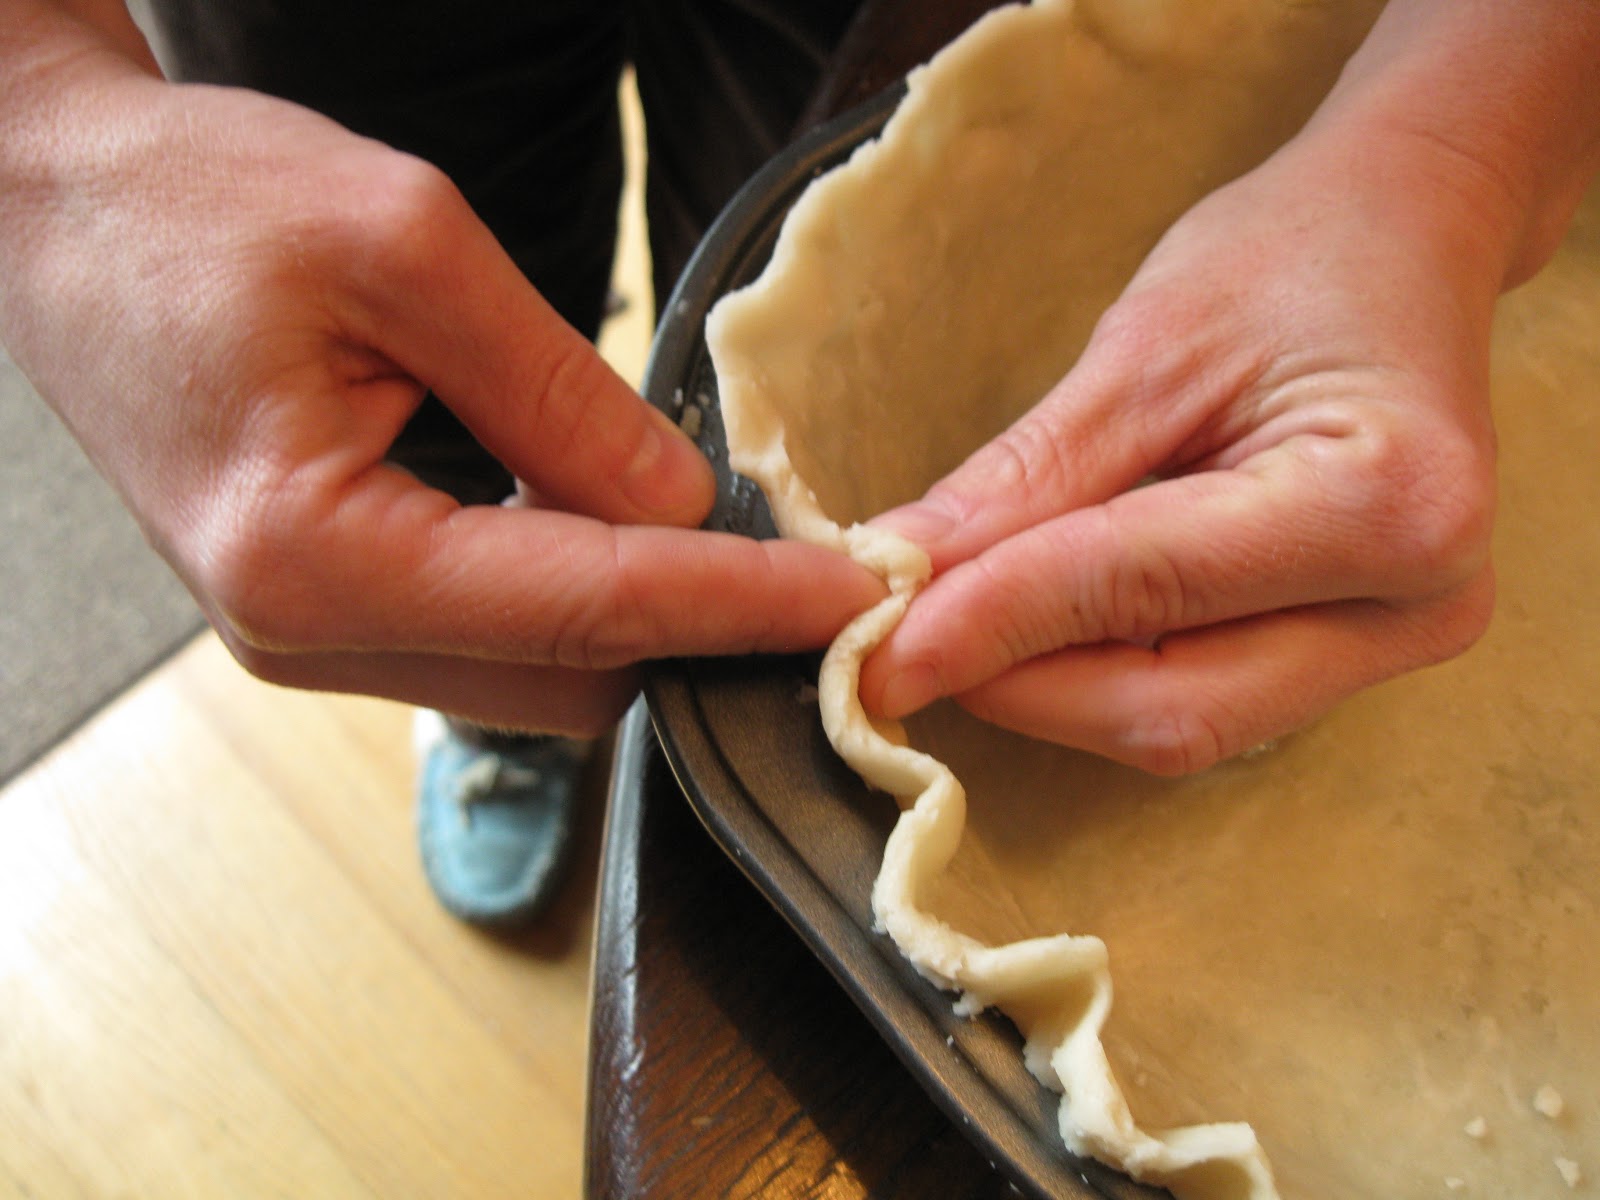
Fold over the edges and pinch them together like this:

Crimp edges in a fluted pattern (see below) or press them with the tines of a fork.
Friday, April 15, 2011
Spring is here!

These Easter/Spring cookies will be wrapped (with about four dozen others) and donated to our local library to be sold at their April fundraiser. The cookies are a standard rolled Butter Cookie with Royal Icing.
Tuesday, April 12, 2011
Crazy for Butterscotch

Butterscotch Bars

Butterscotch Pie with cracker-crumb crust
Simple Shortbread
This recipe comes from The Joy of Cooking. It is so simple to make and deliciously buttery. It is also very versatile - you can spread raspberry jam and crumb topping on top to make raspberry bars, or add lemon zest to the dough then drizzle a lemon glaze on top for lemon bars.
Preheat oven to 325 degrees.
Bars:
1 Cup Butter (at room temperature)
2 Cups sifted all-purpose Flour
1/2 Cup Powdered Sugar
1/4 teaspoon salt
Cream the butter until soft. Sift together the Flour, Sugar, Salt. Add the flour mixture to the butter just until well combined. It will be crumbly. Pat into a 9x9 pan and press down. Pierce with a fork through the dough in several places. Bake 25-30 minutes. Cut into squares while warm.
Brown Sugar Shortbread

These shortbread bars are rich with the flavors of brown sugar and butter. And the best part is they are quick and easy to make!
Bars:
1 Cup Butter (at room temperature)
2 Cups sifted all-purpose Flour
1/2 Cup Light Brown Sugar
1/4 teaspoon salt
1 teaspoon Vanilla
Crumb topping:
2 Tablespoons Flour
2 Tablespoons butter
5 Tablespoons brown sugar
Preheat oven to 325 degrees.
Cream the butter and vanilla just until soft. Sift together the Flour, Sugar, Salt. Add the flour mixture to the butter just until well combined. It will be crumbly. Pat into a 9x9 pan and press down. Pierce with a fork through the dough in several places. Sprinkle with crumb topping (use as little or as much topping as you'd like). Bake 25-30 minutes. Cut into squares while warm.
Tuesday, April 5, 2011
Seven-Minute Icing

Seven-Minute Icing, a.k.a "Boiled Icing" is simple to make and tastes fantastic. It used to be one of the most common cake frostings, so why did it fall off the radar? If you have never tasted it, I can only describe it as having a taste and consistency like whipped marshmallows. The light, billowy texture is an instant hit with cake lovers. The one drawback is that it is best eaten the same day it is made, because it will stiffen slightly after the first day. But seven-minute icing is a great alternative to rich buttercreams, and it goes particularly well with chocolate, spice or carrot cakes.

Seven-Minute Icing
There are so many recipes for this, but here is one I like:
2/3 Cups Sugar
1/4 teaspoon cream of tartar
pinch of salt
1/4 Cup water
1 1/2 teaspoons light corn syrup
1 Egg white
1/2 teaspoon vanilla
Put sugar, cream of tartar, salt, water, and corn syrup in a saucepan. Cook, while stirring, over medium heat until sugar is dissolved.
Put egg whites in a mixing bowl. Whip on high speed about 45 seconds, or until egg whites begin to hold their shape. With the mixer on high, slowly pour the hot sugar syrup in a stream into the egg whites and continue to whip for another minute to a minute and a half. Add vanilla and whip about five more minutes, until the frosting can stand in stiff peaks. Frost cake right away.


Saturday, April 2, 2011
Welcome!
These days, everything you could want to bake comes in a box, can, or refrigerated tube. Cakes, muffins, breads, cinnamon rolls, you name it. The "semi-homemade" trend is big because people want to make something, but don't have a lot of time or they are intimidated by baking from scratch. But for me, baking is like therapy. I love to try out new recipes and tweak them until I get something wonderful.
When I first put away the mixes and started doing everything from scratch, I was surprised to learn that it isn't really that intimidating at all. And there are many recipes out there that don't take much longer (but taste much better) than using a mix. I often try out some recipe or technique that intimidates me, only to learn that it is actually pretty simple.
I would love to have other bakers share their comments, tips and recipes too. If you have a great recipe or a fantastic tip that I could try out and post here, let me know!
Subscribe to:
Posts (Atom)