Tuesday, May 7, 2013

Pink Lemonade Cupcakes


Kids will go crazy over these Pink Lemonade Cupcakes (and adults will too!) They really remind you of Summertime. This is my regular Lemon Cake with a touch of pink coloring added, and topped with a lemon-flavored buttercream.
 
Cake:
3 cups Cake Flour
2 1/2 teaspoons Baking Powder
1 teaspoon salt
2/3 Cup unsalted butter, softened
1 3/4 Cups Sugar
2 whole Eggs + 1 yolk
1 1/2 teaspoons Pure Lemon Extract
1 Tablespoon Lemon zest
1 1/4 Cups Milk
1 drop professional soft pink coloring (I use Americolor brand)


Preheat oven to 350 degrees.
 
Place cupcake papers into the cupcake pan - you should get about 30 cupcakes from this recipe.
 
In a large bowl mix together the flour, baking powder, and salt until thoroughly blended. Set aside.

In an electric mixer bowl, combine the butter and sugar. Beat on medium speed until light and fluffy, about three minutes. Add eggs and yolk one at a time, beating for a few seconds after each addition. Add the extract and zest. Now add the flour and milk in alternating batches, starting and ending with the flour. Mix well after each addition. Scrape the bowl down and then beat on med-low for about one minute until fluffy (Do not overbeat).

Bake for 18-22 minutes, until a toothpick inserted in the center comes out clean. Cool before frosting.
 
Lemony Buttercream:
1 stick butter, softened
3 Cups Confectioner's Sugar
1 Tablespoon Milk
1 teaspoon Lemon Extract
1 teaspoon lemon zest
drop of pink coloring
 
Mix all ingredients in an electric mixer on low until combined, then turn up to medium-high and beat for two minutes. If not frosting right away, place plastic wrap on top of the frosting until you use it.
 
Optional garnish: Thinly sliced lemon triangles and pink sanding sugar

Monday, May 6, 2013

Re-purposing Cupcakes

When I made a batch of cupcakes recently, the batter bubbled over the tops, making an unattractive mess. I couldn't serve these cupcakes at the event they were planned for, but other than the tops, they were fine. I couldn't imagine just throwing them all away. Or maybe you have a batch that came out just a little overdone. If they are totally burnt, you've got to throw them out. But what can you do with a bunch of cupcakes that are fine except that you have to cut off the tops (or bottoms)? I decided to try a few things out and blog about it. Here is what I came up with:


Dolly's Birthday Cake:
Cut the top off the cupcake and cut it in half horizontally 
Spread jam or Nutella between the layers and on top
 Add sprinkles on top


 Fruit-and-Cake Parfait:
Cut the cupcakes into cubes (think crouton-sized)
Get a pretty glass to show the layers
Layer the Cake cubes with Fruit and Yogurt or whipped cream


Individual Strawberry Shortcakes:
Cut the tops off the cupcakes (you will use 2-3 Cupcakes for this). Cut up some fresh strawberries, place them in a bowl with a little sugar. Let this mixture sit for 20+ minutes, stirring and lightly "mashing" them occasionally. This will make a syrup. Make some fresh whipped cream (if making with kids, feel free to use the fun canned kind). Place one cupcake on a plate, top with strawberries and syrup, add some whipped cream, then repeat this process for 2-3 layers as desired. Serve immediately.


Sunday, April 28, 2013

Lavender Almond Tea Cookies


We all know that Lavender is an herb used in soaps and fragrances, but did you know that Lavender can be used in cooking and baking too? When I first saw a recipe that used lavender, I was intrigued. But I could not find food-grade lavender to buy anywhere locally (Lavender sold at garden stores may be sprayed with chemicals, so don't cook with it). I started growing my own, but you can easily order it online if you can't find it. The thing to remember with Lavender is that a little goes a long way. I happen to love the flavor and aroma, so I don't mind a strong lavender flavor. But many people find it overwhelming, so use it sparingly. This recipe calls for 1 1/2 to 2 teaspoons.

These Lavender Almond Tea cookies are light and crispy, with a buttery flavor.

12 Tablespoons (1 1/2 sticks) Butter, softened
1/2 Cup Sugar
1/2 teaspoon Almond extract
1 1/4 Cups All-purpose Flour
1/4 Cup Cornstarch
1 1/2 to 2 teaspoons dried Lavender Flowers
Pinch salt

Using an electric mixer, cream the butter, sugar and almond extract until light and fluffy.
In a separate bowl, combine the flour, cornstarch and salt. Stir well. Add the dry ingredients into the butter mixture and beat on low until blended. Add the lavender last, beating on low just until it is mixed in. Scrape the bowl down and gather up the dough, placing it on a sheet of plastic wrap. Pat the dough to flatten it a bit, and wrap it up in the plastic wrap. Chill 30-60 minutes.

Preheat oven to 325 degrees.

On a lightly floured board, roll out the dough to about 1/4 inch thick. Cut with cookie cutters or cut into squares/diamonds with a knife. Optional: Brush with a small amount of water and then sprinkle with sanding sugar if desired. Place on a cookie sheet lined with parchment paper. Bake until very lightly browned at the edges, about 15 minutes.


Thursday, April 25, 2013

It's SPRING!

Living in New England, I really get tired of Winter after a while. So when Spring finally comes, it is time to celebrate! Here are some great recipes to get you in the mood for Springtime baking:


Thursday, April 11, 2013

Grandma B's Butterscotch Pie

 
This pie has got to be one of my all-time favorites (I think I say that about all pies, but I really mean it this time!) Butterscotch Pie is so different from other pies that it really surprises people. A layer of thick butterscotch cream filling, a slightly salty cracker crumb crust, and a light and airy meringue topping make this pie dangerously good. While the meringue looks impressive, you could top this pie with fresh whipped cream instead if you prefer. If I am making this pie ahead of time and I know the meringue cannot be fresh, I will choose whipped cream and turn it into a "Butterscotch Cream Pie." Just make sure you cut the slices small, it is very sweet and rich!
 
 
Preheat oven to 350 degrees.

Crust:
1 1/3 Cups Cracker Crumbs (you can use graham crackers, but I prefer Ritz crackers for this - I like a slightly salty crust to offset the very sweet filling)
3 Tablespoons confectioner's sugar
6 Tablespoons Melted Butter

Mix together ingredients and press firmly into a pie pan. Bake at 350 for 8-10 minutes until just turning golden brown at the edges (it's a little harder to tell with graham crackers, but it should look dry and set). Set aside while you make the filling. Turn oven down to 325.

*NOTE* If you are making the cream pie version (and will not be baking the pie in the oven) you do not have to bake the crust, just chill it in the fridge until set, about 1 hour.

Filling:
1 cup Brown sugar
1/2 cup all-purpose flour
1/2 tsp salt
1 2/3 Cups milk
3 egg yolks
2 Tablespoons Butter
1 teaspoon vanilla extract

In the top of a double boiler combine the sugar, flour, salt, and milk. Stir the mixture in the bowl while the water boils beneath it, cooking for about 10-12 minutes until the mixture thickens (stir it frequently). Thickening time depends on how cold your milk is to start with. It can take anywhere from 9-14 minutes to get it nice and thick like a pudding. In the first five minutes or so, it doesn't really thicken at all. Once it starts, the thickening goes fast, so watch it carefully and stir constantly once it starts. Once it has thickened, remove it from the heat.

In a separate bowl, beat the egg yolks. Take a small amount of the hot milk/flour mixture (about a tablespoon) and stir it into the eggs. Add another spoonful and stir it in (you are "tempering" the eggs so they don't cook and curdle). Now pour the egg mixture into the rest of the hot milk mix. Return it to the double boiler and cook until thickened some more (about 3-5 minutes) stirring constantly. Take it off the heat. Add in the butter and vanilla extract. Now place a layer of Saran wrap directly on top of the filling (to avoid getting a thickened skin on top). Set aside for about 10 minutes and then pour into the crust.

*NOTE* If making the cream pie version, cool the filling completely in the fridge before filling the pie crust.

Meringue:
4 Egg Whites
4 Tablespoons Sugar
1/2 teaspoon cream of tarter
1/2 teaspoon vanilla

Beat the egg whites and the cream of tarter with a wire whisk until soft peaks form. Add 2 Tablespoons sugar, beat lightly for about 20 seconds. Add the other 2 Tablespoons and the vanilla. Beat until peaks are very stiff but still glossy. Spread over filling immediately and bake at 325 for approximately 15 minutes, until meringue is set and turning golden brown on top.

Allow to cool to room temp before slicing. Use a knife dipped in hot water to make clean cuts.

Enjoy!


Fresh Whipped Cream (for Cream Pie version)
1 pint heavy cream
1/4 - 1/2 cup confectioner's sugar

Make sure the cream is well-chilled, (I even chill the mixing bowl and beaters when I make whipped cream). Beat cream on high speed (or vigorously by hand with a wire whisk) until the cream is thickened. Add sugar and continue beating until it can form stiff peaks. Spread it over the chilled pie and then put the pie back in the fridge until serving.


Sunday, April 7, 2013

Sourdough Pancakes


This is a great recipe for breadmakers who are looking for ways to use up some of that sourdough starter. Sourdough Pancakes are denser than regular pancakes, with a slight tang. You can top them with carmelized bananas (recipe below) or just serve them with real maple syrup or fresh fruit.

Sourdough Pancakes (makes about 20 pancakes depending on size)

1 1/2 Cups all-purpose flour
1 Tablespoon Sugar
1 teaspoon baking soda
1 teaspoon baking powder
3/4 teaspoon salt
1 1/2 Cups sourdough starter
2 Eggs
1/2 Cup milk
1/2 Cup melted butter

Start heating your griddle, especially if it is cast iron, before you mix the recipe. Heating the griddle "low and slow" is best for evenly browned pancakes - If using cast iron, heat it for a good 15 minutes on low or medium low heat.

Mix dry ingredients together in a mixing bowl, stirring well to make sure everything is blended.

In a separate bowl, stir together the sourdough starter, eggs, and milk. Add these into the dry ingredients and give it a good stir. Add the melted butter last, stirring just until incorporated.

When the griddle is preheated, pour the batter on by the 1/4 cup full (adjust to your own personal size preference). Watch the pancakes to see when they start to bubble. BUT WAIT! Don't just flip them when they begin to bubble - look closely at the edges of the pancakes, and when the edges are starting to dry, then flip them. Give them 30-60 seconds on the second side and then remove.

Serve warm. If you are cooking for a crowd, you can keep them warm on a cookie sheet in a warm oven (200 degrees) while you do more batches.


Carmelized Bananas: Put 1 Tablespoon Brown sugar and 1 Tablespoon Butter in a saute pan. Heat until it begins to bubble. Let it bubble for 30 seconds to make a syrup. Add 2 Bananas that have been sliced into "coins" about 1/4 inch thick. Heat for 30-60 seconds, just until the banana slices have browned a little. (These are not truly "carmelized" per se, because they are not browned until they make their own syrup. But bananas will mush up to nothing if you cook them too long.)


Thursday, April 4, 2013

Glorious Ganache!

Did you know that Chocolate Ganache is one of the easiest and most versatile Frosting/Filling options for desserts? It is so rich and decadent that most people assume it must be difficult to make. (Also, the word "ganache" sounds awfully fancy, doesn't it? Most people assume French = fussy) 
But with only two ingredients, ganache is actually really simple to make, and it tastes so sophisticated. Check out what you can do with a basic ganache:


 Chocolate Ganache Truffles

Chocolate Ganache as a frosting or filling for cakes
 

Poured Ganache (which is simply ganache that has not chilled
to the point of being firm yet) gives you a beautifully glossy glaze on cakes.
 
 
Basic Chocolate Ganache recipe:
 
12 oz. Bittersweet Chocolate (use good quality chocolate)
1 2/3 Cups Heavy Cream (use 1/3 Cup less for truffles)
 
Chop chocolate into small pieces.
 
In a saucepan, heat the cream until it starts to boil. Turn off the heat and add in the chocolate pieces. With a heatproof spatula, stir the mixture until the chocolate is melted.
 
Pour this mixture into a bowl and cover it with plastic wrap. Refrigerate as directed below:
 
For Truffles: Refrigerate several hours until VERY firm. Scoop out small spoonfuls of the ganache and roll into balls, then roll the balls in chopped nuts, cocoa powder, cake crumbs, whatever topping you wish.
 
For thick rich frosting: Refrigerate several hours until firm but not totally hard (4 hours worked for me) check it every hour or so to see if it is the right consistency. If it gets too hard, you can always leave it at room temp or even microwave it very briefly to get it back to frosting consistency. Frost cake. Store the cake at room temp or refrigerated, not it a very warm place.
 
Poured Ganache: You don't want to chill this very long, basically you just want to get it down to where it is not HOT anymore. If you use it while it is very hot, it will thin out a lot. So what I do is refrigerate for ten minutes at a time. Every ten minutes I check it and stir it, and take it out when it is thick but still pourable. To top a cake with poured ganache, start by pouring it in the center of the cake and spreading outward toward the edges of the cake. I like to let it droop over the sides a bit.


Tuesday, April 2, 2013

Coconut Layer Cake


If you love coconut like I do, you will love this cake! This is exactly the same recipe as my Toasted Coconut Cupcakes, and there are no adjustments necessary whether you want to make a cake or cupcakes with this recipe. You can fill this cake with a lemon filling (I used a jar of good-quality lemon curd that I bought in the specialty aisle of my local market) or you can use the coconut frosting in between layers for some serious coconut flavor! You can choose to leave the coconut untoasted, but I love the slightly nutty crunch on top of the sweet frosting, so I toasted mine just a little for this cake.

Note: Coconut Milk is usually found canned in the imported food aisle of your grocery store, often with the Asian foods. Do not use Coconut water (which is a beverage) or Cream of Coconut (a sweetened coconut paste used to make tropical drinks).

For the Cake:
3 cups sifted cake flour
1 1/2 Cups sugar
4 teaspoons baking powder
1 teaspoon salt (if using salted butter, omit salt)
3/4 Cup (1 1/2 sticks) unsalted butter, softened to room temperature
4 large egg whites
1 cup Coconut Milk (save what is left over for the frosting)
1 teaspoon Coconut extract

Preheat oven to 350 degrees.  Grease (or line with parchment paper) two 9" or three 6" round cake pans.

In the large bowl of an electric mixer, sift together the flour, sugar, baking powder and salt. Add in the butter and about 1/4 cup of the coconut milk. Turn the mixer on low and beat just until moistened. Then turn the mixer up to medium and beat for one minute to aerate the batter. Scrape down the sides of the bowl.

In a small bowl, combine the egg whites, the rest of the coconut milk and the coconut extract. Mix with a fork until well-blended.

Add the egg mixture into the batter in three batches, mixing for just 15-20 seconds each time until incorporated. Give the bowl a final scrape down by hand, just to make sure any remaining clumps of flour get mixed in.

Pour batter in pans, smoothing the top with a spatula to level the batter.

Bake about 25-35 minutes, or until a toothpick inserted in the center comes out clean.
Cool before frosting.

For the Frosting:
3 Cups Confectioner's Sugar
1/2 Cup (1 stick) softened butter
2-3 Tablespoons Coconut Milk (you should have some left over in the can)
1 teaspoon coconut extract

Place all ingredients into the bowl of an electric mixer. Using the whisk attachment, beat all of the ingredients together on low until everything is moistened. Then turn the mixer up to med-high and beat for about 5 minutes until nice and fluffy. The amount of coconut milk you use depends on how soft or stiff you like your frosting.

Place one cup of flaked coconut on a cookie sheet and put it in the oven at 350 for about 6 minutes, stirring it halfway through. Watch very carefully the last two minutes so it doesn't get overly browned - coconut can burn very quickly. Cool.

Frost the cake, then sprinkle the toasted coconut on top, pressing it into the sides.

Enjoy!

Saturday, March 30, 2013

Super-Easy Birthday Cake Ideas

You don't have to be a cake decorator to put together a cute theme cake or cupcake display! Go to party stores and look for non-edible party items that could be fun cake toppers. Look for creative ways to use crackers, cookies and candies from the grocery store. Here are some easy ideas that anyone can do:

These Minnie Mouse Cupcakes are so simple - use miniature oreos for the ears and cut bits of pink fondant for the bows.

 
Printable paper toppers are available online for any theme. Tape them to lollipop sticks and stick in the cupcakes or cake. You can buy plastic molds for these seashells (or just about any theme) at craft stores or online. Melt white chocolate (or meltable candy pieces) and pour into the molds. They set up quickly in the fridge. Garnish the plate with something that fits the theme (in this case cracker crumb sand).
 

 Cut a sheet cake into the shape of an ice-cream cone and frost it like this


 Look for toys in the theme you want (in this case a little monkey) and make simple edible accents to go with it. These palm trees are pretzel rods with Royal Icing leaves. Just make some royal icing, pipe in a rough leaf shape and let dry. Attach to the top of the pretzel rods with more royal icing and let dry (you will need to put the pretzel rods in a glass or something to hold them upright). Stick them in the cake and add some brown M&Ms as coconuts.


 These CandyLand cupcakes were topped with lollipops, candy canes, and giant gumdrops. Using brightly-colored cupcake wrappers and display plates helps make them even more colorful.


 These dinosaur cupcakes are another example of using molds and meltable candy chips 
to create a simple edible toppers.


For a more adult cake, cover the cake in rich chocolate frosting, chocolate covered strawberries, and shaved chocolate. For the strawberries: chop some good quality chocolate into pieces, melt it in a double boiler, dip in the strawberries and dry on waxed paper. Shaved Chocolate: Use a vegetable peeler to shave pieces from a bar of chocolate (use a good quality chocolate for this).
 
 
These lovely cameos are actually very simple to make. You can buy a cameo mold at cake supply stores or online. Use melted white chocolate in the mold and then dust with lustre dust to highlight it. The pearls are edible candies (also from the cake supply store) and a pretty satin ribbon is an easy way to make a cake have a finished, tailored look.
 

Thursday, March 28, 2013

Toasted Coconut Cupcakes


If you love coconut like I do, this will be one of your favorite cakes. You could also use this recipe to make a coconut layer cake. If you prefer, you can leave the coconut untoasted, but I love the slightly nutty crunch on top of the sweet frosting.

Coconut Milk is usually found canned in the imported food aisle of your grocery store, often with the Asian foods. Do not use Coconut water (which is a beverage) or Cream of Coconut (a sweetened coconut paste used to make tropical drinks).

For the Cake:
3 cups sifted cake flour
1 1/2 Cups sugar
4 teaspoons baking powder
1 teaspoon salt (if using salted butter, omit salt)
3/4 Cup (1 1/2 sticks) unsalted butter, softened to room temperature
4 large egg whites
1 cup Coconut Milk (save what is left over for the frosting)
1 teaspoon Coconut extract

Preheat oven to 350 degrees. Line muffin cups with paper liners. (This recipe should make 24+ cupcakes, depending on how much you fill each muffin cup.)

In the large bowl of an electric mixer, sift together the flour, sugar, baking powder and salt. Add in the butter and about 1/4 cup of the coconut milk. Turn the mixer on low and beat just until moistened. Then turn the mixer up to medium and beat for one minute to aerate the batter. Scrape down the sides of the bowl.

In a small bowl, combine the egg whites, the rest of the coconut milk and the coconut extract. Mix with a fork until well-blended.

Add the egg mixture into the batter in three batches, mixing for just 15-20 seconds each time until incorporated. Give the bowl a final scrape down by hand, just to make sure any remaining clumps of flour get mixed in.

Fill muffin cups no more than half full. I like to use a standard ice cream scooper levelled off to measure and dispense the batter.

Bake about 20 minutes until the tops spring back when you gently press on them with a finger.

Cool before frosting.

For the Frosting:
3 Cups Confectioner's Sugar
1/2 Cup (1 stick) softened butter
2-3 Tablespoons Coconut Milk (you should have some left over in the can)
1 teaspoon coconut extract

Place all ingredients into the bowl of an electric mixer. Using the whisk attachment, beat all of the ingredients together on low until everything is moistened. Then turn the mixer up to med-high and beat for about 5 minutes until nice and fluffy. The amount of coconut milk you use depends on how soft or stiff you like your frosting.

Place one cup of flaked coconut on a cookie sheet and put it in the oven at 350 for about 6 minutes, stirring it halfway through. Watch very carefully the last two minutes so it doesn't get overly browned. Coconut can burn quickly. Cool.

Frost the cupcakes, then sprinkle the toasted coconut on top.

Enjoy!


Tuesday, March 26, 2013

Why I can't seem to bake "healthy"

I've been trying to bake healthier lately. I could say it's because of the growing awareness about rising obesity rates, but mostly it's about me. I'm in my late thirties with two kids, and let's face it: my metabolism just isn't what it used to be. The problem is that I LOVE to bake. I mean, I REALLY love baking, almost to the point of obsession. The whole reason I started this blog was just so I could ramble on about baking techniques and recipes, topics my husband finds rather boring.

Since I bake more often than my waistline can handle, I give away a lot of goodies. I figure my family doesn't need a whole cake, a dozen cupcakes, or an entire pie every other day. But my friends and neighbors are surely getting tired of being my tasters all the time. They joke that I am trying to make them fat.

So lately I've been trying to expand my recipes to include healthier fare. I'm generally pretty health-conscious in my cooking, so I figured it couldn't be that hard to make my desserts healthier too. Some things I tried were: Cutting white flour with wheat or other flours, incorporating oats into recipes, cutting down on the refined sugar or using alternative sweeteners like honey. Substituting applesauce for oil, and mashed bananas for eggs are also ideas that I have tried with some success in the past. 

Some of these things worked fine, but others not so much. For example, I like wheat bread (especially homemade wheat bread) but I hate whole wheat pie crusts, and cookies. I can cut down on the sugar, but cut it too much and it just isn't a dessert anymore. And any time you substitute something else for eggs, the texture changes. Not that that is a bad thing, necessarily, but it just won't be the same.

I started getting frustrated in my experiment with healthier baking. I had some pretty major failures. And then I realized that an old bit of wisdom about life applies to food writing too: Stick to what you know and don't try to be something else. I had a "duh"moment when it occurred to me that there are a lot of fantastic healthy eating blogs out there, so why should I try to be like them? I am all about old-fashioned, homey, all-American desserts made from scratch with quality ingredients. I am not fancy French pastries, I am not mind-blowing cake decoration, and I am not "ten different ways to use quinoa."   

So I won't be trying to corner the market on desserts that "taste good AND are good for you!" But you know what? I do believe that baking from scratch is automatically healthier than store-bought goodies. Baking from scratch means that YOU control the ingredients, without the preservatives and chemicals found in most commercially-processed baked goods. YOU control whether or not you use artificial colors and flavors. YOU control the quality of the ingredients you use. I am proud to say that I use top-quality local butter, and I get my milk and eggs from a local farm.

And lastly, even though I bake all the time, I realize that people who are reading my blog do not. They are probably looking for a great cake recipe once in a while, or filing away an idea for a homemade pie they might make next Fourth-of-July. The point is, they aren't eating this stuff all the time, and it wasn't meant to be eaten all the time. You know what they say, "Everything in moderation."

Wednesday, March 20, 2013

Carrot Cake Cupcakes with Maple Icing


I made these cupcakes using my Grandmother's Carrot Cake recipe. I like a maple icing with carrot cake, but you can substitute a standard cream cheese frosting if you prefer that instead. This fluffy maple icing is a variation on Seven Minute Icing, in this case using real maple syrup instead of making a syrup from sugar and water. I give you two icing options here, the fluffy maple icing and a maple buttercream.

For the Cake, use this recipe: Grandma Minnie's Carrot Cake
(I halved the recipe to make one dozen cupcakes)

For Maple Frostings, you can choose Fluffy Maple Icing or one of these Maple Buttercreams.


Fluffy Maple Icing


This Fluffy Maple Icing is a variation on Seven-Minute Icing, which is light and billowy and tastes a bit like whipped marshmallows. The one caveat with any Seven-minute icing (and especially this maple variation) is that you must make it fresh. I recommend making the icing right before you frost your cake/cupcakes, and serving the cake immediately or not more than an hour later. After that, the icing deflates a bit and becomes a little chewy. If you want a maple frosting that does not need to be made right before serving, I would recommend my Maple Buttercream instead.

Fluffy Maple Icing:
3/4 Cup Real Maple Syrup
1 teaspoon cream of tartar
2 Egg Whites

Put the maple syrup and the cream of tartar in a small saucepan and, over low heat, simmer gently for one minute, stirring often. Take off heat.

In the bowl of an electric mixer, beat the egg whites on medium until the mixture can form soft peaks.

Keeping the mixer on medium high speed, very slowly pour the hot maple syrup into the egg whites in a thin stream (this adds the hot syrup gradually so as not to cook the eggs). You want to pour the syrup down the side of the bowl so it goes into the egg whites, not directly onto the beaters.

When the mixture is blended, turn the mixer up to high and beat for five minutes. The icing will be very fluffy, stiffer and look a little less glossy.

Frost and serve as soon as possible.

Maple Buttercreams


Here are two recipes for Maple Buttercream. The first one is the Maple Frosting I use for my Maple Spice cake (pictured). It is super-easy to make, based on old-fashioned butter frosting (a.k.a. American Buttercream). The second is a Maple Swiss Meringue Buttercream.

Christa's Maple Buttercream:
1/2 cup (1 Stick) Unsalted Butter, softened
2 Cups Confectioner's Sugar
2-3 Tablespoons Real Maple Syrup, Grade B if possible
(you can use 1/2 tsp maple extract to get a stronger flavor, but I prefer just the syrup)

Put all ingredients in the bowl of an electric mixer. Beat on medium speed for about five minutes, until soft and fluffy.


Another great maple frosting is a Maple Swiss Meringue Buttercream. If you aren't familiar with Swiss Meringue Buttercream, it is a frosting that tastes rich and buttery and less heavy than other frostings. Being less sweet than American-style buttercream, it doesn't appeal to everyone (namely my kids). Swiss Meringue Buttercream is somewhat tempermental to make, so if you need a step-by-step guide, here is a fantastic tutorial:Swiss Meringue Buttercream tutorial from Beyond Buttercream

Maple Swiss Meringue Buttercream
(Adapted from Beyond Buttercream)

6.25 oz egg whites (about 5 large Egg whites, but weigh if you can because it is more accurate)
1 Cup Sugar
pinch of Salt
1 pound butter, cut into pieces and warmed to room temp (ideally 72 degrees or warmer)
1/2 to 1 teaspoon Maple extract (depending on your taste)

Combine egg whites, sugar and salt in the top of a double boiler. Whisking constantly, heat mixture until the sugar has dissolved COMPLETELY. If you have a candy thermometer, you can test the temp. It is ready at 160 degrees.

Transfer the egg mixture into the bowl of an electric mixer, using the whisk attachment. Start at low speed and gradually increase to medium high, beating until stiff peaks form and the mixture is cool, about 10 minutes. If you are using a stand mixer such as a KitchenAid, you can set the timer and go do something else.

When the mixture has cooled and the egg whites are at stiff peak stage, turn the mixer off. Switch to the paddle attachment, and add the butter a few chunks at a time on the lowest speed. Then add maple extract and keep mixing on low. After a few minutes, the mixture will look soupy, then curdled, but don't give up! It can take as much as 15 minutes on low to come together, but don't rush it. If you crank up the mixer, it may still turn out, but you will get less volume and it may not be as silky smooth. Be Patient!

Thursday, March 14, 2013

Irish Soda Breads


Irish Soda breads are delicious and a great thing to make when you need a bread that is quick and easy. Soda bread gets its name from Baking Soda, which provides the leavener, making them much quicker than yeast breads.

From FoodTimeline.org: "Irish soda bread, as we know it today, surfaces in the mid-19th century, when bicarbonate of soda was first used as a leavening agent. Prior to this time, similar breads and raised cakes were made with sourdough and barm brack, yeast created by fermenting ale."

Irish Soda Bread comes in three varieties: White, Brown, and with raisins or currants. Originally, soda bread was just a simple mix of flour (probably wheat flour originally) baking soda, a touch of salt, and Buttermilk. Because most Irish were poor at that time, this bread originally did not contain "luxury" ingredients like sugar and raisins. Those were added later.

There are many different recipes for Irish Soda Bread, and depending on which part of Ireland your family hails from, ingredients will vary. My family's recipe for Irish Bread (which is now lost to the ages) did not contain carraway seeds, but my husband's old family recipe does. Whether you add sugar or raisins, at its core soda bread is still four basic ingredients: Flour, Baking Soda, Salt and Buttermilk.

Brown Soda Bread (Americans often call it "Irish Brown Bread") is not sweet and is made with wheat flour (usually a mix of white and wheat flours). It is a delicious hearty bread to eat with soup, or just serve it warm with butter. One great easy recipe comes from Darina Allen and can be found on the KerryGold website: Darina Allen's Brown Soda Bread (Special thanks to my Irish friend Claire for passing that along!)


Raisin Soda Bread, or what my family just calls "Irish Bread" is slightly sweet, moist and dense, with a smattering of dark and golden raisins. My in-laws make this for every holiday dinner, and learning how to make it is a rite of passage in his family. Our recipe has a small amount of carraway seeds, but you can omit them if you'd like. Granny Mahoneys Irish Bread

Monday, March 11, 2013

St. Patrick's Day


This weekend is St. Patrick's Day, and in the Boston area you can bet it is a party! My area is more than 30% Irish, but the Irish-Americans celebrate even more than the real Irish do. Everybody whips out their favorite Shepherd's Pie recipes and compares the virtues of the different types of corned beef (Corned beef and cabbage, aka "New England Boiled Dinner" is another Irish American thing apparently. My Irish friends tell me that they have Irish Bacon instead of Corned Beef.)

Anyway, this blog is supposed to be about Baking, so I shouldn't go off on too much of a tangent here. I have two great baked items for St. Patrick's Day, one is a real old-time Irish recipe and the other is an American homage to Guinness, that deliciously dark brew. So here are the links if you want to get your Irish on:

Guinness Cake

Granny Mahoney's Irish Bread

Thursday, March 7, 2013

Maple Bread Pudding


I created this recipe for my husband, who loves bread pudding. I had never really cared for it myself, not really liking any of the various "soggy bread" type desserts. But I decided that if I used a good crusty bread to minimize the sog factor and added real maple syrup, I might just like it. Sure enough, I really enjoyed this bread pudding. My caution is that if you like a very "wet" bread pudding, this one may not be the one for you. Use a good hearty bread like Sourdough or crusty white bread. Wimpy sandwich bread just won't cut it for this recipe.

2 Cups Milk
1/3 Cup Real Maple Syrup
1 Tablespoon Sugar
1/2 teaspoon salt
1 teaspoon Vanilla
7 Eggs
3 Cups cubed bread (Use good hearty bread that is a little stale, no wimpy Wonder bread for this!)
dash of Nutmeg

Preheat oven to 350 degrees. Grease an 8x8 casserole dish. You will also need a larger (9x13) pan for this recipe (to do a water bath).

In a small saucepan, heat the milk to the point where it is just beginning to simmer. Remove from heat. Stir in the syrup, sugar, salt, stirring until the sugar is dissolved. In a separate bowl, beat the eggs lightly. Gradually add the milk mixture to the eggs, adding just a little liquid at a time while continuously stirring it into the eggs (this tempers the eggs so the hot liquid does not cook them).
Add vanilla, and give the egg/milk mixture one last good beating to mix.

Pour the egg/milk mixture over the cubed bread and stir well. Let the mixture sit for five minutes before pouring it into a greased 8x8 casserole dish. Dust the top with nutmeg. Place the dish in a larger pan and add 1-2 inches of water into the larger pan (pouring carefully so you don't get water into the bread pudding.) Bake 40-45 minutes, or until it no longer jiggles in the middle when you give it a shake. Cool a bit before cutting (I like to serve it warm, but not hot). This makes 9 regular squares or 12 little squares. Drizzle real maple syrup over the top of each piece when serving. This bread pudding is not overly sweet, so don't skip the extra maple syrup on top - it really makes it just right!

Wednesday, March 6, 2013

Easy Scratch Cakes

What holds most people back from making a cake from scratch is the time and the extra steps required in many cake recipes. I'll admit that I have several cakes on this blog which are "high maintenance" recipes - Cakes that require special ingredients, or ask you to take extra steps like beating egg whites until stiff then gently folding them into the batter. But have no fear! There are cakes out there (and on this blog) which are TRULY EASY to make! No special ingredients, no extra steps, you don't even have to use an electric mixer if you don't have one. So there is really no reason to use a box mix when you can make a homemade cake quickly and easily. See the links below:


(Substitute Coffee or Water for the Guinness if you want to)


And some Others:


Tuesday, March 5, 2013

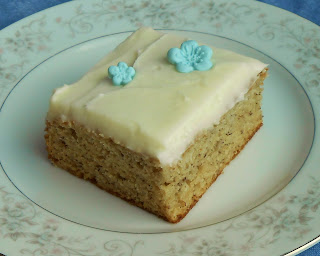
Banana Cake with Sour Cream Frosting

 
What could be better than the flavor of Banana Bread with the lighter texture of a cake? Sour Cream frosting provides a slightly tangy flavor, which makes a nice contrast to the sweetness of the banana cake. The cake is adapted from a recipe I found on Epicurious a few years ago. The sour cream frosting is something I created to replace the cream cheese frosting the original recipe called for (I am not a big fan of cream cheese frosting).
 
I recommend making this as a sheet cake in a 9x13 pan. I have tried it as a layer cake, but it is dense and sweet, and just seems too heavy with two layers.
 
 
For the Cake:
1 1/3 Cups Sugar
1 Cup Mashed Ripe Bananas (about 3 small bananas)
1/2 Cup Vegetable or Canola oil
2 large eggs
1/4 Cup Buttermilk
1 teaspoon Vanilla extract
2 Cups All-purpose Flour
1 teaspoon Baking Soda
1/2 teaspoon Salt
 
Preheat oven to 350 degrees. Grease and dust with flour a 9x13 pan (or line with parchment paper).
 
In a bowl, combine the sugar, mashed banana, oil, eggs, buttermilk and vanilla. Beat by hand (or with an electric mixer on low) until mixture is well-blended.
 
In a seperate bowl, combine the flour, baking soda and salt. Add these dry ingredients into the banana mixture, again beating by hand (or on low) just until well-blended.
 
Bake at 350 for 22-25 minutes, or until a cake tester inserted in the center comes out clean. Allow to cool to room temperature before frosting.
 
For the Frosting:
1/4 Cup Butter, softened
3 Tablespoons Sour Cream
2 Cups Confectioner's Sugar

Beat the butter, sour cream and confectioner's sugar together with an electric mixer on medium for 2-3 minutes. If you want a softer consistency, add another tablespoon of Sour Cream.


Friday, February 22, 2013

Winter Baking with Canned and Frozen Fruit

These days, we can generally get a variety of fruits and vegetables year-round due to long distance shipping and air freight. But buying produce out of season never quite tastes as good, and there is growing environmental concern over the energy used to get that food to us in the dead of winter. For all of these reasons, I try to use fruits and vegetables IN SEASON. Canned and frozen fruits can be a good substitute, especially since they are often picked at peak season before they go into a can or a freezer.

Which fruits are good canned or frozen, and which ones should we just wait to have them fresh? Are there special steps to take before baking with frozen or canned fruits that is different from using fresh? Here is a guide to baking with canned or frozen fruits:

Blueberries - Blueberries are available frozen all year round. They are also available canned, but often the canned ones come in a sweetened syrup. For pies, muffins, breads, and pancakes, I recommend using frozen berries. Spread them out on a paper towel and let them thaw, then use in the recipe as if they were fresh. If popping them into breads and muffins, you often don't even have to thaw them - follow your particular recipe. Canned blueberries (if you can find them in just water) should be rinsed and spread on paper towels to dry before using. I do not like how mushy the canned ones are, so I would only recommend them for items where the filling is all going to mush together like a jam anyway (blueberry bars, etc.) I do not use canned berries for any baked item where I want to see the individual berries (i.e. muffins).

Strawberries - Strawberries are available frozen. They get mushy after they've been frozen, so use them in things where they can be made into a syrup or a jam-like layer in bars and coffee cakes. The other great use for strawberries is to cut or mash them, macerate them in sugar, then puree them. Use this puree in strawberry cakes, cupcakes or buttercreams: Strawberry Butter Cake

Raspberries - Raspberries are widely available frozen. Since they tend to be mushy after freezing, you won't be able to use them as a lovely garnish on cakes, but you can still make them into a filling for bars, cakes, pastries, or to be mixed into frostings. For frosting and cake filling, I actually prefer to use a jar of good-quality seedless raspberry JAM instead. Make sure to get SEEDLESS.

Cherries - Sour cherries (the ones that give cherry pie its signature tartness) are rarely available in my area, even during their brief season. And since I have not found sour cherries frozen in my area, I am always forced to use canned. OreGon brand water-packed tart cherries make a good pie, just drain them and then make the filling according to your recipe. Dark Sweet cherries are widely available frozen, and these are great for baking as well. They are sweet, not tart like sour cherries. You don't always have to thaw them before using, but follow the specific instructions according to the recipe. (For example, if you are making a pie, they will thaw during the macerating phase, so you don't need to pre-thaw them.)

Squash/Pumpkin - You can cook your own and freeze it for later use, but to be honest, I love using canned pumpkin and canned squash. (NOT pumpkin pie filling in a can, but just plain cooked pumpkin or squash). Although it is not difficult to cook them yourself (and it does add a layer of flavor, especially if you roast the squash), canned has several benefits: First, you can always have a can on hand, just sitting in your cupboard, ready any time to make breads, cakes, muffins and pies. Second, it cuts down a lot on your prep time. Cooking pumpkin/squash may not be difficult, but it takes time. It usually adds a good hour on to your prep time. I do cook some pumpkin each year when the sugar pumpkins are in season, but on the whole this is one time when the difference in flavor is not dramatic enough for me to feel guilty about using canned most of the time.

Bananas - You may find bananas frozen, or you can freeze ripe ones yourself.I love to keep some frozen bananas on hand because it is hard to get ripe ones at the store. To freeze them, just peel the bananas and wrap in air-tight bags or a double layer of plastic wrap. Bananas do turn brown, but for Banana bread, muffins or cake this is fine. When you are ready to bake, just thaw and mash the bananas and use according to your recipe. Generally, three small bananas is about 1 cup when mashed.

Lemons / Limes - You can generally find lemons and limes year-round in your grocery store. But if not, a good substitute can be a jar of good-quality Lemon Curd (available in the jam aisle) for making tarts or filled pastries. If your recipe just calls for the juice, bottled lemon and key lime juice is available (usually in the juice or drink-mix aisle).


Apple Butter / Apple Jam -  I am lucky enough to have a couple of family members who like to make jams and apple butters. This year I made a delicious apple butter cake with a jar of homemade apple butter. Apples are widely available raw year-round, but you may find the quality and selection is not good off-season. So using Apple Butter, Apple Jam, or Homemade Apple Sauce may be a better choice druing the winter, depending on what you are baking.


Thursday, February 21, 2013

Banana Muffins


These muffins are based on my mother's old Banana Bread recipe, with a couple of very minor alterations. (I have to say that because my mother will point it out when she reads this).

2 Cups Flour
1 teaspoon salt
1 teaspoon baking soda
1/2 cup Butter
3/4 cup Sugar
1/4 cup Sour Milk* or Buttermilk
2 Eggs
1 teaspoon vanilla
2 large or 3 small Bananas, mashed (you want to end up with about 1 Cup mashed banana)

Optional: 1/2 Cup nuts (walnuts work well for this)

Preheat oven to 350 degrees and line the muffin tins with cupcake papers (or spray with non-stick spray)

Sift together the flour, salt and baking soda in a bowl. Set aside.

Cream the butter and sugar together in a mixing bowl until fluffy. Add the eggs and mix in. Add the buttermilk (or sour milk) and vanilla. Add the mashed bananas last (and nuts if using), stirring them in by hand until well-mixed.

Drop into the muffin cups (I use an ice-cream scoop) filling each cup only about halfway.

Bake for 20-24 minutes, until the tops spring back when gently poked with a finger.

*Sour Milk - Sour milk is often found in old recipes and can be used in place of buttermilk. To make sour milk, use 1 tablespoon of white vinegar for each cup of sour milk needed. Just pour the vinegar into a measuring cup, add the milk, then stir and let sit five minutes. It will sour and slightly thicken the milk. For this recipe I used slightly less than 1 teaspoon of vinegar to make the 1/4 cup sour milk required.


Baker's Calendar

I love any excuse to bake, so I have what I fondly call my "Baker's Calendar." This list reminds me of the various holidays, change of seasons, and events coming up. If you're like me, you can use these events as an excuse to try out new recipes and dig up old favorites. Obviously any old weekday can also be a baking day, but these allow you to bake with a THEME in mind! :)

My baking calendar goes like this:

New Year's
Valentine's Day
Mardi Gras
St. Patrick's Day
Maple Tapping Season
Easter/Start of Spring
Cinco de Mayo
Mother's Day
Start of Summer
Father's Day
Fourth of July
Kids' birthdays (mine happen to be summer babies)
End of Summer
Back to School
Autumn / Apple and Pumpkin season
Halloween
Thanksgiving
Gingerbread House Season
Christmas / Hanukkah

Tuesday, February 12, 2013

Easy Valentine's Day Treats

If you are looking for sweets for your sweetie, but you don't want to get into complicated decorating, here are some treats that look lovely and are pretty easy to make (links or instructions are below each picture):


Nutella Hearts: This one is so simple it doesn't need its own recipe.
Take your favorite sugar cookie dough, roll it out and cut into hearts.
Bake as directed and spread Nutella over one heart, then top with another heart.
 
 
Jam Hearts: Same as above, just use good quality seedless jam instead of Nutella.
I like to cut a little "Window" out of half of the hearts (the ones that will go on top)
so the jam shows through like a Linzer cookie. Then dust with powdered sugar.


"Pink Lady" Cupcakes: Using the Strawberry Butter Cake recipe,
make into cupcakes and frost with Whipped Strawberry Buttercream
 
 
Red and White Swirl Cupcakes: Make your favorite cupcake recipe and white frosting (I used Whipped Butter Rum Frosting for this - it is tasty and sophisticated).
Get a pastry bag and paint 3-4 stripes of red food coloring inside the bag (from the tip outward). Then fill the pastry bag with the white frosting and choose any decorator tip you like. Pipe the frosting onto the cupcakes and it will come out with both red and white swirls. Top with store-bought heart candies.