In New England, Apple Pie with cheddar cheese is a traditional thing, though most of the rest of the country thinks we've lost our marbles. This is my Great-Grandmother's recipe for Cheddar Cheese pie crust, which I find odd since she was from Ohio, not New England. This crust doesn't taste overly cheesy, so don't be hesitant to make it for any standard apple pie recipe. People who do not like the idea of Apple Pie with cheese will not be put off by this crust because the flavor is subtle. For the best results, use sharp cheddar.
2 1/4 Cups sifted Flour
1 teaspoon salt
3/4 Cup chilled shortening
1/2 Cup finely shredded cheddar
4-5 Tablespoons ice water
Mix together the flour and salt. Cut in the shortening in two batches with a pastry cutter. Sprinkle the cheddar cheese into the mix and gently mix it into the dough with your hands. Sprinkle the water over the dough a little at a time. You may not use all of the water, so don't put it all in at once. Mix lightly with a fork as you add the water, stopping when the dough is just moist enough to hold together in a ball. Chill the dough before rolling. (I flatten in between sheets of waxed paper).
Friday, September 28, 2012
Thursday, September 27, 2012
Decoding Antique Recipes

Have you ever looked at an old recipe and wondered what the heck "Oleo" was? Or how to make sour milk? Here is a quick guide to some old-fashioned terms you might find on old recipes. Some of these may seem obvious, while others are real stumpers. Some of these you may not have seen because, hey, my ancestors just might have been oddballs.
Oleo = Margarine. It used to be called "oleomargarine" many moons ago.
T (Tbsp) vs. t (tsp) = Shorthand for Tablespoon and teaspoon. It used to be that people would use a capital T for Tablespoon and a lower-case t for teaspoon.
Spry/Lard = Spry was a brand name for Lard. Lard can generally be substituted with vegetable shortening very successfully in most recipes, but there are some recipes when lard really is better (a pie crust for mincemeat, for example). Nowadays many recipes that used to call for lard use butter.
Suet = Beef fat. The only recipe I have seen this in (and used it in myself) is a 100-year-old Irish mince pie recipe. It is also used a lot in traditional British puddings.
Soda = Baking Soda. That one's pretty obvious.

Sour Milk = Milk that has been soured with vinegar. To make sour milk, put 1 Tablespoon of white vinegar into a cup measure, then fill it with milk up to the cup mark. Stir well and let sit for five minutes. Not to be confused with clabbered milk, which is milk curdled with lemon juice. Sour milk can usually be substituted for buttermilk in most recipes.
"Coffee Cream" = No, they don't mean French Vanilla Coffee Creamer! I've seen this in a couple of recipes from the 1940s that list coffee cream where they apparently mean half and half or light cream.
Icing Sugar = Powdered, or "Confectioner's" Sugar
Carnation Milk or Pet Milk = Evaporated Milk. Many home cooks used to write out their recipes using brand names. Carnation is still around, of course, but they make many different milk products these days. In some cases, seeing a brand name in recipes gets confusing because the brand is no longer around or they were a strictly regional brand.
Treacle = Although they are not technically the same thing, if you see "treacle" in an old recipe, it basically means Molasses.
Salad Oil = Vegetable Oil.
Scant vs. Heaping = Pretty self-explanatory - "Scant" means slightly less than what is called for (a scant Tablespoon is just a little less than a full measured Tablespoon) and "Heaping" or "Rounded" means a little more.
"Mix like cake" = When you are making something that is not cake but will be mixing it in the way cakes are usually mixed: Cream butter with sugar, add eggs, then liquid, then gradually add flour.
"Moderate" Oven, "Hot" Oven, etc. = A moderate oven means 350 degrees. It is the "middle" temperature and the most commonly used in baking. A hot oven would be 400-425. A "Slow" oven would be 300-325 and a "cool" oven would be 200.
This is just my own short list of what I've seen come up in my old family recipes. If you are interested in learning more, a really excellent website about food history is The Food Timeline
Wednesday, September 26, 2012
Apple Breakfast Muffins

These muffins are not overly sweet, like so many of today's dessert-style muffins are. And you can make this recipe healthier by substituting up to half of the flour with whole wheat flour, reducing the sugar a bit, and adding in nuts if you'd like.
I made this recipe as shown with chunks of apple that were about the size of a dime. I was going to call them "Chunky Apple Muffins." But my kids turned their noses up at the big chunks, so I thought these muffins might be more universally appealing if the apples are diced very finely, so I changed the directions to reflect that.
3 1/2 Cups finely diced apples (If they are very firm you even can grate them)
1 Cup Sugar
2 Eggs
1/2 Cup vegetable oil
2 Cups Flour
2 teaspoons baking soda
1 teaspoon salt
1 1/2 teaspoons cinnamon
1/2 teaspoon freshly ground nutmeg
1/4 teaspoon ground cloves
Preheat oven to 325 degrees. Grease muffin tins (or line with muffin papers) for 12 muffins.
Put the diced apples into a large bowl and cover with the sugar. Let the apples macerate for about 20 minutes.
In a separate bowl, mix together the flour, baking soda, salt and spices. Stir well to mix thoroughly.
Beat the eggs lightly in a small bowl and stir in the oil. Add the egg mixture into the apples and stir well. Add the flour mixture in and give it all a few good strokes with a wooden spoon.
Fill muffin tins about 2/3 full and bake for 20-25 minutes. Touch them lightly with a finger to make sure they are set in the center.
Tuesday, September 25, 2012
Tangy Pancakes with Camelized Apples

These carmelized apples are so quick and easy to make and taste heavenly. You can put them on top of the tangy pancake recipe below, or use them to top any pancakes or waffles. They would taste great on top of pork chops as well. This recipe makes two servings, so double as needed.
Carmelized Apples:
2 medium-sized crisp apples
1 Tablespoon Butter
1 Tablespoon Brown Sugar
dash of cinnamon (optional)
dash of nutmeg (optional)
Peel the apples and cut into slices about 1/4 inch thick. Melt butter in a skillet over medium heat. Add the apple slices, brown sugar, and spices. Cook the apples, stirring often, until they are dark golden brown and the juices have turned into a thick syrup. Make the apples before cooking the pancakes, but don't make them too far ahead - you want to serve the apples while still warm.
Tangy Pancakes:
These pancakes are thinner than regular pancakes, with a tanginess that comes from souring the milk with a little vinegar. These pancakes are perfect with the carmelized apple topping. (For a more traditional pancake, see my homemade pancake recipe in the recipe section.) This recipe only makes about 8 full sized pancakes or 12-16 silver dollar ones, so feel free to double it if needed.
3/4 Cup Soured Milk (put 1 Tablespoon white vinegar in a measuring cup, then pour in milk to equal 3/4 cup. Stir well and let sit 5 minutes).
1 Egg
3 Tablespoons melted butter
1 Cup Flour
1/2 teaspoon salt
1 teaspoon baking soda
In a mixing bowl, lightly beat the egg then add the milk and melted butter. Stir well. In a separate mixing bowl, mix the dry ingredients together and stir well. Add the dry ingredients to the milk and egg mixture, stirring just until the larger lumps are gone - do not try to get rid of all the lumps or it will be overmixed.
Pour onto a hot griddle (I like a cast iron pan for this). The pancakes are done when you see bubbles break on top AND the pancakes are starting to look "dry" around the edges.
Spoon the apples and some of the juice over the pancakes.
Monday, September 24, 2012
Brandied Apple Skillet Cake
.jpg)
The brandy is inevitably cooked off, so this is not a "Tipsy Cake." But it mixes nicely with the spices and the apples, giving the cake a delighful flavor, just for grown-ups.
Preheat oven to 350 degrees. Grease a 10" or 12" Cast Iron Skillet with shortening.
For the Brandied Apples:
2 Tablespoons Butter (you can omit the butter for a vegan recipe)
2 large crisp apples, peeled and sliced thin
1/4 Cup packed brown sugar
1/4 Cup Brandy
In a separate skillet (not the one you will bake the cake in), melt the butter over medium heat. Add apple slices, brown sugar, and gently pour in the brandy. Cook over medium heat for several minutes until the apples are softened and the liquid has turned syrupy. (If your liquid is still very thin when the apples are cooked, you can remove the apples and thicken the liquid a bit more.) Set aside.
For the Cake:
1 1/2 Cups All-purpose Flour
1 Cup Sugar
1 teaspoon Salt
1 teaspoon Baking Soda
1 1/2 teaspoons Cinnamon
1/2 teaspoon ground Ginger
1/2 teaspoon nutmeg
1/4 teaspoon ground Cloves
6 Tablespoons vegetable oil
1 Tablespoon Vinegar (white or cider vinegar)
1/4 Cup Brandy
3/4 Cup Cold Water
In a large bowl, mix together flour, sugar, salt, baking soda and spices. Stir well. Add the oil, vinegar, Brandy and water into the dry ingredients and stir until batter is moistened and larger lumps disappear.
Arrange the cooked apple slices in one layer on the bottom of the cast iron skillet. Pour the syrupy liquid over the apples. Pour the cake batter over the apples and bake for approximately 35 minutes, until a toothpick inserted in the center comes out clean. Time will vary depending on the size skillet you use.
When the cake has cooled a bit, run a sharp knife around the edges to loosen it and then invert onto a large plate. sprinkle with powdered sugar and serve.
Thursday, September 20, 2012
Autumn Sweet Potato Pie

I love pumpkin pie, and I like it with lots of cinnamon, nutmeg, ginger, and a touch of clove. When I started making a Sweet Potato Pie recently, I just couldn't resist spicing it up like I do with a pumpkin pie. Southerners will see that this vears off the traditional sweet potato path, but I think it tastes delicious! This is the same recipe I use for my Spiced Pumpkin Pie, the only difference is I use sweet potatoes instead of pumpkin (I use the orange-fleshed ones commonly called yams, but you can use the yellow-fleshed sweet potatoes if you prefer). If you want, you could even do half sweet potatoes, half pumpkin.
To prepare the sweet potatoes: Pierce with a fork two large or three small yams. Bake in the oven until tender just like a regular potato, 400 degrees for 40-60 minutes depending on size. OR pierce with a fork and microwave until soft (about eight minutes, turning halfway through cook time). Do not boil them or they will be watery. When they are soft, carefully pull the skin off and mash with a fork. I was told by a Southerner years ago that my sweet potato pie was too "smooth" because I had used a potato ricer to remove all lumps - since then I just mash with a fork.
1 flaky pie crust shell, unbaked
1 1/2 Cups cooked mashed sweet potatoes
1 twelve ounce can of Evaporated Milk
1/2 Cup White Sugar
1/4 Cup Brown Sugar
1/2 tsp Salt
1/2 teaspoon freshly ground nutmeg
1/2 teaspoon ginger
1 tsp cinnamon
pinch of cloves (about 1/8 tsp)
1 teaspoon cornstarch
1/8 Cup Molasses
2 eggs
Preheat oven to 425 degrees.
Mix all dry ingredients together in a small bowl. In a large mixing bowl, beat eggs lightly. Add the sweet potato to the eggs, then mix in the spiced sugar mixture and the molasses. When it is mixed well, slowly pour the evaporated milk in, stirring to incorporate in gradually (The mixture will be thin). Pour into the pie shell and bake at 425 for 15 minutes. Turn the oven down to 350 and bake an additional 35-40 minutes, until the filling is set in the middle. (Check the crust halfway through and put foil over the crust if it is getting too brown before the filling is set. Cool to room temperature before slicing with a sharp knife dipped in hot water. Serve with whipped cream.

Monday, September 17, 2012
Top 5 Easy Scratch Items
Alright, when I am honest with myself, I must accept that not everyone enjoys the time and effort scratch baking involves. Sometimes people actually have other things to do.
But the good news is that there ARE some things that are so easy to make from scratch, it's almost pointless to buy them pre-made. Here is my list of things that are so quick and easy, once you make them you won't go back to a box or a can.
Fresh Whipped Cream - This is about the easiest thing you can make from scratch: Put your mixing bowl and whisk in the freezer to chill for a while. Make sure your cream is very cold (I stick that in the freezer for about ten minutes too - just don't forget about it in there). Whip the cream with a wire whisk by hand or use an electric mixer. When the cream just begins to thicken, add in however much sugar and vanilla you would like (my preference is about 2 Tablespoons sugar and 1 teaspoon vanilla for one pint of cream). Continue beating until it forms stiff peaks. Just remember to watch it carefully toward the end, or it will become butter!

Frosting: Why would anyone use canned frosting? It is SO bad. Do people just not know how quick and easy frosting is to make? If you are intimidated by Meringue Buttercreams or Ganaches, you can just whip up a batch of good ol' Butter Frosting (some people call it "American Buttercream"): One stick of room temperature butter, 1 pound of confectioner's sugar, 1 Tablespoon vanilla (less if you like) and just enough milk to moisten it (usually about 2 Tablespoons). Beat with an electric mixer for 3-5 minutes until fluffy. Done.

Skillet Cake - This rivals box mixes for speed and simplicity. Is it my favorite cake? No. But it is pretty good and you can whip it up super fast. You don't have to make it in a skillet, you can use a square baking dish instead. Mix the dry ingredients right there in the pan (don't even bother to sift the flour), and stir them together really good. Add the wet ingredients and stir well. Bake as directed, then sprinkle with powdered sugar or frost as desired. Here is one recipe: Quick & Easy Skillet Cake

Graham Cracker Crust: Manufacturers may be able to put out fairly good pre-made flaky pie crusts. But pre-made cracker crumb crusts are still terrible. Instead, use this simple recipe to make your own: Put crackers in a food processor and grind to fine crumbs. Measure out 1 1/2 Cups of crumbs into a bowl with 6 Tablespoons melted butter and, if desired, a little sugar. Mix well and then press into a pie shell. Chill until set for ice box pies, or prebake the crust at 350 for 10 minutes for cooked pies.

Homemade Pancakes: Many pancake mixes require the addition of fresh eggs and milk, so it's not much more effort to just make them from scratch. Then you can control the ingredients and choose a recipe you love. This one is my favorite: Homemade Pancakes

Friday, September 14, 2012
Sourdough Chocolate Cake

Sourdough CAKE? Hmm...I found this unique recipe in The Joy of Cooking when I was looking for a way to use up some of my sourdough starter. You can only make so many loaves of sourdough bread before you start looking for other things to do with your starter.
This cake is dense and slightly chewy, with a slight tang underlying the chocolate flavor. It is not as sweet as many other chocolate cakes, which makes it more geared toward adult taste buds. You can add sweetness by frosting it with a rich chocolate ganache or butter frosting, or just sprinkle powdered sugar on top.
If you do not have Sourdough starter already, this recipe doesn't really justify starting one (but Sourdough bread does!) However, if you are already a Sourdough Bread baker and have starter on hand, this is a really interesting way to use some of it up.
Preheat oven to 350 degrees. Grease and flour (or line with parchment) one 9"square cake pan. For a layer cake, prepare two 8" round pans or three 6" round pans.
1 3/4 Cups sifted all-purpose Flour
1/3 Cup Cocoa Powder
1 teaspoon Baking Soda
1/2 tsp salt
1/2 Cup (1 Stick) Butter
1 Cup Sugar
2 Eggs
1 Cup Sourdough Starter
3/4 Cup Milk
1 teaspoon Vanilla
Sift all dry ingredients together in a mixing bowl. Set aside.
In an electric mixing bowl, cream the butter and sugar on low until combined. Increase the speed to medium and beat for one minute until fluffy. Add eggs one at a time and beat until just combined. Add the sourdough starter and beat on low until combined. Scrape the bowl down. Mix the vanilla into the milk and then add into the batter alternating with the flour mixture. When all the flour and liquid is incorporated, beat for another 30 seconds or so, until well-mixed.
Pour batter into the pans and bake at 350 degrees. Three 6" rounds will take 20-25 minutes; two 8" rounds will take 25-30 minutes; a thick square cake will be 35-40 minutes. The cake is done when it springs back when touched in the center, or when a toothpick inserted in the center comes out clean.
Cool, then sprinkle with powdered sugar or top with frosting of your choice. I used Sinful Chocolate Buttercream.
Chocolate Peanut Butter Cookies

I adore Peanut Butter cookies, and my kids like chocolate. So one day when I was mixing up some PB cookies, my daughter chimed in with, "Can't we put some CHOCOLATE in there?!" Normally I would just add chocolate chips as a compromise, but I didn't have any in the house. I figured cocoa powder would be a good idea; maybe they would taste like a Reese's Peanut Butter Cup. So I substituted some of the flour for Cocoa Powder, and I'm glad I tried it - One simple change to a classic peanut butter cookie recipe made them deliciously different!
1 Cup Peanut Butter (Chunky or smooth depends on whether you want bits of peanut in the cookies)
1/2 Cup Butter (1 stick)
2 Tablespoons Shortening
1/2 Cup White Sugar
1/2 Cup Brown Sugar
2 Eggs
1 teaspoon vanilla
1 1/4 Cups Flour
1/3 Cup Cocoa Powder
1/2 teaspoon Salt
1/2 teaspoon Baking Soda
Optional: Add Peanut Butter Chips or Chocolate Chips, Nuts or Candies (1/2 to 1 Cup as desired)
Preheat oven to 375 degrees.
Cream the Butter, Shortening, Peanut Butter and sugars with an electric mixer on medium speed until fluffy. Add eggs and vanilla, beating until combined. In a separate bowl, combine the flour, cocoa, salt and baking soda with a fork until well-mixed. Add the flour mixture to the peanut butter mixture and beat on low until smooth. Add any chips/nuts you want to at this point.
Roll the dough into balls, then roll balls in granulated sugar. Place on cookie sheet. Press down on the balls with a fork to make the classic Peanut butter criss-cross pattern.

Drop onto a greased (or parchment lined) cookie sheet and bake for 8-10 minutes until the cookies look "set" and the tops are no longer shiny. (It is hard to detect browning with cookies this color). Cool on parchment or brown paper, then enjoy!
Saturday, September 1, 2012
The "Reverse Creaming" Method
After seeing this technique take hold and become a growing trend, I think it is time to give credit where credit is due. I saw a reputable cooking show the other night where the baker said, "We came up with the idea to mix this cake a little differently - we mix the butter into the flour." And I thought, "You didn't just come up with that!"
Rose Levy Beranbaum rocked the baking world when her book The Cake Bible was published in 1988. In this book, she shared interesting new techniques for mixing and baking cakes, based on a very scientific approach. She had painstakingly researched cakes, breaking down the process like a series of scientific experiments. She came up with an idea that sounds simple on the surface: Mix the ingredients in a different order for better results - specifically, mix all of the dry ingredients together first, then add the butter into the flour so the fat coats the flour. Doesn't sound like anything revolutionary, but to generations of bakers who had always followed the old "cream the butter and sugar together first" rule, this was almost sacrilege. I remember my mother thinking it was downright crazy. I'm sure if my grandmother had been still alive, she would have rolled her eyes skyward and muttered something about the new generation trying out all kinds of weird things!
After flipping through my much-loved copy of The Cake Bible (with many notes in the margins), I cannot find anywhere that Rose actually gives this method a name. I think that other bakers, needing a quick way to reference this technique, are the ones who called it the "reverse creaming" method. In her initial explanation, Rose describes it like this: "In the traditional method, the butter and sugar are creamed before adding the other ingredients. The method I have chosen for my butter cakes is faster, easier, and virtually eliminates any possibility of toughening the cake by overbeating. Creaming still takes place but in a different way: All the dry ingredients are first combined with the butter and a minimum amount of liquid, which coats the flour before adding the remaining liquid ingredients." (From The Cake Bible, Part 1, page 23)
I have tried this method on virtually every butter cake recipe I bake, and it really does work. I do not use it every time, but I use it more often than not. More and more, I am seeing new recipes come out using this method instead of the old-school creaming method, and when I develop my own butter cake recipes, I usually use this method as well. I imagine there will come a day when new bakers using modern recipes will only be familiar with this technique, and creaming the butter and sugar first will be something reserved for cookie making.
Have you tried this technique? What do you think of it?
Thursday, August 30, 2012
Zucchini Spice Muffins (or Carrot Spice Muffins)
.jpg)
After all the cakes, cookies and pies, I figured I should post something that could reasonably be called "healthy" for a change! These zucchini muffins are slightly sweet, slightly spicy, and make a really great breakfast muffin.
To make a delicious carrot spice muffin (similar to carrot cake but less sweet) just use this recipe with carrots in place of zucchini. Since carrots have a natural sweetness, you could lessen the sugar by 1/4 cup if you wanted to.
1 medium zucchini (or two small ones - enough to get about 1 1/2 cups when grated)
2 Cups All-purpose flour
1 Cup Sugar
1 teaspoon salt
2 teaspoons baking soda
Spices: I like to use 1 whole freshly grated nutmeg. That sounds like a lot, but I love nutmeg. Alternately, you can use 1 teaspoon cinnamon, 1/2 teaspoon nutmeg and a dash of clove. The spices are really up to your own taste.
3 eggs
1 Cup Canola Oil
Preheat oven to 350 degrees.
Spray muffin pans with non-stick spray or line with muffin cups.
Grate the zucchini with a microplane or the finest setting on your box grater. If the strands of zucchini are very long, you can chop them a couple of times horizontally with a knife. Place the grated zucchini in a clean kitchen towel and wring it firmly to release the moisture within the zucchini. Set aside.
In a large mixing bowl, sift together the flour, sugar, salt, baking soda, and spices until well-mixed. In a separate small bowl, beat the eggs lightly with the oil, then add the wet ingredients into the dry. Mix well and then add in the zucchini last, stirring only until all of the zucchini has been blended in.
Pour into muffin pans and bake 18-20 minutes, until the tops spring back when you touch them gently with your fingertip.
Tuesday, August 28, 2012
Homemade Soft Pretzels

I found this recipe in a catalog from Penzey's Spices. This recipe makes 12-15 soft pretzels, depending on how large you want them. They are best eaten the same day they are made.
Dough:
3 cups All-purpose Flour (plus another 1/2 - 1 cup for kneading in)
1 1/2 teaspoons INSTANT yeast *see note on yeast below
1/4 Brown Sugar
1 1/4 cups warm water (not HOT)
4 Cups water
4 Tablespoons Baking Soda
Kosher Flake Salt for sprinkling on top
Other seasoning ideas: Parmesan Cheese, Italian Seasoning blend
Put the flour in a bowl with the yeast and sugar. Stir together until well-mixed. Add the water in and mix with a wooden spoon. Turn the mixture out onto a well-floured board and knead in the extra flour until the mixture feels smooth and not tacky to the touch (a nice elastic dough will take 7-10 minutes of kneading). Place the doughball in a greased bowl and cover loosely with plastic wrap or a clean kitchen towel. Place it in a warm area of the kitchen and let it sit for 30-40 minutes. It doesn't have to double in size, but it will be much bigger than it was.
Preheat oven to 500 degrees. Line two baking sheets with parchment paper.
Pour the 4 Cups of water into a large pot and bring to a boil. While you are waiting for the oven and the water, divide the dough into 12-15 pieces, depending on how big you want your pretzels (I cut the dough in half with a knife, then half again, etc. until I have 12 pieces). Roll each piece of dough into a long snake-like shape, then twist it into a pretzel shape (this gets easier with practice). Let your kids make funny shapes if you want. Make sure to push the ends of the pretzel into the main part, giving them a firm poke with your fingertip so they stay intact when you boil them. This will create a divet, but that will mostly go away during cooking.

When the water has boiled, add the 4 Tablespoons of baking soda to the water (kids like to watch this because it foams up like a volcano). Give it a minute to dissolve, then dunk the pretzels in one at a time. Let them sit in the water for about ten seconds, turning them once to get the other side. Then gently lift them out of the water with a slotted spoon and place on a drying rack. DO NOT BLOT the top of the pretzel - leave it damp so the salt adheres. Repeat this step until all of the pretzels have had a short dip in the boiling water. I like to sprinkle the salt on each batch right after they've come out of the water.
Place the pretzels on a cookie sheet lined with parchment. Bake at 500 degrees for 6-8 minutes. They should be medium to dark golden brown and a little firm to the touch. If in doubt, take a spatula and peek at the bottoms to make sure the bottoms are golden brown as well. You can give them an extra minute or two if needed, but watch them carefully at this point - at 500 degrees, they can burn quickly!
These are best served while still warm from the oven. You can make them a couple of hours ahead and re-warm them in a low oven (200 degrees), but they are best eaten the same day.
* Note about yeast: I like using INSTANT yeast because you mix it directly into the flour, skipping the step of dissolving the yeast in water first. Instant yeast is also more powerful, so you use less and it tends to work more quickly. However, you can use active dry yeast if that is what is available to you - Use one packet (which equals 2 1/4 teaspoons) and be sure to dissolve it into the warm water for a few minutes before mixing the yeast/water mixture into the flour. Proceed with the rest of the recipe as above.
Friday, August 24, 2012
Homemade Frozen Waffles
.JPG)
Everyone loves waffles, but making homemade ones can be time consuming, and frozen waffles are usually bland and full of preservatives. So, one lazy Sunday, make up a double batch of your favorite homemade waffles, and freeze a bunch for busy mornings. That way you get tastier homemade waffles and you can control what ingredients you use. Follow these simple steps:
1) Make some homemade batter
2) Slightly undercook them on the waffle iron
3) Cool to room temp
4) Wrap portions in airtight baggies (I do two squares per bag)
5) To reheat them you can do it one of two ways: Either toast on low, flip them over, toast on low again. Repeat this process until cooked through. OR microwave the waffles for ten seconds or so to thaw them out and then toast them on a low setting. If you are doing many waffles, you can reheat them in your oven on low.
Enjoy!
Tuesday, August 14, 2012
The Cake Dilemma - Compromising TASTE to get the LOOK?
My mother has a saying that she uses every year when I send her a tin of hand-decorated sugar cookies: "They're too pretty to eat!" I used to laugh, but lately I think I know what she means: they are lovely but in fact, they don't look edible.
Okay, so I am a scratch baker. I like to bake the old fashioned way, and take my time on it. Flavor comes first and all that.
BUT...
I am also a cake decorator. And lately I am more and more at odds with myself over the compromises to taste that one often has to make in order to get a certain look. When someone orders a custom cake from me, I want to make it taste as good as possible, but people often don't realize that by asking for a certain look, they are putting up obstacles to having the freshest, tastiest cake possible. Some of the challenges are:

Fondant:
I actually kind of like the taste of fondant (a.k.a. sugar paste), when it is homemade. But the taste (and more important the texture) of fondant is something that is not palatable to everyone. On those occasions where I attend the function for which I have made the cake, I often see it peeled off of the cake slices.
There are distinct advantages of using fondant, of course: 1) There is a uniquely different look to fondant which is very popular. 2) You can sculpt life-like figures with it. 3) Fondant-covered cakes can stand up to heat like most buttercreams cannot.
But despite its popularity, I am seeing more requests lately to return to buttercream and only use fondant for the accents or toppers, if at all.
 Gum Paste: Used to sculpt life-like figures and flowers, gum paste dries quicker and harder than fondant. But although it is certainly edible, very few people want to eat it. It is rock hard when dry, which makes it ideal for certain detailed sculptures (the shoe at left is gum paste).
 The CAKE itself: When you order a wedding cake or any other custom cake that requires time-consuming, detailed decorations, that usually requires working over the course of a few days. So the cake is not so fresh by the time you get it. This can lead to cakes that are dry. There ARE things your cake decorator can do to help this somewhat - applying a sugar syrup to moisten the layers, choosing a cake recipe that is less prone to drying out in the first place, etc. But the simple fact is that elaborate cakes are, by necessity, several days old by the time you eat them. Not that they aren't still tasty, but they are rarely as tasty as simpler ones that were made fresh. This is a compromise that you pretty much just have to accept.
Sculpted/3-D Shapes: Speaking of the CAKE part of the cake, you may also have to compromise on the type of cake you were looking for if you have a unique 3-D shape in mind. Sculpted cakes are generally made with something dense like pound cake. If you were looking for a light, delicate white cake, you probably shouldn't ask for it to be shaped like a rowboat or something.

 If possible, the best thing to do is store the cake in a cool room and bring it outside just before cutting (of course, this may not be possible with a tiered wedding cake). ALL cakes need to be kept from direct sunlight, so find a shady spot if it has to be outside.
 Artificial Colors: I don't have a problem with artificial colors, but there is an ongoing debate about whether or not they pose a health risk. You may be surprised at just how much coloring you have to use to get the vivid colors seen in modern cake trends (This 8" cake took an entire small bottle of professional strength red coloring). All-natural colors just do not achieve the same shades.


Okay, so I am a scratch baker. I like to bake the old fashioned way, and take my time on it. Flavor comes first and all that.
BUT...
I am also a cake decorator. And lately I am more and more at odds with myself over the compromises to taste that one often has to make in order to get a certain look. When someone orders a custom cake from me, I want to make it taste as good as possible, but people often don't realize that by asking for a certain look, they are putting up obstacles to having the freshest, tastiest cake possible. Some of the challenges are:


Fondant:
I actually kind of like the taste of fondant (a.k.a. sugar paste), when it is homemade. But the taste (and more important the texture) of fondant is something that is not palatable to everyone. On those occasions where I attend the function for which I have made the cake, I often see it peeled off of the cake slices.
There are distinct advantages of using fondant, of course: 1) There is a uniquely different look to fondant which is very popular. 2) You can sculpt life-like figures with it. 3) Fondant-covered cakes can stand up to heat like most buttercreams cannot.
But despite its popularity, I am seeing more requests lately to return to buttercream and only use fondant for the accents or toppers, if at all.
 Gum Paste: Used to sculpt life-like figures and flowers, gum paste dries quicker and harder than fondant. But although it is certainly edible, very few people want to eat it. It is rock hard when dry, which makes it ideal for certain detailed sculptures (the shoe at left is gum paste).
Sculpted/3-D Shapes: Speaking of the CAKE part of the cake, you may also have to compromise on the type of cake you were looking for if you have a unique 3-D shape in mind. Sculpted cakes are generally made with something dense like pound cake. If you were looking for a light, delicate white cake, you probably shouldn't ask for it to be shaped like a rowboat or something.

Warm Weather Outdoor Events:
If you absolutely HAVE to display your cake outside on a warm day, you will be limited about which frostings can be used. I have searched high and low for frostings that can stand up to high heat. There are many buttercreams that can sit at room temperature for several hours, but if your cake will be outside on a day that is 85+ degrees, you basically have two options:
1) Opt for a fondant covered cake (with fillings that can withstand heat). If you don't mind fondant, this is a great option.
2) Use a high-ratio shortening in place of butter for the frosting. Nobody likes the idea of a shortening buttercream (think of grocery store cakes with that really sweet frosting on them and that is what a shortening buttercream is) But if it is really necessary, there are ways to make it taste fairly good with extended beating and adding flavored extracts. I had to use it once for an outdoor summer wedding cake (the bride requested no fondant) and I actually got many compliments on how tasty that cake was.
 If possible, the best thing to do is store the cake in a cool room and bring it outside just before cutting (of course, this may not be possible with a tiered wedding cake). ALL cakes need to be kept from direct sunlight, so find a shady spot if it has to be outside.
  Artificial Colors: I don't have a problem with artificial colors, but there is an ongoing debate about whether or not they pose a health risk. You may be surprised at just how much coloring you have to use to get the vivid colors seen in modern cake trends (This 8" cake took an entire small bottle of professional strength red coloring). All-natural colors just do not achieve the same shades.
Non-Cake Items and Architectural Supports:
If you have watched any of the trendy shows like Ace of Cakes or The Cake Boss, you know that there is a lot of Non-Cake in today's cakes. Rice Krispies are used to make shapes that can't be achieved with cake alone. And the more impressive the cake sculpture, the more likely it is that a large percentage of that structure is actually non-edible architectural support. I don't have a problem with that, but again it takes us one more step away from pure cake that tastes good. So people should be aware that when they order a fantastical cake, some of it may not be cake at all, and they may be sacrificing taste to some extent.
So what's the summary of all this? I actually don't know. Other than maybe I am just getting old. Because the older I get, the more I prefer cakes that look simply and utterly delicious. I am still heartily impressed by cakes that look like shoes, snakes, and cars. I just don't really want to eat them.

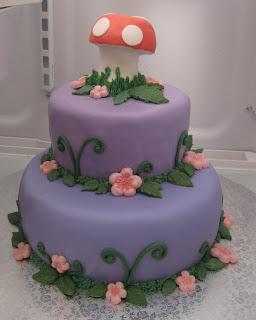
Vanilla Raspberry Cake with Raspberry Buttercream

Boston Cream Pie
Saturday, August 11, 2012
Unnecessary Baking Products
Lately, whenever I walk the aisles of my local craft store, I realize two things: 1) Everyone and their grandmother is getting into cake decorating, and 2) Companies are making BIG bucks trying to sell bakers and cake decorators completely unnecessary products. Any task you can imagine doing in the kitchen has its own special tool these days, instead of cooks having just a handful of multi-purpose tools.
Once in a while, those single-use gadgets can be pretty clever and useful. But more often than not, that special pan or ultra-specific tool is just a waste of money. In some cases it even goes further than that - the special pan actually makes a WORSE product. Hence, the latest item on my Roll-of-the-eyes list: The Whoopie Pie pan. This pan looks like a cookie sheet with circular indentations in it (See the Wilton version here: HERE).
First of all, why do we need to complicate the Whoopie Pie? It is so easy and delicious the way it is, no special equipment needed. Just take a cookie sheet, spoon on your batter (or use an ice cream scooper - a tool that can be used for more than one task). This means that the batter must be thicker than your average cake batter so it holds its shape without spreading. Bake them and Voila! You have little cakes that are perfect for sandwiching with a billowy filling - Domed on top and totally flat on the underside (I don't like to call them cookies, because, well, it's NOT a cookie).
Secondly, these new-fangled things just look weird to me. The trend of using those unnecessary pans is leading to some strange looking Whoopie Pies. Instead of being a simple half moon kind of shape, the sides of the whoopie pies are strangely flat and slanted outward before doming up. I can't post a picture here because I've never made these oddly shaped things and probably can't get permission to make fun of someone else's picture (alas). But here is a picture of my own traditional, no-frills whoopie pies. I LOVE this recipe (which you can find in the recipe section). It was adapted from something I found on Epicurious:

I will say that one popular bakery in our area that ONLY makes Whoopie Pies uses these silly pans, and the first time I saw their product I thought to myself, "How can they make nothing but Whoopie Pies when they obviously don't know what a real one is?!" Okay, maybe that was a bit harsh of me. I'll just take my foot out of my mouth and fill it with a whoopie pie now.
Wednesday, August 1, 2012
White Almond Sour Cream Cake

Aside from being a crazy baker, I am also a cake decorator. As I was searching for good recipes on my favorite cake decorating website Cake Central, I kept coming across something called White Almond Sour Cream Cake. Hmm, that sounded really good. But wait - when I clicked on the recipe for this intriguing cake, I found that it started with a box of white cake mix. Clicking on variations of the recipe, I saw that they all started with a box mix! I was puzzled, because I had long believed that professional cake decorators do everything from scratch. I wanted to try this delicious-sounding cake, but I didn't want to just make a modified mix - I wanted the real thing. So I set out to come up with my own recipe. I started with my go-to white cake recipe, mixed it with the reverse creaming method (mixing the dry ingredients with the butter), added almond extract, and substituted sour cream for half of the milk it called for. Success! The cake tasted delicious. It is pictured here with cooked milk buttercream. If you are worried about nut allergies or just don't like almond flavor, this cake would also taste delicious as a vanilla sour cream cake.
Preheat oven to 350 degrees. Spray pans with cooking spray and line with parchment. This cake will do three 8" round layers, or two 10" round layers.
Have all ingredients at room temperature before starting:
3 1/2 Cups Sifted Cake Flour
4 teaspoons Baking Powder
1 tsp salt
2 Cups granulated sugar
1 Cup unsalted butter, softened (if you are using salted butter, omit the salt)
1/2 Cup milk
1/2 Cup Sour Cream
1 teaspoon almond extract (OR 1 Tablespoon vanilla extract for vanilla flavor)
7 egg whites
Mix all dry ingredients together in a large mixing bowl and stir well (if you have a KitchenAid mixer, go ahead and put it in that bowl and mix on low speed with the paddle to combine.)
Add the softened butter and the milk to the dry ingredients and mix on low until combined. Turn mixer on medium and beat for about 60 seconds to aerate. Stir the Almond extract into the sour cream and add half of this to the batter. Mix on low until just combined (about 15 seconds). Add the last of the sour cream and mix on low again, until just combined. Scrape the bowl to make sure the bottom of the bowl got mixed in.
In a separate bowl, beat the egg whites with a wire whisk until they are stiff but still a bit moist. Gently fold the egg whites into the batter, just until they are incorporated (you will still see some thin streaks of white). Immediately fill pans and bake at 350 degrees:
Cupcakes: 18-20 minutes
6" or 8" layers: 25-35 minutes
9" or 10" layers: 30-40 minutes
12" layer: 45-50 minutes
Bake just until the cakes spring back when gently poked with a finger on top, or when a toothpick inserted in the center comes out clean.
Cool before frosting.
Wednesday, July 25, 2012
Three different takes on Blueberry Pie

Blueberry Pie is one of the easiest pies to make - you don't even have to peel or cut the fruit! At its most basic, blueberry pie is just blueberries, sugar, and some kind of thickener. That is how my husband likes it - very simple, so the blueberries have nothing else to compete with their flavor. But I like to mix it up a little, so I tried some other flavor combinations to see how they compared to Basic Blue.
They all follow a pretty easy base recipe. I have specified certain amounts of sugar and certain thickeners in these recipes, but go ahead and experiment - vary the sugar to your own taste and try out different thickeners to see which you like best. (See note on thickeners at the bottom of this post.)
Basic Method for Baking Blueberry Pie:
1) Use 1 recipe Flaky pie crust, rolling out half for the top and half for the bottom crust.
2) Follow directions for one of the three pie fillings below.
3) Fill bottom crust with filling and top with the other crust, crimping edges together
4) Optional: Brush crust with milk and sprinkle with sugar.
5) Put Pie on a cookie sheet and Bake at 400 degrees for about 40 minutes.
6) Cool completely before cutting ("Hot out of the oven" makes for very messy slices!)
Basic Blue
5 Cups Fresh Blueberries (you can use frozen too, but fresh is better)
2/3 Cup Sugar
1/4 Cup Instant Tapioca
In a large bowl, mix the ingredients together, stirring roughly to break up some of the berries and create juice. (The berries will create juice as they cook, of course, but when using tapioca as a thickener you want to let the tapioca sit in some juice before the cooking process). Let this mixture sit and macerate for at least 20 minutes before filling the pie.
Hint of Citrus Blueberry Pie:
Okay, totally cheesy name. Maybe I'll come up with something better and rename it.
5 Cups Blueberries
2/3 Cup Sugar
1/4 Cup Instant Tapioca
1/2 teaspoon almond extract
1 Tablespoon sweet orange marmalade
- OR -
1 teaspoon fresh orange zest
In a large bowl, mix all ingredients together, stirring roughly to break up some of the berries to create some juice for the tapioca to absorb. Let this mixture macerate for 20+ minutes before filling your crust.
Blue Ribbon Blueberry
I call it "Blue Ribbon" not because I won the county fair pie contest or anything, but because this filling is the one that won the taste-test in my family, which is much more important! This is the same filling I use for my Blueberry Bars recipe.
5 Cups Blueberries
1 Cup Sugar
2 teaspoons Balsamic Vinegar
1/2 teaspoon ground cardamom
1/4 Cup instant Tapioca -OR- 2 Tablespoons + 1/2 teaspoon Cornstarch
Put 1 Cup of the berries in a small saucepan with the sugar. Over low heat, cook while smashing up the berries with a fork or potato masher. Cook 2-4 minutes, until the sugar is dissolved and mixture is syrupy. Remove from heat and stir in the balsamic vinegar and the cardamom. Let the mixture cool for 5-10 minutes. Add in the Tapioca (or cornstarch) and the remaining berries, stirring well. Fill pie crust and bake.
Note on Thickeners:
There are several different options for thickening your pies, and bakers have different preferences for what to use. You may decide to vary it depending on which fruit you are using. I like cornstarch for most pies, but I also like tapioca sometimes. Here are the most common thickeners:
Flour - A lot of the old recipes I look at use flour as the thickener. I don't really like flour because I always seem to end up with a runny pie when I use it. Not just "juicy" but downright runny. However, many bakers still like it and use it successfully.
Cornstarch - Has more thickening power than flour, and will not add any off flavors or textures to your filling.
Instant Tapioca - Because these beads absorb liquid and turn jelly-like, you will rarely have a runny pie. The upside is that tapioca gives you a "set" filling that won't run, giving you nice pretty slices. The downside is that the beady, jelly-like texture does not work well with some fruits. I think it works well for blueberry, becomming unnoticable. But I don't really like it for apple or peach. You have to be careful not to add too much tapioca to a filling, or it will become so gelatinous it is SOLID and not very appealing.
Other thickeners: ClearJel, Cassava (basically the same as tapioca, but not in bead-form), Arrowroot starch. I have not used these thickeners yet, so I cannot speak to how well they work.
The above is only based on my own experience making pies, so if you want a more comprehensive look at different thickeners, the Everything Pies website has a great page here: Everything Pies thickener page
Tuesday, July 24, 2012
Blueberry Bars
.JPG)
These bars really let the fresh blueberry flavor come through. The secret ingredient is just a touch of balsamic vinegar. My husband thought I had gone crazy, but you would never guess it is in there if no one told you. Actually, balsamic vinegar is a pretty common thing to add to strawberries and blueberries. It enhances their tartness, which is particularly good if you are starting with very sweet berries. If you are using very tart blueberries, you can omit the balsamic vinegar and still get a good result.
The bottom crust mixture (which is similar to a shortbread) is used as the topping as well, making these blueberry bars fairly quick and easy. One caveat - unlike other bars, these are not really finger food. Serve them on a plate with a fork since they tend to crumble a bit.
Preheat oven to 350 degrees.
Crust:
1/3 Cup Confectioner's Sugar
1 Cup Butter
1 1/2 Cups Flour
Mix in food processor or by hand with a pastry blender. Set aside 1/2 Cup of this mixture to use as the topping on the bars. Press the remaining crust mixture into the bottom of an 8x8" square pan. Prick the crust all over with a fork, then bake for 12-15 minutes, until it is starting to get golden brown. Remove the crust from the oven and let it cool to room temp.
Filling:
2 Cups Fresh Blueberries (washed and stems removed)
1/4 Cup granulated sugar (more or less to taste)
1/2 teaspoon balsamic vinegar
1/2 teaspoon ground cardamom
(just a pinch of cinnamon can be substituted here, but the taste will be a little different)
1 Tablespoon Cornstarch
Place about 1/2 cup of the berries with the sugar in a small saucepan. Heat on low, smashing up the berries with a fork or a potato masher. Continue cooking over low heat for a few minutes until the sugar is dissolved and the mixture is syrupy. Remove from heat. Add the balsamic vinegar and the cardamom, stir well. Let the mixture cool a bit, then add the remaining blueberries and the cornstarch. Stir well. Spread the blueberry filling over the cooled crust. Sprinkle the remaining crust mixture over the top. (Alternately, you could substitute a standard streusel topping or crushed almonds if you prefer.)
Bake at 350 degrees for about 30 minutes, until golden and bubbling. The filling should look "set" and no longer liquidy. You must let these bars cool completely or they will not cut well.
Thursday, July 19, 2012
Blueberry Cardamom Ice Cream

I know, this is a baking blog, but I just had to branch out and add an ice cream section to the recipe list. This quick and easy recipe is a little bit healthier than most ice creams. It combines cream with yogurt, fresh berries, and only a small amount of sugar. Blueberry and Cardamom is a more sophisticated flavor combination, so it definitely has a more adult appeal. (Translation: If your kids are anything like mine, they won't like it). But I really love it. And besides, if I wanted a super-sweet kid flavor, I could just go buy that in any store.
Blueberry Cardamom Ice Cream
2 Cups Fresh Blueberries
1/4 Cup Sugar
3/4 tsp Cardamom
1 Cup Heavy Cream
1 1/2 Cups good quality Vanilla Yogurt
Put the blueberries, sugar, and cardamom in a small saucepan over low heat. With a potato masher, smash the berries and cook on low for a couple of minutes, until the sugar dissolves and the mixture just starts to become syrupy. Take off the heat and cool for a few minutes.
In a mixing bowl, mix the cream and yogurt together. Add in the blueberry syrup and stir well. Refrigerate until very cold.
Pour the mixture into your ice cream maker and mix as directed for your machine (instructions will vary for electric vs. hand-cranked ice cream makers).
When the ice cream looks like a thick milk shake, spoon it into a tupperware container and freeze until it is more solid (several hours). FYI - This ice cream never gets super hard.
Garnish with fresh blueberries.
Tuesday, July 17, 2012
Tools I can't live without
Every baker has a list of tools that they just can't live without. Aside from the obvious - Good quality pans, measuring devices, sharp knives and a good sturdy rolling pin, my list is a pretty short. Each of them is a good multi-purpose tool. Like the wonderful Alton Brown, I do not employ many gadgets in my kitchen that only do one thing.
In fairness, I must admit that I am also a cake decorator, and when I put on my decorating hat, I need a lot more tools and gadgets to make my job easier. But for good old-fashioned baking, there are a just few tools I can't live without:


In fairness, I must admit that I am also a cake decorator, and when I put on my decorating hat, I need a lot more tools and gadgets to make my job easier. But for good old-fashioned baking, there are a just few tools I can't live without:

This simple cheap plastic scraper and multi-purpose tool is one of the things I use most often in my kitchen. I use it as a spatula, a bowl scraper, a frosting knife, and it makes the best pie server ever. It has a very thin flexible "blade" to get in between the pie crust and the pie plate, for serving up beautiful slices that are not broken or dented. I actually bring it with me every time I bring a pie anywhere, because standard pie servers make for messy slices. It is also my go-to tool for loosening cake layers from their pans, and any time I need to get a thin edge under a baked item to lift it. To find this (seemingly nameless) plastic tool, you have to go to a cooking supply shop, or order it online.

Pastry Cutter/Blender - Yeah, that is how much of a baking geek I am. I actually prefer to mix my pie crust with this old-fahioned hand tool rather than the modern food processor methods. Food processors are perfectly capable of mixing dough, and most modern bakers have stepped up to the food processor method. But I still like to "feel" the dough, and why clean up the food processor when doing it by hand is not that hard?

Wire Whisk: I have several in different sizes. I use them to stir, to whip air into things like meringues and whipped cream, and I also use it to mix my dry ingredients together well (flour, salt, baking powder). It is the ideal tool for stirring things when you don't want to get clumps - gravies, puddings and pie fillings (see above, making pudding on the stove).

My KitchenAid Mixer - Okay, I am not so old-fashioned that I can't appreciate a good modern tool. I would cry if my trusty old KitchenAid broke. I have had it for more than twelve years and I use it nearly every single day. KitchenAid mixers may seem expensive, but they last and last. I may love retro recipes and techiniques, but this is one case where we are definitely better off than our Grandmothers were!
Saturday, July 14, 2012
Banana Cream Pie
.JPG)
This pie is always a favorite - it is one of my most requested pies (after Apple, Lemon Meringue and Key Lime). The banana flavor comes from the filling and also a layer of fresh banana slices on that line the crust.
Cream Pies are great in the summer - not only do they taste cool and creamy, but they are cooked only briefly on the stovetop instead of a prolonged baking in the oven. So you aren't spending an hour heating your kitchen.
This Banana Cream Pie is adapted from something I found in my old copy of The Joy of Cooking. Once you get the basics of making a cream pie down, there are endless variations you can do. I have made up some pretty unusual flavors over the years, but cream pies are so popular that it's really worth learning the basic recipe for making them.
1 Cracker Crumb Crust made with Ritz crackers or Vanilla Wafers. After pressing into the pie pan, CHILL the crust instead of baking it.
Filling:
2/3 cup sugar
1/2 cup all-purpose flour
1/2 tsp salt
1 2/3 Cups milk
3 egg yolks
2 bananas
1 Tablespoon vanilla extract
In the top of a double boiler combine the sugar, flour, salt, and milk. Stir the mixture in the bowl while the water boils beneath it, cooking for about 10-12 minutes until the mixture thickens. *Thickening time depends on how cold your milk is to start with. It can take anywhere from 9-14 minutes to get it nice and thick like a pudding. In the first 5-7 minutes it doesn't thicken much at all, but when it starts it goes fast. So watch the filling carefully and when it starts to thicken, stir it constantly. Once it has thickened, remove it from the heat.
In a separate bowl, beat the egg yolks. Take a small amount of the hot milk/flour mixture (about a tablespoon) and stir it into the eggs. Add another spoonful and stir it in (you are "tempering" the eggs so they don't cook and curdle). Now pour the egg mixture into the rest of the hot milk mix. Return it to the double boiler and cook until thickened some more (about 3-5 minutes) stirring constantly. Take it off the heat. Cut one of the bananas in half. Mash half of the banana in a small bowl. Add the mashed banana and vanilla extract to the filling mixture. Now place a layer of Saran wrap directly on top of the filling (to avoid getting a thickened skin on top). Put it in the fridge to cool.

In the meantime, cut the remaining 1 1/2 bananas into thin slices and line the
cracker crust with the slices.

When the filling has cooled (it can be a lukewarm, but not HOT), pour it slowly into the
pie shell, being careful not to mess up the banana slices.
Top with fresh whipped cream (see below for recipe) and refrigerate for at least an hour before serving. Try to eat it the same day because the sliced bananas turn brown.
Fresh Whipped Cream:
1 pint heavy cream
1/4 - 1/2 cup confectioner's sugar, depending on how sweet you want it
Make sure the cream is well-chilled, (I even chill the mixing bowl and beaters when I make whipped cream). Beat on high speed with mixer until it is thickened. Spread it over the chilled pie and then put the pie back in the fridge until serving.
Subscribe to:
Posts (Atom)