Thursday, February 7, 2013

Valentine Heart Cookies

There are so many different things you can do with heart cookies for Valentine's day.
Whether you are looking for a very basic cookie or more complex decorations,
here are some ideas for heart cookies:


My favorite thing to do is make some Sarcastic Valentines:
This is actually a Chocolate Rolled Cookie recipe. To do this design, roll out colored fondant and cut it with a heart shaped cookie cutter. Apply it by brushing a thin layer of Karo syrup onto the cookie and gently press the fondant on, then write the words with a food marker or by hand-painting them on with dark pink food gel.


An easy idea is to make these Nutella sandwich hearts. Use your favorite Rolled Sugar Cookie recipe (a good one I like to use is Cake Central's No Fail Sugar Cookies recipe) and cut into hearts. When cooled, spread a small amount of Nutella on one cookie and cover it with another cookie. Done.

 
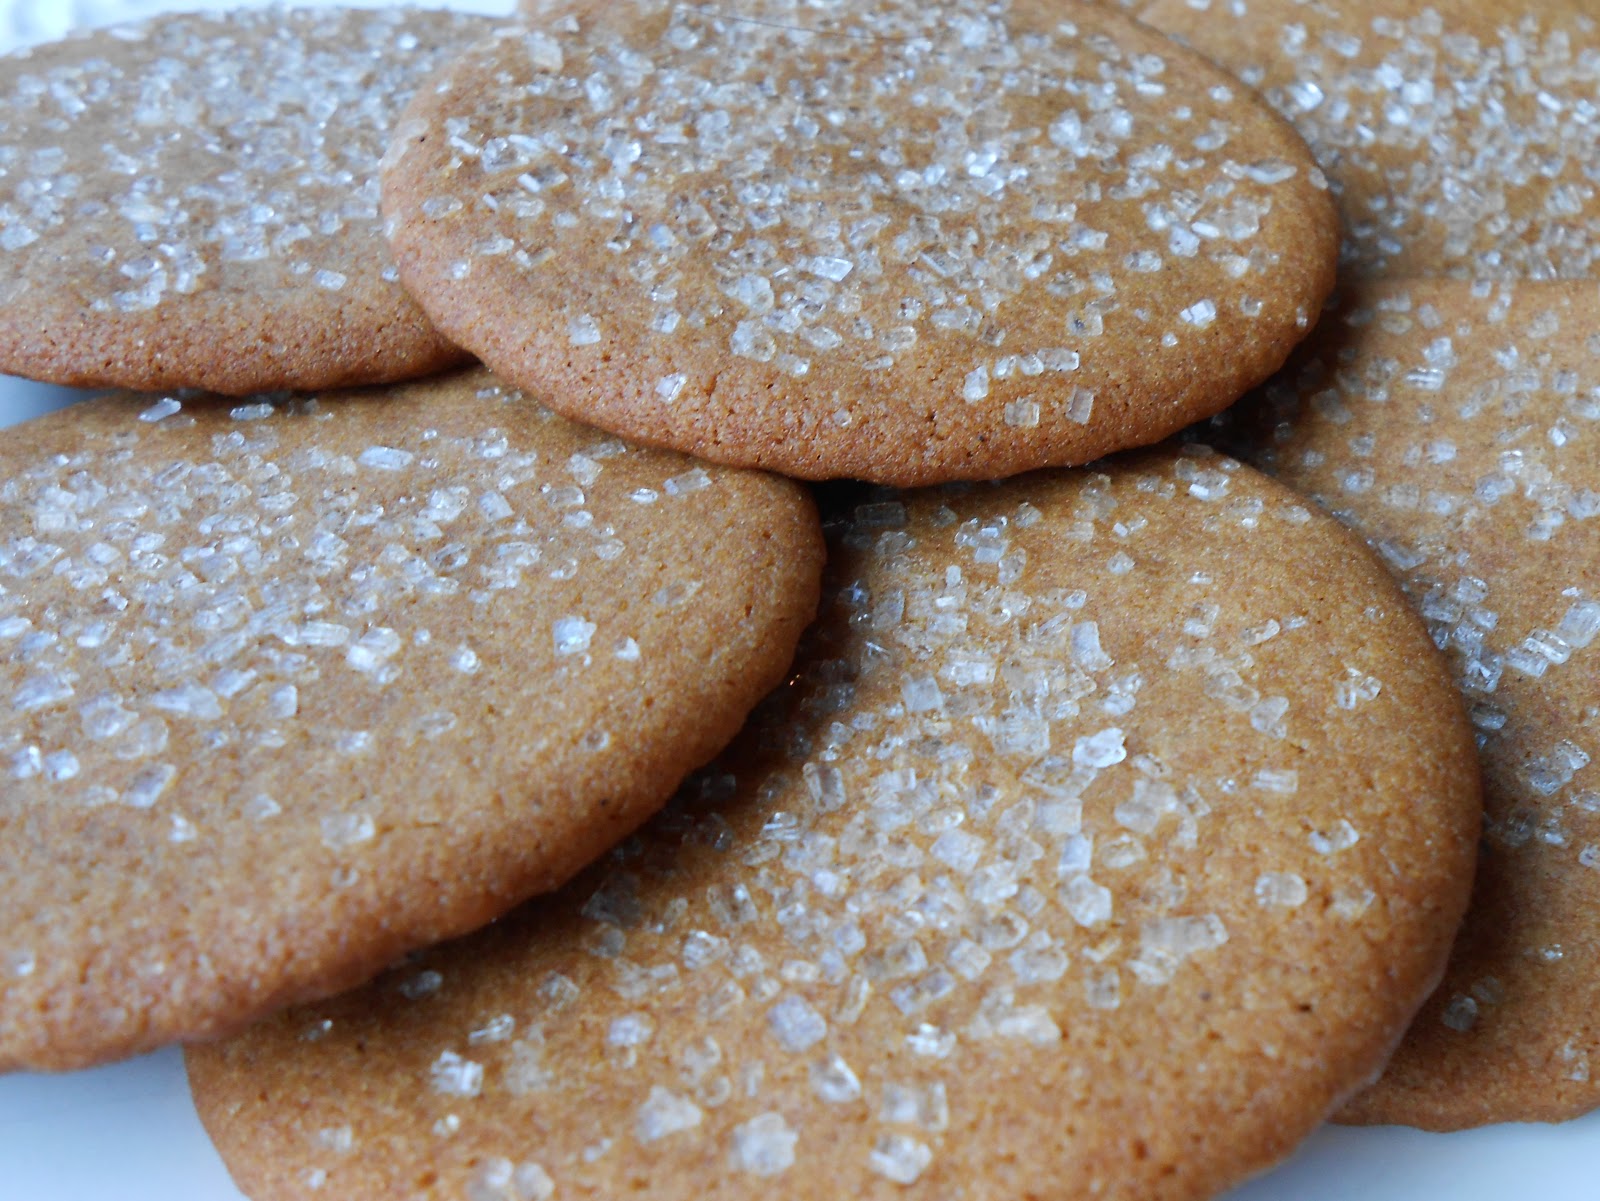
These hearts are decorated with Red and White Royal Icing. Royal Icing gives you a lovely smooth finish and dries hard so cookies are stackable. However, you definitely sacrifice some taste for looks here - Royal Icing is not the most tasty icing around.

These jam hearts are delicious and look like a pretty linzer cookie. Just roll out dough and cut it into heart shapes, using a smaller cutter to make "windows" in half of the cookies. When they are cooled, spread a little bit of your favorite jam on a cookie (I like a seedless Raspberry jam for this) and then cover with the top cookie (the one with the window in it). When you have done all the cookies, dust them with powdered sugar.
 
 
 These hearts are made using the recipe for Chocolate Rolled Cookies
Then they are decorated using a Glace Icing which tastes better than royal icing and dries smooth with a nice sheen to it. The downside is that this icing usually takes a FULL day to dry, so plan ahead if you want to use it.

 
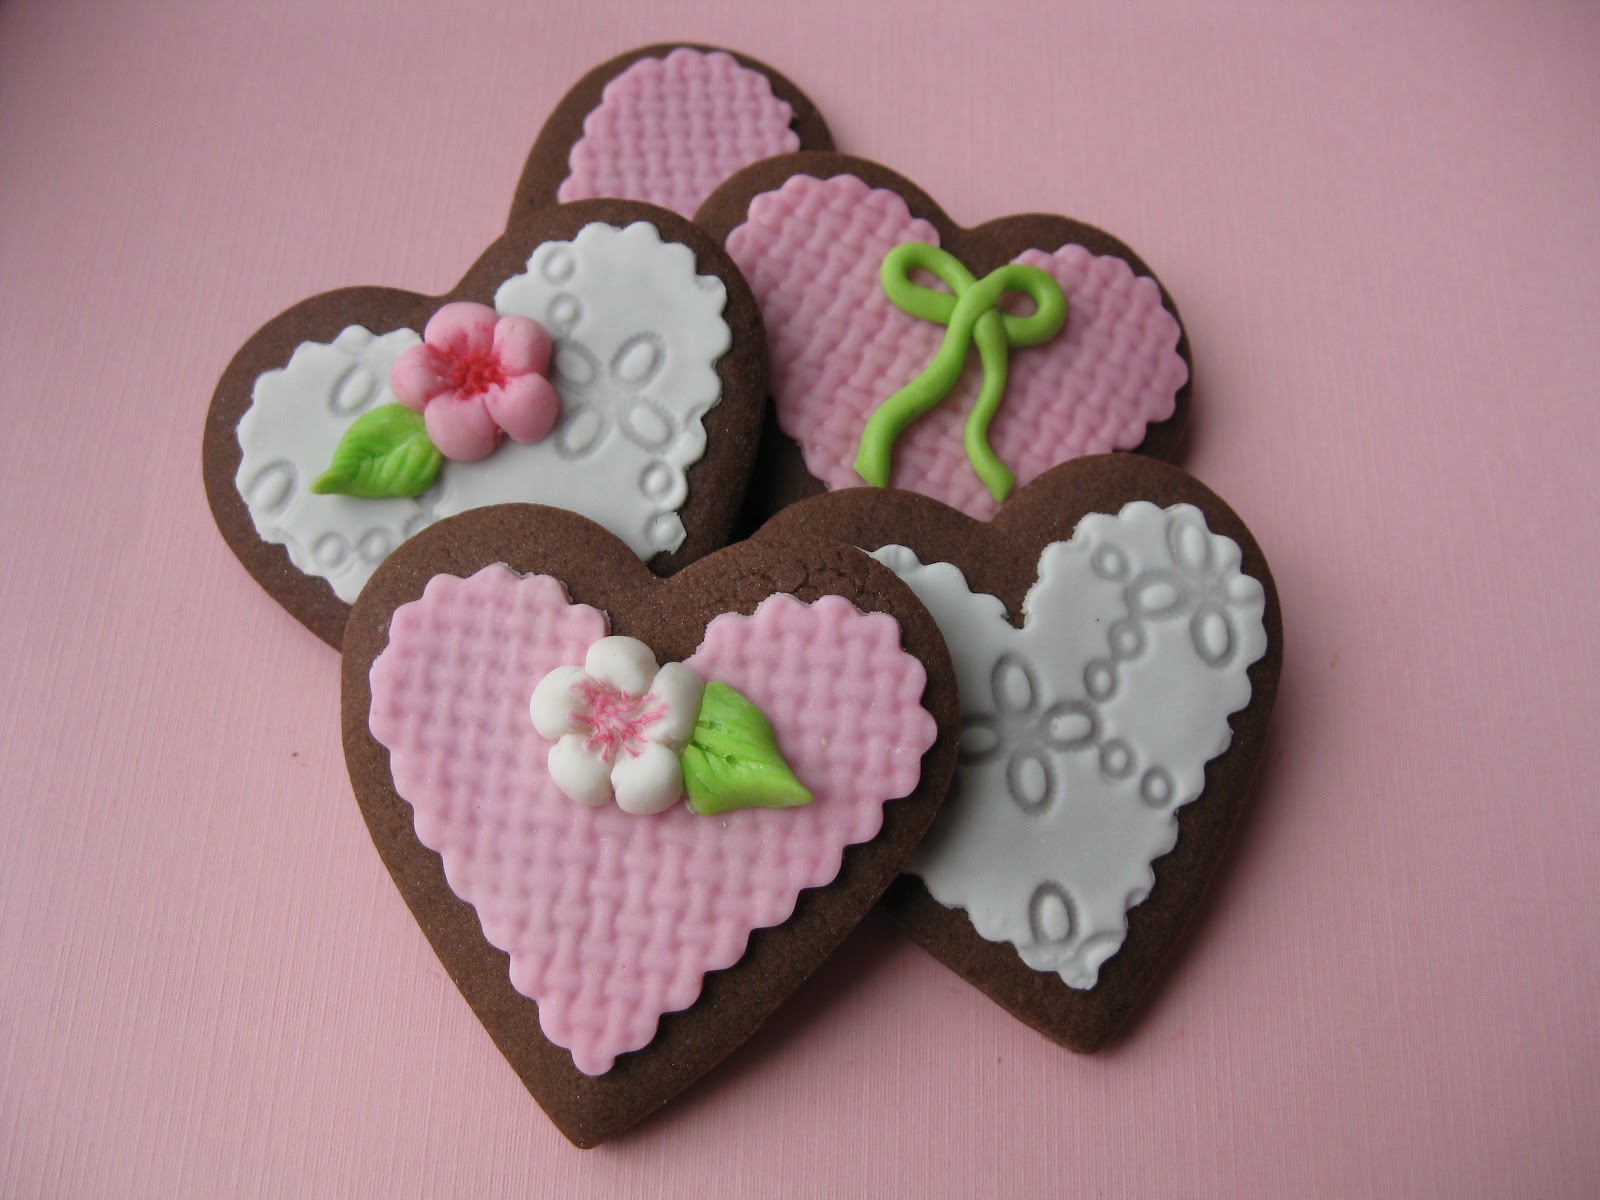
These chocolate hearts are decorated with fondant. You can buy embossing sheets with various patterns on them at your local cake decorating store or online. After rolling out the fondant, imprint it with the embossing sheet (follow instructions on the package, but with most embossing sheets you dust the sheet with cornstarch and then just press the plastic sheet onto the fondant, pressing it in with your hand or a rolling pin). Then cut out hearts from the patterned fondant with a heart cookie cutter that is slightly smaller than your cookie. Apply by brushing on a thin layer of Karo syrup onto the cookie and then smoothing the fondant piece on. The flowers above are also made from fondant put into a flower mold.

Monday, February 4, 2013

Host a Kid-friendly Mardi Gras Party!

Although I've visited New Orleans a few times, it was never during Mardi Gras. However, I loved the food and the music so much, that I wanted an excuse to enjoy it here in New England, far far away from NOLA. So I thought, why not use this fabulous "holiday" as a great party theme?  Since I am a mom, I decided to do a Kid-friendly version of a Mardi Gras Party. Kids have a blast with this theme - they get to try new foods, hear fun new kinds of music, and make masks. Here are some ideas if you'd like to host your own Kiddie Mardi Gras Party:


1) Buy cardboard masks at your local craft store, along with glitter and feathers for the kids to decorate their own masks. This gives them something fun to wear and a cool keepsake to take home.


2) Serve New Orleans foods: Make a pot of Jambalaya ahead of time and then put it in a crock pot to stay warm. Kids may not like Jambalaya, so for them you could serve popcorn chicken bites and call them "Alligator bites." One thing kids will be sure to love is the sweet stuff: King Cake and Pralines can be made the day before, and Beignets can be made during (or right before) the party. For drinks, I serve Cafe au Lait made with Chicory Coffee for the adults and mock Mint Juleps for the kids (made with iced tea and mint). Here are some great recipes to get you started:


I also love Pecan Pralines and they are surprisingly easy to make. Here is a great recipe I use:
 Paula Deen's Pecan Pralines
 
For Jambalaya and other authentic Deep South recipes, a great source is Deep South Dish
 

For New Orleans-style Cafe au Lait (Coffee with Chicory) I order from Cafe du Monde. You can also get beignet mix from them if you do not want to make them from scratch. Some specialty stores in your area may actually carry these products so you don't need to order online and pay shipping.

Mock Mint Juleps: Make a pitcher of unsweetened iced tea. Then, in another empty pitcher or a large bowl, place 1/3 cup sugar and a handful of mint sprigs. "Muddle" the mint and sugar together to release the mint flavor a bit. Pour the iced tea over the sugar/mint mixture, then stir. Add more sugar if you'd like, then store it in the fridge. The mint flavor will strengthen as it sits. Garnish each glass with a little sprig of mint when you serve it.


Next, it's time for a PARADE:


Choose some great Mardi Gras Music: We put some Zydeco or Preservation Hall Jazz Band on the stereo and have a "parade" through the house. The adults can give out beads or Moon Pies as the kids go by. It's kind of silly, but the kids have so much fun!


Then, dance dance dance!

How to Make a King Cake


One of the things I love best about New Orleans is the FOOD. Although King Cake isn't my personal favorite of the NOLA foods, it is so quintissentially New Orleans that I decided last year to learn how to make one. This ring-shped pastry is a heck of a lot more challenging than it looks. Since King Cakes are rather time-consuming to make, it's good that Mardi Gras comes only once a year!

King Cake is actually not a cake at all. The only way to describe it for those who haven't had one is that it is kind of like a giant cinnamon roll shaped in a ring and covered with icing and sugars in the mardi gras colors - purple, green and gold. It is the food most associated with Mardi Gras. There is a wonderful history behind the King Cake, which is summarized nicely by Nola.com here: Brief history of the King Cake

Traditionally there is a little baby hidden within the cake. The person who gets the baby has to buy the next cake or some say, host next year's party. Getting the baby is also supposed to be lucky. If you want to put a baby in your cake, you can buy little plastic or ceramic ones at most party stores or online. (Ceramic can be baked in, plastic ones should be inserted through the bottom of the cake after it is baked).

This King Cake Recipe supposedly comes from the famous Bakery Haydel's in New Orleans, which is known for being one of the top King Cake bakeries. I cannot swear that it is in fact Haydel's recipe, but it is good!

Dough:
1/3 cup granulated sugar
1 tsp salt
½ cup all purpose shortening
4 cups all purpose flour
2 lg. eggs
1 cup milk (room temperature)
2 sm. packs active dry yeast
¼ tsp lemon flavor
¼ tsp orange flavor
¼ tsp vanilla flavor
¼ tsp butter flavor
½ cup canola oil
½ cup cinnamon sugar


In a mixer at first speed combine 1/3 cup granulated sugar, salt, and shortening until well creamed:


Add eggs and continue to cream. In a separate bowl, dissolve the yeast in the milk and add the flavors. Once dissolved add to creamed mixture and continue to mix. Switch to your dough hook attachment and add flour and mix until dough tightens:


Remove from mixer and kneed into a ball. Place the ball in a lightly greased bowl and cover with a clean kitchen towel or plastic wrap. Allow the dough to rest in a warm place for 1½ hours.


(While the dough is resting you can mix your colored sugars if you are making them instead of using pre-colored sugars - See below for directions).

When dough has rested roll out into an oblong piece. Brush on canola oil covering the entire piece:


Sprinkle the cinnamon sugar liberally over the whole piece.


Once the dough is covered with the cinnamon sugar and oil, fold it in half lengthwise:


Cut into 3 strips and braid the dough.


Gently roll the dough, (kind of smooshing it into itself) by starting at one end and working all the way down to the other end:


This long piece can then be shaped into a ring like this:


Once shaped place on a baking pan covered with piece of parchment.


Place in a warm area covered with a clean kitchen towel. Allow the dough to rest again until it doubles in size.
You can sprinkle the sugars directly onto the dough before baking, or you can bake it first and then top with the icing and sugars. Make sure to alternate the three colors.

Bake at 370 degrees F for 12-15 minutes until dough is golden brown.
Laissez les bon temps rouler!

How to Make your own Colored Sugar:
3 cups granulated sugar
1 tsp purple food color (try 2 drops red to one drop blue and adjust as needed)
1 tsp yellow food color
1 tsp green food color
Note: liquid colors work best for this, not professional paste colors.

Start by taking one cup of sugar and your yellow food coloring.
Mix by hand with a wire wisk in a metal bowl until the sugar turns yellow.
Pour you yellow sugar into a separate bowl and put off to the side.
Repeat this process mixing green then purple. (By doing them in that order you only dirty one mixingbowl)

Friday, February 1, 2013

Moist White Cake


Delicate white cake is one of the most popular cakes, but it can be hard to find a recipe that is both light and moist. Sour cream keeps this white cake moist, while beating the egg whites and then gently folding them into the batter keeps the texture light and delicate. This recipe is so versatile - you can use the standard Vanilla extract, or vary the flavor by using other extracts like Almond or Anise (see notes below). This white cake would work well as the base for a Lady Baltimore Cake.

3 1/2 Cups Sifted Cake Flour
4 teaspoons Baking Powder
1 teaspoon Salt
2 Cups Sugar
1 Cup Unsalted Butter (at room temperature)
1/2 Cup Milk
1/2 Cup Sour Cream
2 teaspoons Vanilla extract*
7 Egg Whites

Preheat oven to 350 degrees. Line two 9" round pans with parchment paper, or use paper cupcake liners to make cupcakes. (This recipe makes 34-36 cupcakes)

Put all dry ingredients (Flour, Baking Powder, Salt and Sugar) together in the bowl of an electric mixer. Turn the mixer on low and mix the dry ingredients until they are well blended (If using a KitchenAid mixer, use the paddle attachment).

Add the butter into the flour mixture in small chunks, along with the milk. (It is very important that your butter is soft at room temperature or it will not get incorporated with the flour properly). Mix on low until moistened and then turn the mixer up to medium. Beat for 60 seconds to aerate.

Add the sour cream and vanilla into the batter, mixing for only about 20 seconds to blend it in.

In a separate bowl, beat the egg whites until they form stiff peaks (Don't beat them until they are dry, though - you want the egg whites to be thick and stiff but still moist and glossy-looking).

Gently fold the egg whites into the batter, using large slow strokes by hand. You will see streaks of egg white in the batter, that's okay, you don't want to overmix it.

Pour into pans and smooth the batter with the spoon to spread it evenly in the pan. OR if making cupcakes, use a standard ice-cream scoop to measure and dispense the batter into the cups. I find that one level scoop is the right size for a perfect cupcake, each cup no more than half full.

Bake 18-20 minutes for cupcakes
25-30 minutes for three small layers (6" or 8")
30-35 minutes for two medium layers (9" or 10")
40-45 minutes for one large layer (12")
***Bake just until the cakes spring back to the touch or until a toothpick inserted comes out clean. This cake will not brown a lot, only slightly at the edges. So don't wait for it to brown or it may be overdone.

*If using other flavored extracts, follow this chart:
Almond extract = 1 teaspoon
Anise Extract = 1/2 teaspoon
Rum Extract = 1 teaspoon
Lemon or Orange Extract = 1 teaspoon (also add 1 Tablespoon zest if possible)


Monday, January 28, 2013

Beignets


Beignets are a New Orleans staple, and they are divine in their simplicity. Beignets are a kind of French donut - slightly sweetened fried dough that is usually served with a generous dusting of powdered sugar or a fresh fruit sauce. The most iconic beignets are from Cafe du Monde, the all-night outdoor cafe in Jackson Square. If you find yourself in New Orleans, you absolutely MUST make a trip there. All they serve is Cafe au Lait and Beignets, but they are always hot and fresh.

Since Cafe du Monde doesn't share their famous beignet recipe (though you can buy it in a box mix if you'd like) I found a delicious and easy recipe from another iconic New Orleans establishment, Commander's Palace Restaurant. This recipe is adapted from their Commander's Kitchen cookbook.

3 Cups All-purpose Flour
2 Tablespoons Baking Powder
1 teaspoon Kosher Salt
1/2 Cup Granulated Sugar
1 Cup Water
1 Cup Milk
1 Egg, beaten

2 1/2 quarts vegetable oil (or other frying oil - Canola, Safflower, etc.)
Powdered Sugar for dusting

Pour the vegetable oil into a large pot and heat over medium high heat to a temperature of 325 degrees. This will take a while to reach the right temperature, so start it heating while you prepare the batter:

In a bowl, combine the flour, baking powder, salt and sugar and mix well. In a separate bowl, mix the water, milk and egg. Add the wet ingredients to the dry, stirring until well-mixed.

Check your oil temperature - if it has reached 325 degrees, turn it down low while you do the last step to get the beignets ready to fry.

Turn the batter out onto a well-floured board. With a rolling pin, roll the dough to about 1/2" thick. Cut into squares (about 2") or rectangles. Don't worry if they aren't perfectly shaped -they will fry up nicely anyway. You can fry up the little scraps leftover too.

When the oil has reached 325 degrees, drop the beignets into the oil carefully, just a few at a time so you don't crowd the pot. Give them about 2-3 minutes and then gently turn them onto their other side. (It is best to use a long-handled slotted spoon or a mesh skimmer for this.) Give them another 2-3 minutes until they are golden brown on each side. Lift them out of the oil and place on a rack lined with paper towels. Dust each batch with powdered sugar while they are hot, before moving on to other batches.

Between each batch of beignets, check and adjust your oil to make sure you are maintaining 325 degrees.

Serve warm and enjoy!


Friday, January 25, 2013

Variations on Cornbread


Cornbread is generally thought of as a Southern thing. So, being that I grew up out West and now live in New England, I am not going to claim to be an expert on "Traditional Southern-Style" cornbread. But I will provide links to some great Southern Cornbread recipes from other bloggers, as well as my own recipe here.

Cornbread is one of those things that is SO easy to make from scratch, the trick is finding a recipe you like. I searched and searched, making recipes from the back of the cornmeal bag, recipes from various cookbooks, and recipes from the Lodge Cast Iron website (a site a recommend if you love cooking with Cast Iron as I do.) In the end I made up my own recipe, which was kind of a hodge-podge of a bunch of others I had tried.

I adore cornbread and to me there is not just ONE way to make it. I love to taste all the different variations people make. For me it is like a good chili (which of course goes great with cornbread) - Chili is one of those foods where there are SO many different ones, you cannot pin down just one and say this is the only way to make good chili. Cornbread is the same way - it has so many great variations.

I only have one "rule" that I always follow regarding cornbread: Bake your cornbread in CAST IRON. As I gathered recipes from other cooks for this post, I was happy to see that many of them agreed with this rule. For my small family, I use a little mini-skillet (see pic below), and I like that the pieces come out thick.

 
Another tip is to preheat your cast iron skillet in the oven until it gets hot. Then add a little oil, crisco, or (if you want to be really flavorful) bacon grease and let it melt before adding your batter. DO NOT ever use non-stick cooking spray in cast iron. Non-stick cooking spray leaves a residue which can only be washed off with soap, and that is a no-no for your cast iron pans.
 
Here are some great cornbread recipes from my
fellow food bloggers:
 
Jackie at Syrup and Biscuits shares a wealth of Cornbread
history with her recipe for Southern Buttermilk Cornbread
 
 Mary at Deep South Dish has a great recipe for Buttermilk Sour Cream Cornbread
 
Suzanne Renee Covey shared her recipe for Johnny Cake:
In a bowl, 2 T soft butter, 1/2 t salt, 4 T sugar, 1 egg (slightly beaten), 1 t baking soda.
Mix well. Add 1 cup buttermilk, mix. Add 1 cup flour and 3/4 cup cornmeal. Mix well and bake in round pan for 20 mins (or until golden brown) at 400 degrees.
 
My own easy recipe is as follows:
1/2 cup Yellow Cornmeal
3/4 Cup All-purpose Flour
1/2 teaspoon baking soda
1 Tablespoon honey or real maple syrup
Optional: 2 Tablespoons Sugar
1 teaspoon salt
1 beaten egg
1/4 Cup creamed corn
1/2 Cup Buttermilk
 
Preheat oven to 425 degrees with the cast-iron skillet inside. You can use a small 6" skillet for four thick servings, or a larger skillet (8" or 10") for thinner servings. When the oven is preheated and the pan is very hot, pull it out and drop in 1 Tablespoon of Oil, Crisco, or Bacon Grease until melted. Mix all ingredients together in a bowl and stir well with a wooden spoon.

Pour batter into the skillet and put it back in the oven. Depending on how thick your cornbread is (which pan size you use) it will take 20-25 minutes until it is set and turning golden. Test it with a toothpick in the center. Serve while warm with honey and butter.


Thursday, January 17, 2013

Apple Butter Spice Cake


If you love spice cakes like I do, this will be one of your favorites. I used some homemade Apple Butter that was given to me as a gift, but you could use applesauce if you don't have apple butter available. This cake has assertive flavors of cinnamon and clove while not being too sweet. It makes a nice brunch item, or serve it with afternoon tea.

2 cups all-purpose flour
3/4 Cup Sugar
1 teaspoon salt
1 teaspoon baking powder
3/4 teaspoon baking soda
1 teaspoon cinnamon
3/4 teaspoon ground cloves
pinch of nutmeg
1/2 Cup (1 Stick) Butter, room temperature
1 Cup Apple Butter or Apple Sauce
1/2 Cup Buttermilk
3 Eggs

Preheat oven to 350 degrees. Grease and flour a standard bundt pan.

(I use the "reverse creaming" method for this, which means I mix the butter into the dry ingredients):
Put all dry ingredients (flour, sugar, salt, baking powder, baking soda and spices) together in the bowl of an electric mixer. On low, mix until dry ingredients are blended. Add the butter and half of the apple butter. On the lowest speed, mix just until the flour is moistened. Turn the mixer up to medium-low speed (#3 if using a KitchenAid mixer) and beat for 1 minute to aerate the batter. Add the remaining apple butter, stirring it in just until combined.

In a separate bowl, beat the eggs lightly with the buttermilk. Add the egg mixture into the batter gradually, beating just for about ten seconds after each addition. Scrape down the bowl and give it one last stir by hand.

Pour into the bundt pan and bake for 35-40 minutes, until you can insert a toothpick in the center and it comes out clean.

Cool a bit before unmolding, then sprinkle with powdered sugar.


Monday, January 14, 2013

Winter Breads


Breads can be made in any season of course, but in the Winter homemade bread is even better. For one thing, winter foods like soups and casseroles are just begging to be served with some really good bread. And in the wintertime, you don't mind having your oven on for hours at a time.

Making your own bread is easier than most people think. It does take time, but if you plan ahead it is pretty simple to do. And the more you do it, the easier it gets and the better your breads will be.

This week I am revisiting bread recipes I have made over the past year:

Easy French Bread is one of the easiest yeast breads I have found. This recipe is so versatile that you can do just about anything to it - make it savory with some herbs or grated cheese, make it sweet by adding sugar and spices, or just do a traditional crusty loaf.

Sourdough Bread takes a lot of planning ahead (you must make a starter first). But mastering Sourdough is a feat that all bread makers set out to accomplish, and being a native Californian, it is my personal favorite type of bread.

Potato Yeast Rolls are the perfect roll for any dinner menu - so soft and moist that you might just forget about any other kind of roll or biscuit.

Chocolate Beer Bread has a very unusual flavor - you taste the cocoa, but it is only mildly sweet. I like it as an appetizer bread, almost like a pumpernickle.

Savory Beer Bread is a rustic bread that goes well with hearty stews and chowders.

Cinnamon French Bread is a variation on Easy French Bread, and it makes a great breakfast bread.

Wednesday, January 9, 2013

Cinnamon French Bread

 
This Cinnamon French Bread is SO easy to make! It is the same as my Easy French Bread with a couple of minor additions. This recipe is a great one for beginning bread-makers. It makes two slender loaves or one very big loaf.
 
3 1/2 Cups Flour (you can use all-purpose or bread flour) plus extra for kneading
2 teaspoons INSTANT yeast
1 teaspoon salt
2 Tablespoons Sugar
1/4 tsp each of cloves and freshly ground nutmeg
1 Tablespoon melted butter
1 1/4 Cups Warm water

Cinnamon Swirl Filling:
3/4 Cup Sugar
1 1/2 to 2 teaspoons cinnamon (to taste)
2 Tablespoons butter, melted

Egg Wash (for crisp golden brown crust):
1 egg white
1 Tablespoon water

Put the flour into a large mixing bowl and stir in the yeast. Add the salt and stir well. Mix in the melted butter and the warm water, stirring with a wooden spoon until most of the flour has been mixed in. Put the dough on a floured breadboard and knead for about five minutes, working in more flour as needed until the dough feels smooth and not sticky to the touch.

Put the dough ball into a greased bowl and cover loosely with plastic wrap or a clean kitchen towel. Place the bowl in a warm place free from drafts and let it sit until the dough has doubled, about one hour. (I put my dough in the oven with the oven off - this is a great draft-free place. On a very cold day I might turn the oven on "warm" for just a couple of minutes and then turn it off again before placing the dough inside).

Punch dough down and divide in half (or leave it in one piece if you want one larger loaf). With your fingers, press each half into a rectangular shape.

 
Brush with melted butter and then sprinkle the cinnamon sugar mixture.


Starting on one of the long sides, roll the dough tightly into a long log. You can taper the ends or push them in to round them.


Repeat with second loaf. Place loaves in the wells of a french bread pan, or lay them on a large greased cookie sheet.


Cover with a clean kitchen towel. Place the loaves in a draft-free area and allow them the rise again until doubled (about one hour).

Preheat oven to 450 degrees.

When the loaves have risen, make diagonal slits on the top of each loaf with a sharp knife. Bake about 20 minutes, or until almost done. While the bread is baking, get your egg wash ready:

Beat together the egg white and water. When the initial 20 minute baking time is up, pull loaves out and brush the mixture over each loaf. Return the bread to the oven for another five or six minutes. The loaves should be golden brown and feel hard on the outside. Press on them gently to make sure they don't feel squishy inside. When you tap on them they should give a hollow "thump" sound.


Easy French Bread


Yeast breads don't have to be intimidating, this French bread is SO easy to make! This is a great recipe to use if you have never made bread from scratch before. I always like to use INSTANT yeast because it is easier to use than "active dry yeast" - instant yeast is mixed directly into the flour instead of blooming it in liquid first.

You can add your own herbs and spices to this bread to change the flavor. This recipe makes one large loaf or two smallish loaves.

3 1/2 Cups Flour (you can use all-purpose or bread flour) plus extra for kneading
2 teaspoons INSTANT yeast
2 teaspoons salt
1 Tablespoon melted butter
1 1/4 Cups Warm water

Egg Wash (for crisp golden brown crust):
1 egg white
1 Tablespoon water

Put the flour into a large mixing bowl and stir in the yeast. Add the salt and stir well. Mix in the melted butter and the warm water, stirring with a wooden spoon until most of the flour has been mixed in. Put the dough on a floured breadboard and knead for about five minutes, working in more flour as needed until the dough feels smooth and not sticky to the touch.

Put the dough ball into a greased bowl and cover loosely with plastic wrap or a clean kitchen towel. Place the bowl in a warm place free from drafts and let it sit until the dough has doubled, about one hour. (I put my dough in the oven with the oven off - this is a great draft-free place. On a very cold day I might turn the oven on "warm" for just a couple of minutes and then turn it off again before placing the dough inside).

Punch dough down and divide in half (or leave it in one piece if you want one larger loaf). With your fingers, press each half into a rectangular shape. Starting on one of the long sides, roll the dough tightly into a long log. You can taper the ends or push them in to round them. Repeat with second loaf. Place loaves in the wells of a french bread pan, or lay them on a large greased cookie sheet. Cover with a clean kitchen towel. Place the loaves in a draft-free area and allow them the rise again until doubled (about one hour).

Preheat oven to 450 degrees.

When the loaves have risen, make diagonal slits on the top of each loaf with a sharp knife. Bake about 20 minutes, or until almost done. While the bread is baking, get your egg wash ready:

Beat together the egg white and water. When the initial 20 minute baking time is up, pull loaves out and brush the mixture over each loaf. Return the bread to the oven for another five or six minutes. The loaves should be golden brown and feel hard on the outside. Press on them gently to make sure they don't feel squishy inside. When you tap on them they should give a hollow "thump" sound.


Monday, December 31, 2012

New Year's Day Brunch

Everyone is getting ready for big New Year's Eve parties, but I prefer to stay low key tonight and celebrate tomorrow with a New Year's Day brunch! Brunch is my favorite meal and a great one to host. You can make it as easy or as complicated as you'd like. I prefer to try to do as much as possible ahead of time, serving coffee cakes, muffins and other baked items I can make the night before. Here are a few tips and recipe ideas for your own brunch celebration:


Tip #1: Bake items the night before. Choose items that can be made ahead so you can enjoy your guests. Muffins and Coffee Cakes are a great choice.

Tip #2: Consider Pot-luck: You can ask other guests to bring things so you aren't spending too much time in the kitchen. Again, the idea is to be able to enjoy your guests. If you want to do the baking, you can ask guests to bring an egg, meat or vegetable dish. Or just ask them to bring some fresh fruit, which is always a great part of any brunch.

Tip #3: Even if you are making everything yourself, choose dishes that can be made ahead of time and kept warm in the oven. Things like egg casseroles, french toast, or hash browns are good options. Cover with tin foil and put in the oven at 250. Or you could make MOST of the meal ahead of time and have just ONE item that needs to be made on the spot - pancakes, eggs to order, etc.

Tip #4: Have several drink options - Coffee, Tea, (and Decaf coffee or tea) as well as a variety of juices. Some brunch cocktails can be great too - Mimosas and Bloody Marys can be made by the pitcher quickly and easily just before serving the food. Sure, it's nice to make individual drinks, but we're trying to keep it EASY here! :)

Here are some Menu Ideas. Just click on the link for the recipe:


Go British with fancy teas and freshly made Scones:


Great Coffee Cakes you can make ahead:
 
 
I also make a cranberry almond coffee cake by adding
one cup chopped fresh cranberries to this recipe.


Muffins can also be made ahead and are a healthier option:


(okay, so these ones are not as healthy as the
ones above, but they are my favorite!)
 
 
Or do traditional breakfast fare with these Homemade Pancakes:


You can even "carmelize" some apples to put on top - just peel and slice 2-3 large apples, put them in a sautee pan, add 1 Tbsp butter plus 1 Tbsp brown sugar, and cinnamon (or other spices to taste) cook on medium heat until the apples have softened and the sauce is syrupy like caramel.

Wednesday, December 12, 2012

Christmas Ornament Cupcakes

 
These Ornament Cupcakes are festive and not very difficult to make. They do take a bit of time, but I think they are worth it. Here is what you do:
 
1) Bake your favorite cupcakes in sturdy paper or foil cups and let them cool.
 
2) Make (or buy) fondant, and color it in whichever shades you like (it is good to do different 3-4 colors. You only need a little of each color).
 
3) Roll out the fondant and cut it into circles with a large round cookie cutter.
 
4) Place the fondant circles into the holes of a mini half-ball pan and press gently, working the fondant into the domes to make it fit. (You can purchase a mini half-ball pan at most cake decorating stores or craft stores. If you do not know what a half-ball pan is, here is a link: Wilton Mini-Ball Pan
 
5) Let the fondant sit overnight to set.
 
6) Frost the cupcakes with any stiff buttercream. Soft or gooey frosting won't work here.
 
7) Put the fondant domes over the tops of the cupcakes, pressing down gently.
 
8) Brush the domes with lustre dust (shimmery edible dust available at Cake Decorating stores).
 
9) If desired, make a half batch of Royal Icing and pipe designs on your ornaments.
 
10) Make some hook and loop attachments out of fondant and attach them with royal icing (you can color it gray or just form them out of white fondant and then paint them with silver lustre dust afterward).


This post is featured on Wicked Good Wednesdays at 365 Days of Baking. See more here:

Monday, December 3, 2012

Spicy Gingersnaps


If you like your gingerbread spicy and crisp, these will be your favorite. These gingersnaps have a BOLD spicy ginger flavor, which is how a gingersnap should be. If you like a softer cookie instead, try my Soft Gingerbread Cookies which are the same cookies with some minor tweaks to keep them soft instead of crisp.


1 1/2 Cups Shortening
2 Cups Sugar
1/2 Cup Molasses (dark or light - it's up to you)
2 eggs
4 Cups Flour
1 tsp salt
4 tsp baking soda
1 tsp cloves
1 tsp ginger
2 tsp cinnamon

Melt shortening in a medium saucepan on low heat. Cool a little. Add Sugar, Molasses, and Eggs (it is important to let the molasses cool a little so it doesn't curdle the eggs). Beat good. Have all dry ingredients mixed together in a separate bowl, then mix into the wet ingredients and stir until well blended (you can transfer it into a kitchenaid mixer to do this part if you'd like). Chill the dough for at least 2 hours, preferably overnight.
 
Preheat oven to 350 degrees.

On a generously floured board, roll the dough thin and cut into simple shapes like circles (no intricate shapes because they spread). Do not be afraid to flour the board generously, this dough can handle it since it was originally meant to be a chewy cookie. When they are rolled out, you can sprinkle them sith sanding sugar if you'd like, pressing it in gently to help it adhere. Bake at 375 degrees for 7-10 minutes until the center looks set and the edges are getting browner than the rest of the cookie. Cool completely before stacking or packaging.

Wednesday, November 21, 2012

Cranberry Mini-Pies

 
These cute little pies and tarts are easy to make and they are also a great use for leftover cranberry sauce (the chunky kind, not the jellied cranberry sauce). Below is my own super-easy recipe that works as both a sauce and a filling. If you want to use your own leftover cranberry sauce, you can just add some thickener. How much thickener to add? Depending on how much liquid your sauce has, a good place to start would be 1 teaspoon cornstarch for two cups of cranberry sauce. If you like your pies sweeter than you like your cranberry sauce, you can always add a little extra sugar too.

Cranberry Sauce / Pie Filling:

1 12-ounce bag raw cranberries, picked over to remove stems and bad berries
1 Tablespoon grated orange zest
2/3 Cup firmly packed brown sugar
1/2 Cup Pure Maple Syrup
pinch of ground clove (about 1/8 tsp)
optional: 1/4 teaspoon each freshly ground nutmeg and ground cinnamon

Simmer over low heat until the mixture makes a thick sauce and berries are mostly broken. Cool to room temperature. At this point you can use it as a delicious cranberry sauce. If you want to thicken it for pie filling, add 1 teaspoon cornstarch and stir well. The filling will thicken while baking. Use with your favorite sweet butter crust, or try this great recipe from Martha Stewart: Pate Sucree Extra. (You can use however much you need based on how much cranberry sauce you have and freeze the leftover dough).

Roll out the crust and fill mini-pie pans, tart shells, or muffin cups with the dough. Spoon in the cranberry sauce mixture and cover with a top crust or a streusel topping. (I like to sprinkle sugar on top if I am using a top crust.)

Bake at 400 degrees for about 20 minutes for mini-pies and tarts, or 40 minutes for a full-sized pie. The crust should be turning golden and the filling should be bubbling up a little bit.

Enjoy!

Tuesday, November 20, 2012

Baking with Cranberries


Living in Massachusetts, home of Ocean Spray, we are big on cranberries around here. I love to see the bogs at harvest time. And no Thanksgiving table would be complete without cranberry sauce. But cranberries can be used for so much more than sauce at Thanksgiving dinner. Cranberry breads, muffins, pies, bars and cookies are great too.

Cranberries are very acidic and too bitter to eat raw. But their tartness is wonderful when it is mellowed with sugar. For breads and muffins, I put them into the batter raw, and they soften while baking. The sweet bread surrounding the tart berries is a great flavor combination. For cookies, I like to use dried cranberries paired with white or dark chocolate chips (an oatmeal base is great for this). For pies and bars, I cook the cranberries in a saucepan with sugar, spices and a bit of pure maple syrup (see recipe below). This makes a great easy cranberry sauce, which becomes a great filling with just a little added thickener. You can also swirl this mixture into a coffee cake.

Cranberry Sauce / Pie Filling:

1 12-ounce bag raw cranberries, picked over to remove stems and bad berries
1 Tablespoon grated orange zest
2/3 Cup firmly packed brown sugar
1/2 Cup Pure Maple Syrup
pinch of ground clove (about 1/8 tsp)

Simmer over low heat until the mixture makes a thick sauce and berries are mostly broken. Cool to room temperature. At this point you can use it as a delicious cranberry sauce. If you want to thicken it for pie filling or cranberry bars, add 1 teaspoon cornstarch and stir well. The filling will thicken while baking. Use with your favorite sweet butter crust, or try this great recipe from Martha Stewart: Pate Sucree Extra. Bake at 400 degrees for 40 minutes for a full-sized pie or 20 minutes for mini-pies and tarts.