Pages

Tuesday, May 28, 2013

Sour Cream Frosting

 
Sour Cream Frosting is a great alternative to Cream Cheese Frosting for anyone who wants something a little tangy but does not care for cream cheese. Sour Cream Frosting is similar but a little more versatile than Cream Cheese frosting - it works well with pretty much any cake and can be flavored any way you like by adding extracts. One flavor combination that is strangely popular with my family and customers is Sour Cream Frosting with just a touch of Rum extract (about 1/2 teaspoon).


Sour Cream Frosting:
1/2 Cup (1 stick) butter at room temperature
4 Cups confectioner's sugar
1/4 Cup Sour Cream
1/2 - 1 teaspoon vanilla or other flavoring
dash of salt
 
 
Place ingredients into the bowl of an electric mixer. With the paddle attachment, mix on low speed until moistened, then turn up to med-high and beat for about 5 minutes, until fluffy. Cover with plastic wrap if not frosting the cake right away. This recipe will frost and fill one small layer cake or one dozen cupcakes.


Wednesday, May 22, 2013

Buttermilk Cake with Strawberry Whipped Cream


This is the Norman Rockwell of cakes - the homey, All-American taste makes you nostalgic for picnics and summertime. Buttermilk cake is deliciously paired with fresh whipped cream and strawberry jam, reminding us that sometimes the best desserts are the simplest. Make the cake the same day so it can be as fresh as possible. Use any good quality Strawberry Jam for the filling and the whipped cream (I prefer a seedless one that does not have large chunks when I use it for fillings).

Buttermilk Cake:

2 cups sifted Cake Flour
1 Cup Sugar
1 Tablespoon Baking Powder
1 teaspoon salt
1/2 Cup (1 stick) softened butter
4 egg yolks
2/3 Cup Buttermilk
1 teaspoon Vanilla extract

Preheat oven to 350 degrees. Grease or line with parchment one 9" pan or two 6" round pans. (To get the four layers shown here, I used two 6" pans and then cut the cakes in half horizontally).

Combine the flour, Sugar, Baking Powder and Salt in a large mixing bowl (or the bowl of your KitchenAid mixer). Mix together by hand or on low speed with the mixer until ingredients are thoroughly combined, about one minute. Add the softened butter into the flour mixture in small chunks and add in half of the buttermilk. With an electric mixer, beat on low until combined. Turn up to medium and beat for one minute to aerate the batter.

Mix together the rest of the buttermilk with the egg yolks and vanilla. Beat lightly. Add the liquid mixture to the batter in three batches, beating on low after each addition just until combined. Scrape down the bowl.

Pour batter into the pans and bake 30-40 minutes for the one 9" cake or 25-30 minutes for the two 6" layers. Let cool completely before frosting.

Strawberry Whipped Cream:
1 pint heavy cream
1/4 cup confectioner's sugar
1 Tablespoon Strawberry Jam

Chill your mixing bowl and wire whisk in the freezer for about 20 minutes. Have the cream and the jam very cold as well.

Place the cream into the mixing bowl and whip vigorously with the wire whisk until soft peaks form. Add the sugar and jam and continue to beat until you can form stiff peaks.

NOTE: If you are not serving the cake within ah hour of frosting it, you can add a "stabilizer" to the whipped cream so it will not separate. Commercial stabilizers are available such as Whip It from Dr. Oetker which is available at most cake decorating stores or online. OR you can make your own stabilizer with gelatin. Dissolve 1 teaspoon unflavored gelatin over 4 teaspoons water, and let sit five minutes. Then microwave on high until the gelatin is dissolved (Cooking only 15 seconds at a time and stirring. Repeat until dissolved). Let sit until it cools to room temperature but it is still liquid. Add into the whipped cream when you add the sugar.

When cooled, cut the cake horizontally into layers. Fill the cake layers with strawberry jam and frost with the Strawberry Whipped Cream.

Enjoy!


Monday, May 20, 2013

Milk Chocolate Cream Pie

 
Who can resist homemade chocolate cream pie? Don't ever use a pudding mix for cream pies - making your own filling lets you use good quality chocolate for a rich, divine chocolate pie. And if you like it dark, this same recipe makes a decadent dark chocolate cream pie, just substitute dark chocolate for milk.
 

1 recipe Graham Cracker Crust using, chocolate graham crackers or chocolate cookie crumbs.

Filling:
1 cup sugar (or you can start with 3/4 cup and add more as you go - this pie is very sweet)
1/2 cup all-purpose flour
1 Tablespoon cocoa powder
1/2 tsp salt
1 2/3 Cups milk
3 egg yolks
2 oz. chopped milk chocolate (use good quality chocolate here)
2 teaspoons vanilla extract

In the top of a double boiler combine the sugar, flour, cocoa, salt, and milk. Stir the mixture in the bowl while the water boils beneath it, cooking for about 10-12 minutes until the mixture thickens (stir it frequently). Thickening time depends on how cold your milk is to start with. It can take anywhere from 9-14 minutes to get it nice and thick like a pudding. Once it has thickened, remove it from the heat.

In a separate bowl, beat the egg yolks. Take a small amount of the hot milk/flour mixture (about a tablespoon) and stir it into the eggs. Add another spoonful and stir it in (you are "tempering" the eggs so they don't cook and curdle). Now pour the egg mixture into the rest of the hot milk mix. Return it to the double boiler and cook until thickened some more (about 3 more minutes) stirring constantly. Take it off the heat.

Stir in the chocolate and the vanilla extract to the filling mixture. Now let it cool a bit. (You can stick the filling in the fridge or freezer to help it chill faster, just remember to take it out and stir it occasionally). When the filling has cooled pour it into the pie shell. Then return it to the fridge to for another hour to make sure it is well-chilled before topping it with whipped cream (you can add the whipped cream ahead of time or just before serving) Keep it in the fridge when not serving.

Fresh Whipped Cream Topping:
1 pint heavy cream
1/4 - 1/2 cup confectioner's sugar, depending on how sweet you want it

Make sure the cream is well-chilled, (I even chill the mixing bowl and beaters when I make whipped cream). Beat the cream on with a wire whisk (or electric mixer with the whisk attachment on high) until it is thicker and can form soft peaks. Add in the sugar and continue to beat until very thick and can form stiff peaks. Spread it over the chilled pie and garnish with shaved or curled chocolate. (To make chocolate curls, warm the chocolate bar slightly in the microwave for about 5 -10 seconds, then scrape a vegetable peeler along the edges. If it doesn't curl, it may not be warm enough, put it back in the microwave for 5 seconds, but be careful not to melt it.)

Keep the pie back in the fridge until serving.

Cut this with a very sharp knife dipped in hot water. Clean the knife with a towel between slices to keep it neat.

Saturday, May 11, 2013

Happy Mother's Day!

Instead of a recipe, today I'd like to share this moving essay I read in "The Little Big Book for Moms." As a mom of two who was pretty terrified of motherhood at first, this essay really speaks to me.  Happy Mother's Day!

"Mortal Terrors and Motherhood" By Amy Herrick

Often I wonder, if it had been given to me to know beforehand what I now know about motherhood--the swift and merciless loss of innocence, how you are transformed from being someone's child to being someone's parent, handed summarily a love so incandescent and irrevocable that you have to stay awake twenty-four hours a day to protect if from all the dark dangers our of left field--if I had known all this beforehand, would I have agreed to have a child?

My little one sits in his bath splashing around contentedly. I am not prepared, my breath is taken away, when suddenly he looks up and asks me point-blank if it's true we all must die.

The answer I give him, of course, is not good news. I wait for him to say something, to rise up angrily and punch me in the nose at this, the greatest betrayal. But he just looks away and busies himself with his rubber frog.

I'm washing his face when he says, "And then after you die, you get to be a baby again?"

"Well, I don't know. Some people think after you die, you get to come back and be another person or animal."

"Do you think that?"

"No. I think after you die, you go back to nature. You become part of the trees and the grass and the sky."

"When are we going to die?"

" I dont' know. I hope not for a long time. I dope I don't die until you're grown up and have your own family and children"

"What about me?"

"Oh, I don't think you're going to die till you're very old and have your own grandchildren."

"Maybe it won't happen."

"Maybe not."

I hold my breath and think about it. Who knows? Then I laugh and see how I've been duped, duped by the cunning and perfect beauty of nature's system, which used babies as a way of securing allegiance to life, of commanding us to go forward and grow better, even though we are burdened with the certainty that in the end we must all return to dust. It is no use to ask the question would we have had them if we had known? There is no going back. We are all driven headlong by a force that has only one thing on its mind, which is to make something of nothing, pattern out of chaos, babies out of the dust motes dancing in the void.

It is the most darling of paradoxes that as fast as the universe makes itself, it is falling apart.

One picks oneself a baby out of the pot and in an instant the world is transformed into a gigantic booby trap. You are forced to see, not only how heartrendingly fragile a child is, but also that your own childhood is over, that there is an inevitable time limit to all things. Yet, faced with this, do you throw your hands up in despair and sink down into lassitude and indifference?

Certainly not, because here before you is that which you jump into a burning building, or out of a speeding locomotive, for. Here before you, by a trick of light upon the bathwater, is the little stroke of genius--the face, the sign, the map-- to show you your next move, to lead you through the doors of your own mortal confines to where you will outlast yourself.

Honey Sourdough Bread


I love Sourdough Bread, and I wanted to find a way to use the delicious honey I had bought from a roadside stand. So I tinkered with my recipe for sourdough and came up with this.

It is not your typical crusty sourdough bread, which takes significantly more time to produce. But it is a nice way to use some of that starter that you have sitting in the fridge. This recipe gives you a slightly sweet bread with a touch of that springy-ness that sourdough is known for. It makes a good sandwich bread or toasting bread, and a decent french toast. Mix 1 stick of softened butter with two Tablespoons of honey to make a delicious honey butter to go with it.

2 Cups White Flour
2/3 Cup Wheat Flour
2 tsp Instant Yeast
1 Tablespoon salt
3/4 Cup Sourdough Starter
2 Tablespoons wildflower Honey (I like to use fresh, local honey)
1/2 Cup lukewarm water

In a large bowl, mix the flour, yeast, and salt together. Stir in the starter, water, and honey, and mix well. Knead with your hands for several minutes until the dough becomes smooth. Put it in a lightly greased large bowl and cover loosely. Allow to rise for about 1 1/2 hours or until doubled.

Punch down the dough and turn it out onto a floured bread board. Flatten it out into a rectangle. Starting at one end, roll the dough into itself, forming a log. Place in a loaf pan. Brush top with melted butter. Cover loosely and let rise until doubled in bulk again, about another hour to an hour and fifteen minutes.

Preheat your oven to 425 for at least 20 minutes before placing the bread in.

Bake 25-30 minutes until golden brown on top and firm to the touch. I take my bread out and give it a pat on the underside - it should sound hollow. Cool for a little bit before slicing. Serve with honey butter.


Friday, May 10, 2013

Cheesy Beer Bread


This is a really tasty savory bread that is not too heavy. You can choose to make the outside nice and crusty like a traditional French Bread or, by skipping one small step, leave the outside softer and less crusty. This recipe makes one good-sized loaf. You can double the recipe if you want two loaves.

3 - 3 1/2 Cups All-purpose flour (start with 3 C and only add more if needed)
2 teaspoons instant yeast
2 teaspoons salt
1 1/4 Cups good quality Beer at room temperature (I use Sam Adams Boston Lager)
1 Cup grated Cheddar Cheese
1 Tablespoon melted butter

Optional for crusty exterior:
1 egg white
1 Tablespoon water

Add the yeast and the salt to the flour and stir well. Add in the grated cheese and mix gently. Slowly add in the beer and melted butter, and stir well. (You can also do this step in a KitchenAid mixer with the dough hook attachment). Add more flour a little at a time as needed to make the dough workable - it should be very moist, but not so sticky that it won't come off your hands when you work with it). Turn the dough out onto a floured board and knead for a few minutes until smooth and soft.

Place the dough in a greased bowl and cover loosely with plastic wrap. Put it in a warm place free from drafts, and let rise until doubled in size, about 1 hour - 1 hour 15 minutes. I like to put it in my oven (unheated but with the light on and the door closed).


When it has doubled in size, punch down the dough. With a rolling pin, roll the dough into a rectangle (about 12" wide by 15" long). Starting on one of the long sides, tightly roll the dough into a long loaf. Pinch the ends a little to taper them. Place the loaf on a greased cookie sheet and cover loosely. Let rise again for another hour or until doubled in bulk.

During the last 25 minutes of rising time, preheat your oven to 450.

When the loaf has doubled, take a sharp knife and make four diagonal slits on top of it (gently - don't press down hard and deflate the loaf). Bake at 450 for 15 minutes. (Meanwhile, place the egg white in a small bowl and add 1 Tablespoon water, beating gently with a fork to combine.)

Take the loaf out when the 15 minutes has passed, and brush it with one egg white mixed with a little water. (Optional: Sprinkle with parmesan or a little more grated cheddar on top.) Put it back in the oven and bake another 5-8 minutes. (If you do not want the traditional crusty outside, you can skip this step and just leave it in the oven until done.) If it is browning too much and doesn't seem completely done yet, you can tent aluminum foil over the top.

Enjoy!

Baking with Beer

        
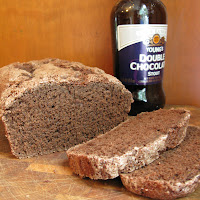
                              Beer Brownies                               Savory Beer Bread
 

Chocolate Beer Bread                         Guinness Cake

 
Cheesy Beer Bread
 
 
This week there is a beer festival going on in my area, The South Shore, Cape & Islands Beer Week. It got me thinking about a wonderful recipe I have for Guinness Cake. I know people use beer in baking quite often, so I decided to tinker in the kitchen a bit and see what else I could come up with. The resulting breads and sweets were delicious, and I learned quite a bit about baking with beer along the way.

When you are baking with beer (or any alcohol for that matter) the alcohol will evaporate during the cooking process. That means that if alcohol is added before the food is cooked, the food isn't going to get you tipsy (a good or bad thing, depending on how you look at it!) The flavor of the beer that stays in baked goods will be subtle, but noticeable. One important thing to remember: Any item you bake with alcohol in it will generally taste even better the next day, when the flavors have had a chance to meld together and mellow a bit. In some cases you can actually taste the beer more after the bread/cake sits overnight, but the flavors will blend more harmoniously. For that reason, when I am making any baked item with alcohol in it, I try to make it the night before I plan to serve it.

There are so many beers out there that it can make your head spin! I am not a very knowledgeable beer drinker, so I tend to stick to a few tried and true ones when I am baking. A good rule to remember is match the shade of your beer to your baked item - sounds simple, but it seriously works: Chocolate loves Stout, Rustic Hearth Breads like medium amber ales, and light, crusty breads like pale ales. Some beers I love to bake with are Guinness, Young's Chocolate Stout, Sam Adams Boston Lager, Sam Adams Summer Lager, and Bass. You generally want a beer with a good body to it, but no unusual quirky flavors that could overpower the baked item.

One last rule, and I say this with some humor: Ask yourself if the beer would be great to have in the keg at a Frat party. If the answer is yes, DON'T BAKE WITH IT!


Here are links to the recipes I developed using beer:
Guinness Cake
Savory Beer Bread
Chocolate Beer Bread
Beer Brownies
Cheesy Beer Bread


Happy Baking!

Tuesday, May 7, 2013

Pink Lemonade Cupcakes


Kids will go crazy over these Pink Lemonade Cupcakes (and adults will too!) They really remind you of Summertime. This is my regular Lemon Cake with a touch of pink coloring added, and topped with a lemon-flavored buttercream.
 
Cake:
3 cups Cake Flour
2 1/2 teaspoons Baking Powder
1 teaspoon salt
2/3 Cup unsalted butter, softened
1 3/4 Cups Sugar
2 whole Eggs + 1 yolk
1 1/2 teaspoons Pure Lemon Extract
1 Tablespoon Lemon zest
1 1/4 Cups Milk
1 drop professional soft pink coloring (I use Americolor brand)


Preheat oven to 350 degrees.
 
Place cupcake papers into the cupcake pan - you should get about 30 cupcakes from this recipe.
 
In a large bowl mix together the flour, baking powder, and salt until thoroughly blended. Set aside.

In an electric mixer bowl, combine the butter and sugar. Beat on medium speed until light and fluffy, about three minutes. Add eggs and yolk one at a time, beating for a few seconds after each addition. Add the extract and zest. Now add the flour and milk in alternating batches, starting and ending with the flour. Mix well after each addition. Scrape the bowl down and then beat on med-low for about one minute until fluffy (Do not overbeat).

Bake for 18-22 minutes, until a toothpick inserted in the center comes out clean. Cool before frosting.
 
Lemony Buttercream:
1 stick butter, softened
3 Cups Confectioner's Sugar
1 Tablespoon Milk
1 teaspoon Lemon Extract
1 teaspoon lemon zest
drop of pink coloring
 
Mix all ingredients in an electric mixer on low until combined, then turn up to medium-high and beat for two minutes. If not frosting right away, place plastic wrap on top of the frosting until you use it.
 
Optional garnish: Thinly sliced lemon triangles and pink sanding sugar

Monday, May 6, 2013

Re-purposing Cupcakes

When I made a batch of cupcakes recently, the batter bubbled over the tops, making an unattractive mess. I couldn't serve these cupcakes at the event they were planned for, but other than the tops, they were fine. I couldn't imagine just throwing them all away. Or maybe you have a batch that came out just a little overdone. If they are totally burnt, you've got to throw them out. But what can you do with a bunch of cupcakes that are fine except that you have to cut off the tops (or bottoms)? I decided to try a few things out and blog about it. Here is what I came up with:


Dolly's Birthday Cake:
Cut the top off the cupcake and cut it in half horizontally 
Spread jam or Nutella between the layers and on top
 Add sprinkles on top


 Fruit-and-Cake Parfait:
Cut the cupcakes into cubes (think crouton-sized)
Get a pretty glass to show the layers
Layer the Cake cubes with Fruit and Yogurt or whipped cream


Individual Strawberry Shortcakes:
Cut the tops off the cupcakes (you will use 2-3 Cupcakes for this). Cut up some fresh strawberries, place them in a bowl with a little sugar. Let this mixture sit for 20+ minutes, stirring and lightly "mashing" them occasionally. This will make a syrup. Make some fresh whipped cream (if making with kids, feel free to use the fun canned kind). Place one cupcake on a plate, top with strawberries and syrup, add some whipped cream, then repeat this process for 2-3 layers as desired. Serve immediately.