Pages

Wednesday, November 21, 2012

Cranberry Mini-Pies

 
These cute little pies and tarts are easy to make and they are also a great use for leftover cranberry sauce (the chunky kind, not the jellied cranberry sauce). Below is my own super-easy recipe that works as both a sauce and a filling. If you want to use your own leftover cranberry sauce, you can just add some thickener. How much thickener to add? Depending on how much liquid your sauce has, a good place to start would be 1 teaspoon cornstarch for two cups of cranberry sauce. If you like your pies sweeter than you like your cranberry sauce, you can always add a little extra sugar too.

Cranberry Sauce / Pie Filling:

1 12-ounce bag raw cranberries, picked over to remove stems and bad berries
1 Tablespoon grated orange zest
2/3 Cup firmly packed brown sugar
1/2 Cup Pure Maple Syrup
pinch of ground clove (about 1/8 tsp)
optional: 1/4 teaspoon each freshly ground nutmeg and ground cinnamon

Simmer over low heat until the mixture makes a thick sauce and berries are mostly broken. Cool to room temperature. At this point you can use it as a delicious cranberry sauce. If you want to thicken it for pie filling, add 1 teaspoon cornstarch and stir well. The filling will thicken while baking. Use with your favorite sweet butter crust, or try this great recipe from Martha Stewart: Pate Sucree Extra. (You can use however much you need based on how much cranberry sauce you have and freeze the leftover dough).

Roll out the crust and fill mini-pie pans, tart shells, or muffin cups with the dough. Spoon in the cranberry sauce mixture and cover with a top crust or a streusel topping. (I like to sprinkle sugar on top if I am using a top crust.)

Bake at 400 degrees for about 20 minutes for mini-pies and tarts, or 40 minutes for a full-sized pie. The crust should be turning golden and the filling should be bubbling up a little bit.

Enjoy!

Tuesday, November 20, 2012

Baking with Cranberries


Living in Massachusetts, home of Ocean Spray, we are big on cranberries around here. I love to see the bogs at harvest time. And no Thanksgiving table would be complete without cranberry sauce. But cranberries can be used for so much more than sauce at Thanksgiving dinner. Cranberry breads, muffins, pies, bars and cookies are great too.

Cranberries are very acidic and too bitter to eat raw. But their tartness is wonderful when it is mellowed with sugar. For breads and muffins, I put them into the batter raw, and they soften while baking. The sweet bread surrounding the tart berries is a great flavor combination. For cookies, I like to use dried cranberries paired with white or dark chocolate chips (an oatmeal base is great for this). For pies and bars, I cook the cranberries in a saucepan with sugar, spices and a bit of pure maple syrup (see recipe below). This makes a great easy cranberry sauce, which becomes a great filling with just a little added thickener. You can also swirl this mixture into a coffee cake.

Cranberry Sauce / Pie Filling:

1 12-ounce bag raw cranberries, picked over to remove stems and bad berries
1 Tablespoon grated orange zest
2/3 Cup firmly packed brown sugar
1/2 Cup Pure Maple Syrup
pinch of ground clove (about 1/8 tsp)

Simmer over low heat until the mixture makes a thick sauce and berries are mostly broken. Cool to room temperature. At this point you can use it as a delicious cranberry sauce. If you want to thicken it for pie filling or cranberry bars, add 1 teaspoon cornstarch and stir well. The filling will thicken while baking. Use with your favorite sweet butter crust, or try this great recipe from Martha Stewart: Pate Sucree Extra. Bake at 400 degrees for 40 minutes for a full-sized pie or 20 minutes for mini-pies and tarts.


Tuesday, November 13, 2012

Book Giveaway!

I was excited to have a picture of my Mile-High Lemon Meringue Pie featured on the back cover of the new book by Mimi Shotland Fix, The Faux Pastry Chef - How I found my Baking Fix.


This great book is a story of re-invention, perseverance, and overcoming obstacles. It's also an insider's look at the commercial preparation of food. I am currently reading my own copy and learning a lot about the inside world of professional high-volume baking. Now one reader can win their own autographed copy! Just see the Rafflecopter instructions below to enter:

The giveaway ends in one week and a random winner will be chosen by Rafflecopter. Good Luck!
a Rafflecopter giveaway

Sunday, November 11, 2012

Soft Gingerbread Cookies with Almond Glaze

These Gingerbread Cookies won "Best Tasting Gingerbread" at the 2012 Boston Christmas Festival. They are the same recipe as my Spicy Gingersnaps, with a couple of minor adjustments to keep them soft. These cookies were the result of an experiment that went deliciously wrong. If you want to read the silly story about that, see the bottom of this post.

***These cookies spread a little, so for Gingerbread People and other intricate cut-out shapes, I still use my standard Gingerbread Cookie recipe, Best Gingerbread Cut-outs.


1 1/2 Cups Shortening
2 Cups Sugar
1/2 Cup Molasses (dark or light - it's up to you)
2 eggs
4 Cups Flour
1 tsp salt
4 tsp baking soda
1 tsp cloves
1 tsp ginger
2 tsp cinnamon

Melt shortening in a medium saucepan on low heat. Cool a little. Add Sugar, Molasses, and Eggs (it is important to let the molasses cool a little so it doesn't curdle the eggs). Beat good. Have all dry ingredients mixed together in a separate bowl, then mix into the wet ingredients and stir until well blended (you can transfer it into a kitchenaid mixer to do this part if you'd like). Chill the dough for at least 2 hours, preferably overnight.

Preheat oven to 350 degrees

On a floured board, roll the dough thick and cut into simple shapes like circles. Bake at 350 degrees for 6-9 minutes, until the tops look set and the edges are just starting to turn a little browner than the rest of the cookie. Cool. Ice them with simple milk glaze or Almond Glaze. Let them dry completely before storing these cookies in an airtight container. Due to the moisture in the icing, they soften up while stored.

Almond Glaze: Stir together 1 Cup Powdered Sugar + 1-2 teaspoons of milk and 1-2 drops of Almond extract (the flavor is strong, so go easy). You can adjust the icing by adding more sugar or milk until you get a thick consistency for spreading or piping.

Funny Cookie Story:

I made a Gingerbread Lighthouse to be displayed at the 2012 Boston Christmas Festival. I was so busy working on my house that I forgot we had been asked to also bring some gingerbread cookies so that the judges could award a "Best Taste" prize. Late the night before the contest, I remembered about the cookies. Tired and not wanting to whip up some new Gingerbread dough, I remembered that I had recently made some Molasses Cookie dough and stuck it in my freezer. Molasses Cookies are almost identical to Gingerbread, having all the same ingredients just in different amounts. (Whereas Molasses cookies stay chewy, Gingerbread tend to be a little firmer so they roll out better). I said to myself, "What the heck?" and gave the Molasses Cookie dough a try. I rolled it like Gingerbread and crossed my fingers. I was surprised when they spread a lot, then turned crunchy when they cooled. I was ready to call the experiment a failure, until I tasted them. They were the best Gingersnaps I had ever tasted! After they cooled, I decorated then with a simple milk glaze flavored with a touch of almond extract. I submitted them and to my shock, ended up winning the taste category, beating out two locally famous sweet shops, including one that specializes in gingerbread.

I had submitted them as gingersnaps since they were crunchy when I packaged them, but when I tried some of my leftover cookies later, I noticed they had softened up in the airtight packaging. To this day I don't know if the judges' cookies stayed crunchy or softened up too! But now I have a recipe that can yield three very different results: Chewy Molasses Cookies, Crispy Gingersnaps, or Soft Gingerbread cookies.

Gingerbread Ideas

I have a love affair with Gingerbread that lasts all year long. Of course I make it at Christmas time (Cookies, Cake, and Houses) but Gingerbread doesn't have to be limited to the holidays. Here are some ideas for using Gingerbread all year 'round:
 
Gingerbread Teddy Bear Cookies
 
 
Gingerbread Skeletons for Halloween
 
 
Gingerbread Mustaches for the kids to have fun with (and eat!)
 
 
If you are planning to keep Gingerbread in the realm of Christmas, you can still get creative and try out different shapes. Don't just think Gingerbread People:
 
Gingerbread Reindeer!


Big Gingerbread People with candy decorations


And, of course, Gingerbread Houses
 
Love the taste of Gingerbread but don't want all the fuss? Try my Boston's Best Gingerbread Cookie recipe - it can be made crispy like a gingersnap or soft with a delicious almond glaze. And of course there is always Old-Fashioned Gingerbread, which is more of a cake. Click the link for that recipe.
 
Enjoy!


Friday, November 9, 2012

How to cook Pumpkin


Pumpkin is everywhere this time of year, and it is one of my favorite flavors! Pumpkin Pie, Pumpkin Bread, Pumpkin Cake, Pumpkin Bars or Pumpkin Muffins - They all start with cooked, mashed pumpkin. You may have wondered how to cook pumpkin, or if it is even worth it when grabbing a can of cooked pumpkin at the store is so easy. Here is a guide to cooking pumpkin and using the puree for baking. Incidentally, canned pumpkin is one of the few canned things that I think is fine to use in baking. It does save steps and, in my opinion, it won't lessen the quality of your dessert. Some people say that using freshly roasted pumpkin instead of canned pumpkin increases the flavor, but I find the results marginal. However, if you DO want to know how to cook pumpkin step-by-step, read on:

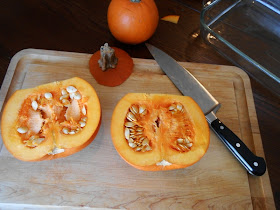
The first step is to choose the right pumpkins. Can't I just use my Jack 'O' Lantern from Halloween? Well, technically you CAN cook it, but the pumpkins used for carving are generally not the type you want to cook with. Those pumpkins have a higher amount of water and a lower sugar content than "cooking pumpkins" which are called Sugar Pumpkins. Sugar pumpkins are smaller and rounder than carving pumpkins, and frequently a deeper shade of orange (See photo above). If you have trouble spotting them, ask for them at your local farm stand or pumpkin patch. Sugar pumpkins are usually NOT found in grocery stores.


After you have the right kind of pumpkin, you need to wash it and cut it open. Cutting a pumpkin can be done with a sturdy sharp knife, or you may find it useful to use the "mini saw" tool available in pumpkin carving kits. Cut the stem off and cut the pumpkin in half:


Scoop the seeds out with a large spoon: (You can save the seeds if you want to make roasted pumpkin seeds: Wash them, sprinkle with a little salt and roast at 400 degrees until golden brown. Cool before eating.) 
 
 
Next, use a pumpkin scraper or similar kitchen tool to scrape the inside of the pumpkin, getting rid of the stringy threads.
 
 
Put the cleaned pumpkin halves in a roasting pan or pyrex casserole dish:
 
 
Preheat oven to 325 degrees. Bake the pumpkin for a minimum of one hour, or until you poke it with a fork and the interior is nice and soft. (One hour was the time I used for my small pumpkins, but you may need to adjust accordingly. Don't worry about overcooking - at this low temp the pumpkins will be fine as long as you check them every ten minutes or so around the one-hour mark.)
 
 
This is what my cooked pumpkin looked like (notice the many fork holes to check for doneness).
Cool the pumpkin until you can comfortably handle it, then scoop out the softened flesh:

 
Take the cooked pumpkin and puree it in a food processor or put it through a ricer like I did. (After using the ricer, I remembered why I used a food processor last time - the ricer works great but it is messy!) If you want it a little chunky, you could just mash it with a fork too. Either way, what you end up with should look something like this:
 
 
If it looks a little watery, you can put the mashed pumpkin in a fine-mesh strainer over a bowl and let it sit to drain for one hour up to overnight in the fridge. I never get much water out, so I just skip this step. But some people say it is useful.
 
Now you can use the pumpkin puree to make all sorts of dishes, savory and sweet!
 
Check out the recipe page to try my Pumpkin Pie, Spiced Pumpkin Squares, and Pumpkin Cake with Sage Whipped Cream.


How to brew a "Proper" cup of Tea

Tea drinkers can be even more fussy than coffee drinkers. To the English and the Irish, a good cup of tea is the cure for whatever ails you. I agree - I always feel better after sitting with a cup of tea. For this post, I consulted my great-aunt Ethel Mahoney, who is a 92-year-old Irish lady, and consequently is rather opinionated on the subject of a proper cup of tea.

1) Fill your kettle with COOL water and put it on the stove to boil

2) Bring the water to a FULL BOIL (don't just shut the kettle off when you see some steam starting, let it whistle)

3) While you wait for the kettle, put the tea into the pot (See notes below for amounts to use)

4) Pour boiling water over the tea (don't add water first and then put tea in). Let it steep for 3-5 minutes.

5) Serve tea with sugar and milk on the side. Milk is preferred by avid tea drinkers, not cream or half and half. Lemon can be served instead of milk - don't use both or the milk will curdle. Remember that milk will also curdle when added to citrus teas like Lemon Tea or Orange Zest Tea.

6) Serve tea with some kind of biscuits, cookies or crackers. Most tea drinkers want a little nosh item with their cup of tea.

Loose vs. Bags? There is some disagreement among tea drinkers about loose tea vs. tea bags, but I find that even the old die-hards are open to bags nowadays. Here is a general idea of how much tea to use, though personal taste will vary:

Loose = One heaping teaspoon of leaves for the pot, plus one spoon per cup (a pot to serve two people would be three heaping teaspoons of tea leaves).

Tea Bags = Usually 3-4 bags for a medium pot is good, or one bag per cup.

If you are unsure how much tea to use, brew a test pot before serving company, and see what tastes good to you.


Monday, November 5, 2012

Gingerbread Lighthouse

 
I made this Gingerbread Lighthouse for the 2012 Boston Christmas Festival. It is a replica of Nauset Light, a famous lighthouse on Cape Cod. Everything is edible on this gingerbread house. It was displayed during the christmas festival and then auctioned off for charity. This was the first year when I actually kept track of how much time and money I spent making a Gingerbread House, and I was pretty surprised by what went into a house this size. Although it is bigger than gingerbread houses I had done in the past, at 2 square feet, it was pretty small by competition standards. None the less, it took 50 hours and $69 to make! Gingerbread houses can get very intricate in detail, and the little details are what take a lot of time. Also, when you do gingerbread replicas of actual buildings, you tend to spend more time in the design phase getting the model accurate before you even make the house. As for what I spent, here is the breakdown:
 
 
2x2 ft plywood base = $5 at Lowe's
LED Lights for inside = $4 at craft store
Candy and Gum = $22
Ingredients to make three batches of Gingerbread dough = $10
4 boxes of rice cereal for the base (rocky shoreline) = $12
Ingredients to make lots of Royal Icing and Gum Paste =  $12
Isomalt for the Lighthouse glass = $4
 
 
Here are some pictures of the details:
 
 
The Rocky shoreline is a base of Rice Krispy treats covered with gum paste.
Below are pictures of how I built it:
 
 Creating a large base of Rice Krispy treats (4 boxes of cereal!)
 
 After the base was built, I packed down the rice krispy treats nice and tight, then levelled it off so the house would have a level foundation.
 
Here is a picture of the base half covered in gum paste rocks. I colored the gum paste different shades of gray and brown and alternated the colors, pressing bits of it onto the rice krispies in the shape of rocks. Then I went back later and hand-painted some shading in places.
 
For the lighthouse, I rolled gingerbread very thick (more than 1/4" thick) and baked it on an inverted french bread loaf pan:
 

You can see that it cracked, but the cracks were merely on the surface, so the structure of the gingerbread was not compromised. I then made a tapered cardboard tube (wider at the base and narrower at the top) out of thin bendable cardboard to provide inner structural support. I "glued" the gingerbread to the cardboard tube with royal icing. Since the gingerbread itself was not tapered, there were gaps on the sides which needed to be filled in with slender triangular pieces.  I baked a small sheet of gingerbread and then cut pieces especially for this purpose. After it dried, I coated the whole lighthouse with royal icing.


Gingerbread Lighthouse is made of gingerbread covered in Royal Icing imprinted with a brick pattern.

 
Above is a picture of the gingerbread lighthouse lit up


Below is a picture of the Christmas Tree in the window:


This is the display at the festival. My gingerbread won "best tasting" (we had to submit GB cookies in addition to our house because one part of the competition was taste.)