Pages

Tuesday, May 22, 2012

When Good Recipes Go Bad


I was all prepared to blog about homemade cinnamon rolls, using a recipe from one of my all-time favorite cookbooks, The Breakfast Book by Marion Cunningham. I had high expectations, but something went wrong: The rolls were not as puffy as they should have been, and they turned out dry and over-browned (not quite burnt, but very close). Since every recipe I have made from this book has been incredible, I can only imagine that it was something I did (or didn't do). When good recipes go bad, you can learn a lot from investigating what went wrong. Learning from your mistakes can make you a better baker, but only IF you can solve the mystery of what happened.

It started out fine - I made the dough the night before and let it rise slowly in the refrigerator overnight. The next morning, I rolled the dough out, brushed it with butter and sprinkled it with cinnamon sugar. So far, so good.


Then, I rolled the dough into a long log:


Then, I cut the dough into several sections:


Next, I put the pinwheel pieces into muffin tins. I covered them and allowed them to rise a second time (for about an hour):


Here is where things went wrong.

1) Looking back, I should have chosen a different pan. This muffin tin has a dark, non-stick coating. I usually shun these pans altogether since they cause things to brown too quickly. I never use them for cakes, but I wasn't thinking about how it would affect cinnamon rolls. Hey, it was early and I hadn't had my coffee yet, so I had a serious lapse in baking judgement.

2) If you must use a dark non-stick pan for ANY type of baking, lower your oven temp by 25 degrees. If all you have is one of these pans, don't worry, just lower your oven temp and watch them carefully. I forgot to set the oven for 325 instead of 350 - this small adjustment could have saved my poor rolls.

3) I would actually try not using a muffin pan at all next time. Although the recipe calls for baking them in individual muffin tins, I think I would prefer baking the rolls close together in a cake pan, so that they all bake together and stay soft on the outer edges.

4) Don't rush it - These rolls were not as puffy as they should have been because I rushed the second rising time. After an hour they didn't seem to have fully risen, but I baked them anyway because at this point it was late morning and everyone was starving. You just can't rush anything with yeast, it won't be light and soft.

5) I should have listened to my nose. I could smell the wonderful smell of "doneness" but told myself it was way too early for them to be done. The recipe said 20-25 minutes, and I had set my timer to check them at 19. But they started to smell done at 15, because I cooked them in a dark pan without lowering the temperature, they were done much more quickly. By the time I checked on them at 19 minutes, they were overbrowned and dry.

My family still ate them, and I learned a good lesson, so it wasn't a complete disaster. But it is SO disappointing to start a recipe the night before and baby it along, only to have it fail. The upside is that I used the leftover scraps to form a braided cinnamon bread, which turned out great!


Monday, May 21, 2012

Grandma Minnie's Carrot Cake


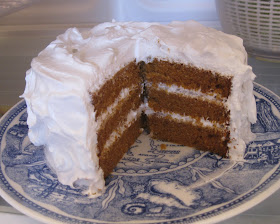
My mother found this recipe in my Great-Grandmother's box, typed on a 3x5 card with a couple of hand-written notes added later. It is dated 1967. This carrot cake is quite good, maybe the best I've ever had. That says a lot since I'm not a huge carrot cake fan! There are no nuts or raisins in this cake, although you can always throw some in if you like them.


3 Cups peeled and finely Grated Carrots (Grandma Minnie ground them with a hand-crank food grinder; I grate them mine with a microplane, you can use a food processor if you wish). Grate them and set aside to be added last.

2 1/3 Cups All-purpose flour
1 teaspoon salt
1 Tablespoon baking soda
2 tsp cinnamon
4 whole eggs, beaten well
1 Tablespoon Vanilla
2 Cups White Sugar
1 1/2 Cups Vegetable Oil

Preheat oven to 350 degrees and grease (or line with parchment) three 6" or two 9" pans (or three 8" pans will work fine, the layers will just be a little thinner).

Mix the dry ingredients together in a large bowl and set aside. In a separate bowl, mix together the eggs, vanilla, sugar and oil and stir well. Add the dry ingredients to the wet and stir until thoroughly blended. Stir in the carrots last and mix well.

Spoon the batter into the pans and bake for approximately 25 minutes.

I do not use the icing recipe that comes with this, I use a standard Cream Cheese Frosting or American Buttercream (or even seven-minute icing sometimes). But  the original recipe for the icing is so retro that I feel I just have to post it here! It is as follows:
8 oz. package of cream cheese, softened
1 Cube Butter or margarine (I assume she meant 1 stick)
1 Box (1 lb) Powdered sugar
1 Cup Coconut
1 Cup chopped nuts

Mix thoroughly and spread onto and between layers.


Wednesday, May 16, 2012

Easy French Bread


This tasty basic French Bread is surprisingly easy to make. Like any bread, "easy" does not mean FAST - you still have to let it rise twice. BUT you could be doing a million other things while it rises, so you really aren't spending much time on it. This is a really excellent white yeast bread, and you can choose to make the outside nice and crusty like a traditional French Bread or, by skipping one small step, leave the outside softer and less crusty. This recipe makes one good-sized loaf. You can double the recipe if you want two loaves.

3 - 3 1/2 Cups All-purpose flour (start with 3 C and only add more if needed)
2 teaspoons instant yeast
2 teaspoons salt
1 1/4 Cups water (You can also use beer if you'd like)
1 Tablespoon melted butter

Add the yeast and the salt to the flour and stir well. Slowly add in the water and melted butter, and stir well. (You can also do this step in a KitchenAid mixer with the dough hook attachment). Add more flour a little at a time as needed to make the dough workable - it should be very moist, but not so sticky that it won't come off your hands when you work with it). Turn the dough out onto a floured board and knead for a few minutes until smooth and soft.

Place the dough in a greased bowl and cover loosely with plastic wrap. Put it in a warm place free from drafts, and let rise until doubled in size, about 1 hour. I like to put it in my oven (unheated but with the light on and the door closed).

When it has doubled in size, punch down the dough.  With a rolling pin, roll the dough into a rectangle (about 12" wide by 15" long). Starting on one of the long sides, tightly roll the dough into a long loaf. Pinch the ends a little to taper them. Place the loaf on a greased cookie sheet and cover loosely. Let rise again for another hour or until doubled in bulk.

During the last 25 minutes of rising time, preheat your oven to 450.

When the loaf has doubled, take a sharp knife and make four diagonal slits on top of it (gently - don't press down hard and deflate the loaf). Bake at 450 for 15 minutes. Take the loaf out and brush it with egg white mixed with a little water. Put it back in the oven and bake another 5-8 minutes. (If you do not want the traditional crusty outside, you can skip this step and just leave it in the oven until done.) If it is browning too much and doesn't seem completely done yet, you can tent aluminum foil over the top. 

Enjoy!

Monday, May 14, 2012

Chocolate Beer Bread


This bread is only slightly sweet, and strangely reminiscent of a Pumpernickel. The cocoa flavor is married with stout beer to give it a deep richness. This "appetizer" bread would be great paired with honey butter or walnut cream cheese. Or you could have it as a breakfast bread, toasted and spread with Nutella.

If you prefer to have it sweeter like a dessert bread, increase the sugar to 3/4 Cup and Sprinkle coarse sugar on top before baking. You could even add chocolate chips to really sweeten it up.

3 Cups Self-Rising Flour (you can buy it, or see instructions below to make your own)
1/2 Cup Sugar
1/3 Cup Cocoa Powder
12 oz. Stout Beer (I like Young's Chocolate Stout for this)

Preheat oven to 350 degrees. Line a loaf pan with parchment paper, or grease it.

Mix together dry ingredients and then add in beer slowly, mixing by hand with a wooden spoon for 60-70 strokes. The batter will be thick. Spoon it into the loaf pan and smooth the batter to even it out. Bake at 350 for 45-50 minutes, until a cake tester or toothpick inserted in it comes out clean. Don't rush it - this bread takes a while to be done in the center! You may need to cover the top with foil at some point to prevent over-browning on top.

To make Self-Rising Flour:

4 Cups Flour (you can use 1/2 white and 1/2 wheat if you prefer)
2 teaspoons Salt
2 Tablespoons Baking Powder

Mix well and store in an airtight container until needed.

Savory Beer Bread


This bread has a crusty outside and a dense, moist interior. The beer flavor is subtle but noticeable, and the spices can be varied to your own taste. If you want a hint of sourdough flavor, add 1/2 cup of sourdough starter and increase the flour by 1/2 Cup.

1 1/2 teaspoons instant yeast
4 Cups All-purpose flour (or 3 C white flour + 1 C wheat) plus a little more for kneading
2 teaspoons salt
2 teaspoons dried herbs (like Italian Blend, Herbs de Provence, or make your own blend with any of the following: Sage, Rosemary, Thyme, Oregano, Tarragon, Basil, Dill, Marjoram, Lavender, etc.)
1 12-oz bottle of Beer (I use a medium-bodied Amber Ale)
Optional: Melted Butter and Parmesan Cheese to top the bread before baking.

Mix the flour with the yeast, stir well. Add the salt and herbs, stir well again. Add in the beer gradually, until the mixture is well-moistened. The dough should be moist but not too sticky. If you need to add a little more flour in order to work with it, add the flour gradually one tablespoon at a time until the dough can be worked.

Put the dough on a floured board and knead it for a few minutes until smooth, soft and no longer sticky to the touch. Put the ball of dough in a greased bowl and cover loosely with plastic wrap or a clean kitchen towel. Let it rise in a warm area of your kitchen for  60-90 minutes, until it has doubled in size.

When the dough has doubled in size, punch it down and form into a loaf (I like to do it free-form on a baking sheet, but you can put it into two small loaf pans if you prefer). Cover and let rise again for 30-40 minutes.

Brush the top with melted butter and Parmesan cheese (optional) then bake approximately 35 minutes. The dough is done when you can knock on it and it sounds hollow. You can also gently press in the center and it will no longer feel soft in the center.   

Thursday, May 10, 2012

Beer Brownies


Yes, that's right, I said BEER brownies. Not being a huge brownie person, I wanted to give the traditional brownie a little twist. Dark beer ("Stout") and chocolate are a marriage made in heaven! Anything you bake with beer is going to be better the next day after the flavors have mellowed, so I recommend making these the night before you plan to serve them. These brownies are more cakey than chewy, but they are so moist and full of chocolate flavor. I don't like a lot of chunky stuff in my brownies (nuts, chocolate chips, etc.) but if you do, by all means add some in.

1 Cup Flour
1 1/4 Cup Sugar
1 teaspoon Salt
1/2 teaspoon Baking Powder
1/3 Cup Cocoa Powder
2 oz Chopped Dark Chocolate
1/2 Cup Young's Chocolate Stout (If you can't find this beer, substitute any Stout)
1/2 Cup (1 Stick) Butter
2 Eggs
1/2 teaspoon vanilla

Mix flour, sugar, salt and baking powder together in a large bowl and set aside.

In a small saucepan, heat the stout and butter just to a simmer. Take it off the heat and add in the cocoa powder and chocolate pieces. Stir until they melt. Allow this mixture to cool a bit.

In a mixing bowl, lightly beat the eggs and vanilla. Add in the chocolate mixture slowly (If you have not cooled it enough, you can temper the eggs by adding just a spoonful of the chocolate mixture at a time and stirring well before you add in the rest.) Blend in the flour mixture. Stir it all together just enough to make sure it is well mixed - do not overbeat. I just mix this recipe by hand, an electric mixer really isn't necessary.

Spread the batter into a greased/parchment lined 8x8" square baking pan. Bake at 325 degrees for
35-45 minutes.

Let them cool a bit before cutting into squares.


Wednesday, May 9, 2012

Potato Yeast Rolls


Any homemade rolls are good, but the addition of mashed potato makes these rolls nice and moist, and just a little bit denser than your average dinner roll. I found this recipe in Bernard Clayton's New Complete Book of Breads (1987 edition). I have made a couple of minor modifications here, since I use instant yeast instead of active dry yeast.

Have ingredients at room temperature:

1 Egg
1/4 Cup Sugar
1/2 Cup Mashed Potatoes (I just cook a potato in the microwave, peel the skin, and mash it up with a small amount of milk. In the book, Mr. Clayton says you can use instant potatoes if necessary)
3/4 Cup Milk
1/3 Cup (5 Tbsp) Butter, softened
1/2 tsp salt
3 to 3 1/2 Cups All purpose flour (I start with 3 and add more as needed)
2 tsp instant yeast
3 Tablespoons melted butter

Add the instant yeast into the flour and give it a good stir. In a separate bowl, blend the egg and sugar (I like to use my KitchenAid mixer for this - I start with the paddle attachment and then switch to the dough hook for the kneading). Add in the potato, milk, softened butter, and salt. Mix well. (If using a KitchenAid mixer, here is where you switch to the dough hook) Add 2 Cups of the flour and work it in. Gradually add the remaining flour 1/2 cup at a time. I use 3 cups, but you may need that extra 1/2 cup if it is looking too moist. The ball of dough should cling to the hook and "clean the sides" of your mixing bowl. It should not be too sticky to the touch, if it is add a little more flour. Knead with the dough hook for about 3 minutes, then by hand for another 3-4 minutes.

Place the ball of dough in a large greased bowl and cover loosely with plastic wrap. Put it in a warm place free from drafts and let it double in volume, about 60-80 minutes. I put mine in an unheated oven with the light on for the first rising.

After it has doubled, punch it down, divide in half, and roll each half into a long log. Cut each log into small pieces and roll each piece into a ball in the palm of your hand. You should get about 20 rolls - don't make them too big. Place the balls into greased cake pans close together but not too squished - remember they are going to expand on the second rising. If they are too squished together I find that they do not fully cook in between the balls. Just barely touching is good. Brush them with the melted butter and cover with a clean kitchen towel. Keep at room temperature and let them rise for another 30-40 minutes.

Preheat oven to 400 degrees a good 20 minutes before you bake.

When they have risen, bake until golden brown - about 12-15 minutes.

Best when served still warm from the oven. :)

Hot Cross Buns


These sweet, slightly spicy rolls are traditionally served at Easter time, and this is a really good recipe for them! The Cinnamon and Nutmeg mix with Lemon Zest and Currants to give these buns a festive, old-fashioned holiday taste.


2 2/3 Cups All-purpose flour (have more on hand incase you need it)
2 teaspoons instant yeast
1 Cup Milk
1/4 Cup Sugar
1/2 teaspoon cinnamon
1/4 teaspoon nutmeg
3/4 teaspoon salt
2 Tablespoons finely grated lemon zest
1/4 cup currants
2 Tablespoons Butter
1 Egg

Mix the instant yeast into the flour and stir well.

Warm the milk in a small saucepan or in the microwave until it is very warm but not HOT. Put the milk, sugar, butter, salt, spices and lemon zest into a mixer bowl and mix well. Add the egg and mix on low until blended (this is why you do not want the milk HOT - it will curdle the egg). Add half of the flour a little at a time. Take the dough out of the mixing bowl and knead in the rest of the flour (additional flour may be needed at this point if it is too sticky. Use only enough to handle the dough easily without sticking). When the dough feels smooth,  place it in a greased bowl and cover loosely with plastic wrap. Let it rise in a warm place (I put mine in the unheated oven with the light on) until doubled in size, about one hour.

In the last 20 minutes of rise time, preheat your oven to 425 degrees. 

After the dough has risen, shape it into small balls and place them on a greased cookie sheet. (Don't make them too big - you should get 16-18 balls.) Cover with a clean kitchen towel and let rise again until doubled, about 40 minutes.  After rising, brush with milk or butter to help them brown. Bake until golden, about 13-16 minutes.

When they have cooled, decorate them with a cross made from milk glaze: 1/2 Cup Confectioner's Sugar + 2 teaspoons milk.

Friday, May 4, 2012

So Many Cookies From Just One Dough!

I love recipes that can be made into many different things. Old-fashioned sugar cookie dough is probably the most versatile cookie recipe I know of. You can tweak it into an endless variety of shapes and flavors.

There are basically two kinds of sugar cookies - Old-fashioned sugar cookies and rolled sugar cookies. Most modern rolled "sugar cookies" are actually a butter cookie, not the kind of sugar cookies our grandmothers made. But if I am decorating a bunch of cookies (and especially if I am shipping them), I prefer a more modern butter cookie recipe - it is sturdier, and I like the butter taste.

Old-fashioned sugar cookies, on the other hand, are a softer, less sweet cookie. This dough, which lacks an assertive butter flavor, is more versatile than a butter cookie. You can still roll it and cut it into shapes, but you can also use it as the base for any number of other cookies. Here is my personal recipe, which was my great-grandmother's: Old-fashioned sugar cookies

Here are some of the different things I do with old-fashioned sugar cookie dough:


Rainbow Sugar Cookies:

Roll dough into balls and roll in sprinkles. Bake as usual.


OR, cut into circles, brush with water and sprinkle with colored sugars:


Almond Tea Cookies:
roll and cut into circles. Bake and then top with an almond milk glaze (1 Cup confectioner's sugar, 1 Tbsp milk, 1/4 tsp almond extract) and sprinkle crushed
almonds on top:


Jam Cutouts
Roll dough and cut into circles. Cut a smaller "window" circle in half of the cookies. Bake and then sandwich two cookies together with seedless raspberry or apricot jam inside:


Decorated Rolled Cutouts:
 
Roll dough out and cut into shapes. Bake as directed and decorate with royal icing or glace icing.


Soft Tea Cookies:
Bake as a drop cookie and dust with powdered sugar. Note: I also like to add 1/2 tsp almond or anise extract to the dough for a nice flavor if I am making tea cookies.

Thursday, May 3, 2012

Cookies for Charity


My friend and I baked nearly forty dozen cookies recently for a charity event in our town. WHEW! That was a lot of work! We learned a lot along the way, including which variety of cookies were most popular. Some things we learned were:

1) Post a sign about whether or not your cookies contain nuts. Ours did, so we wanted everyone to know that.

2) Make it easy for each person to grab a cookie and napkin without touching other cookies.

3) Stick to the basics. Sugar Cookies, Chocolate Chip and, to a lesser extent, Peanut Butter were the big hits. Very few people went for unusual flavors like Coconut Pecan and Almond Tea Cookies.