Tuesday, December 27, 2011

Granny Mahoney's Mince Pie


This recipe comes from my husband's great-grandmother, and it is at least 100 years old. This one does not have actual meat in it, but suet (beef fat). For those who want to make this a vegetarian pie, just omit the suet altogether and add 1 teaspoon of instant tapioca or cornstarch to thicken it.

If possible, It is better to make this a couple of weeks ahead so the flavors can age. According to the directions, you are supposed to stir it every other day, adding a spoonful of Brandy each time you do. The recipe was originally meant to make A LOT of mincemeat, which would be sealed in jars and left to age for months, each jar enough to make one pie. But for this post, I have cut it down to a one pie recipe:

3 lbs apples (mostly very firm apples, though you can have a variety)
1 large box seedless raisins - dark, or a mix of dark and golden
3/4 cup chopped suet
1 tsp salt
1/2 Cup candied orange peel
1/2 Cup candied lemon peel
1 whole lemon, cut in half
3/4 Cup Sugar
1/4 cup molasses
1 teaspoon cinnamon
1/2 teaspoon allspice
1/2 teaspoon cloves
1/4 teaspoon nutmeg
pinch of mace


Peel and core the apples, and chop them into chunks. Put HALF of the apples, and HALF of the raisins into a large pot with the orange and lemon peel, the sugar, molasses, salt, and spices. Squeeze the lemon over the fruit, getting as much juice out as you can. Then put the lemon into the pot to simmer with the fruits (you will take it out later). Simmer (covered) on low for one hour, stirring often. Add the remaining apples and raisins and simmer for two or more hours, stirring often to make sure the bottom doesn't get scorched. Test it to make sure the candied fruits have softened. At this point you can add more sugar and spices to taste. Simmer longer if necessary to soften everything up, then take it off the fire and let it cool to room temp. Put in an airtight container and add a spoonful of Brandy to the top. Add a lid and let it sit for two weeks, stirring every other day and adding another spoonful of Brandy. (I have made this just a few days ahead and it is fine, but it will be better if you can give it the full two weeks).

Roll out a two crust pie dough (I like to use old time lard crust for this) and fill with the mincemeat. Bake at 400 degrees for about 40 minutes, checking after 20 minutes to see if the edges need to be covered with foil. Let it sit for 1-2 hours before serving.

Old-Time Lard Crust


This is the same as the flaky crust, but it comes out sturdier, less tender, because of the lard. It also has a slightly "meaty" aroma and flavor, making it great for pot pies and mince pie.

2 Cups sifted All-purpose flour
1 tsp salt
2/3 Cup chilled Lard
2 Tbsp chilled butter
4 Tbsp Ice Water

*For a sweeter crust, you can take 1/4 cup flour out and replace it with 1/4 cup powdered sugar

Sift together Flour and Salt. Cut half of the shortening into the flour with a pastry blender, until it looks like the texture of cornmeal. Cut in the remaining shortening and butter until the dough is in pea-sized crumbs. Sprinkle on the water and blend in lightly with a fork. If needed to hold the dough together, you can add more water a scant teaspoon at a time. When you can gather up the dough in a ball, stop working it. Divide the dough in half, press circles between two sheets of waxed paper to make a disc. This makes chilling the dough faster and rolling it will be easier later. Put the dough in the fridge to chill for an hour or so before rolling. If not using it right away, put the dough in a large Ziploc bag and freeze it.

Then I just go ahead and roll my dough between the two pieces of waxed paper. You need to keep lifting and repositioning the paper when you do this, but it means that you add little or no extra flour to the dough.  It also makes transferring it from the board to the pie tin easier.

Tuesday, December 20, 2011

Spritz Cookies

These small butter cookies only seem to come out at Christmas time, and that's a shame. They are buttery, delicious, and such a fun cookie. Maybe people don't make them often because they are what I would call a "high maintenance" cookie - they require specific equipment and several steps to prep/make. But they are worth it, since they are so tasty and so festive! This particular recipe comes from the Better Homes and Gardens Christmas Cookie book:

3 1/2 Cups flour
1 tsp baking powder
1 1/2 cups butter
1 Cup sugar
1 egg
1 tsp vanilla
1/2 tsp almond extract
food coloring (optional)
Required tools: Manual or Electric Cookie Press (Spritz Cookie Maker)

Stir together flour and baking powder. In your kitchenaid mixer bowl, beat the butter until softened. Then add sugar and beat until fluffy. Add egg and extracts and beat well. Gradually add flour mixture until well-combined. DO NOT CHILL THE DOUGH so that it will pass easily through the cookie press. If desired, tint the dough different colors. Spray cookie sheet with cooking spray or lay down parchment. Press the dough through the cookie press in whatever shape you desire (follow directions for your particular model). Decorate with sugars and sprinkles if desired (I find it helps to brush them with a little water before sprinkling with decorations so they stick better). Bake at 375 for 6-8 minutes.

Monday, December 19, 2011

Retro Christmas Cookies

I usually send my family fancy decorated sugar cookies for Christmas, but this year I was short on decorating time. I still wanted to send cookies, though. So I decided to dig through my family's old cookie recipes and see if I could do something faster, yet still conjuring up the nostalgia of Christmases past. I came up with Rolled Oats Icebox cookies, Old fashioned Molasses, Butterscotch Walnut cookies, and Brandied Chocolate Balls. Making these old recipes was like visiting a time before I was born! You can find all of these recipes in the recipe page.

Sunday, December 18, 2011

Best Gingerbread Cutouts


When people say they don't really like gingerbread cookies, it's usually because they haven't had really good gingerbread cookies. Many recipes give you tough, hard cookies that are not very sweet or, in some cases, overly sugary. This recipe gives you a softer cookie that has a delicious balance of sugar and spice. Roll them on the thick side.

3 Cups All-purpose Flour
1/2 tsp salt
1/2 tsp Baking soda
1 tsp baking powder
1 1/2 tsp cinnamon
2 tsp ground ginger
1/2 tsp nutmeg
1/4 tsp ground cloves
1/2 Cup light molasses
1/2 Cup melted butter
1/2 Cup sugar
1 lightly beaten egg

Mix together dry ingredients in your mixer bowl. In a separate bowl, combine the molasses, sugar, and melted butter, then add to the dry mixture. Add the beaten egg last, and beat just until well-combined. Chill the dough at least one hour before rolling. Roll the cookies thick, then bake in a 350 oven for approximately 6-8 minutes, depending on the size of your shapes.


Simple Milk Icing: 1 Cup powdered sugar mixed with 1 teaspoon milk, stir well. Add more milk just a few drops at a time until you get the consistency you want. You don't want it too runny, it should be thick and when you run a knife through it, it should take 7-10 seconds for the icing to come together again, making the knife mark disappear. You can always add more powdered sugar if you thin it too much. Use a pastry bag to pipe on designs, or frost with a knife for simpler shapes.

Let the cookies dry overnight before packaging or stacking them. This icing takes longer to dry than royal icing, but it is tastier.


Friday, December 16, 2011

Gingerbread Houses - Tips and Ideas


'Tis the season for Gingerbread Houses! I love to build gingerbread houses, and the great thing is that you can make them as simple or as involved as you wish. This week I will posting some tips about building gingerbread houses from simple to complex. I will also include some professional tips for adding details that take it to the next level, for those who would like to take a house from simple to stunning. Here are some tips for success:

Dough:
  • Use a dough that is specifically for houses, not cookies. Cookie dough is meant to be softer. There are two kinds of gingerbread dough for houses - regular and construction grade. Regular Gingerbread Dough is tasty and suitable for building small houses and children's houses. It is easy to roll out and work with. Construction Grade gingerbread dough is tougher and harder to roll out, but it yields amazingly hard dough that will not warp after assembly. Construction grade is usually only used for large houses or competition houses (which may have to sit for a long time and are susceptible to humidity). 

  • Lay a piece of aluminum foil on your cookie sheet and roll your dough out right on that instead of rolling it on a board and then transferring it. (Transferring it can cause the dough to break or the shape to become askew.) If your dough spreads during baking, you can trim it with a sharp knife after it comes out, so your sides stay nice and straight.
  • Roll the dough thick (about 1/4"). For large houses, I bake it twice for extra hardness. The bigger the house, the more important it is that the dough be very firm. After initial baking, let the pieces sit for a day, then rebake them at 250 degrees for ten minutes to dry the dough out a little more.

Constructing the House:
  • If you aren't working with a pattern, build a model out of cardboard first. Tape it all together to see how the house will look.  Then use the pieces as a pattern to cut out your dough. You can do a search online for gingerbread house patterns if you do not want to design your own. Here is one good source for patterns: Gingerbread by Design


  • Build your house on a sturdy base. The larger the house, the sturdier it needs to be. Small houses can go on cardboard cake boards. Large houses require a wooden board of some kind (scavenge your own from your shed or buy pre-cut plywood squares at your local hardware store).

  • Assemble it with Royal Icing, which dries super-hard like glue: (Royal Icing recipe) For a professional look, Tint half of your Royal Icing the same shade of brown as your gingerbread dough and use that icing to assemble the house (so that the icing does not show through in the cracks):
                                           
  • You will still use white royal icing for the decorating, and for adding "snow."
  • It is generally easier to decorate the sides of your house - windows and walls - BEFORE assembling the house. It is easier to have a steady hand for piping if the walls are flat, and candies will dry without sliding downward like they sometimes do when you decorate after the house is assembled and walls are vertical.

  • Use soup cans to prop up walls while you wait for them to dry. You can also use soup cans or something similar to hold the edges of your roof up while drying.
  • Plah ahead to give yourself assembly time! Allow the assembled house to dry overnight (8 hours) before adding the roof on top. Then give your roof several hours up to overnight to dry before adding shingles or decorations on top. The larger the house, the longer you need to let it dry for structural integrity. For large houses, it can take up to 48 hours of assemble/dry/assemble phases. Very small houses can be completely decorated and assembled in one day, but plan ahead because they always take longer than you think they will!
Decorating Tips:
  • Get creative! Go around your grocery store looking for crackers, candies and cereal that could work as shutters, roof tiles, or accent pieces. Be open to using things other than candy. Remember that what you use for roof tiles will need to be pretty flat because shingles are stacked on top of each other. I have also seen gingerbread houses where the roof pieces are "embossed" or imprinted with a shingle design prior to baking. I have also seen pretty designs drawn on with royal icing. The important thing is to make the house yours, in your own personal style. I tend to make houses that are replicas of real buildings, so they are less whimsical than other gingerbread houses. That is my style, and everyone has their own. Many people prefer a gingerbread house that is whimsical and covered with a rainbow of different candies. I love those houses too, so explore your own design style.

  • Snow makes everything look nicer. You can cover up areas that don't look so good with icicles and snow. Dusting the entire house with a touch of confectioner's sugar when it is complete will give it a "just dusted with snow" look.
Take it to the next level:
  • Let there be light! It is not hard to add lights to the inside of your house. Buy a strand of battery operated christmas lights at any craft store. Put them inside (I prefer to have the side and front walls on before I place the lights, so I can tape down the strand while making sure I get the bulbs placed beneath the windows.) Make a little notch in the back wall to allow for the cord to go underneath it, then put the battery pack in back of the house. Depending on how opaque your windows are, the lights should give a nice warm glow to your house.


  • Candy Windows: Just cut the window holes when you are rolling out the dough. After baking your pieces and cooling them, you can pour crushed candy pieces into the window holes and bake at 350 for 5 minutes or so, just until they are thoroughly melted and no chunks remain (watch carefully to avoid overcooking). Let them sit until cool. If the house is lighted inside, the light will show through the windows a little, giving the gingerbread house a warm glow. You can use any hard candy (lifesavers, jolly ranchers) but sometimes candy windows melt out after several days. Brach's Butterscotch discs are the only ones I have found that never melt out, but they are more opaque than other candies, so it is a trade-off.


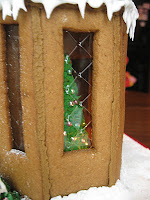
  • See-through windows: Gelatin sheets (aka "leaf gelatin") can be purchased at cake decorating stores or online. You will be able to see completely through the window, so you could place items in the window for viewing:


  • Landscaping: The area around the house looks nicer if there are trees, bushes, etc. You can use trees, fences, etc. to create visual interest, and bushes close to the house can be strategically placed to cover up areas of the house that may look unsightly.


  • Glitz it up! Your local Cake Decorating store or craft store will sell edible glitter which can be dusted lightly over the top of the house to give it sparkle and make the snow "glisten." The one I like best is something called "Disco Dust" - it is far more glittery than other powders.

    FYI - Disco Dust, Lustre Dust, and Metallic Gilding Dust all fall into the category of "Non-Toxic" which means that they won't make you sick, but are not classified as "Edible" by the FDA. So on items that WILL get eaten, do not use them in large quantities. Just something to keep in mind if you plan to eat your house. You only need a little anyway, and in truth, most gingerbread houses do not get eaten after they have been getting stale on display for weeks.


 Again, I have to give a plug to a great gingerbread website, Ultimate Gingerbread. Go visit this site for tons of ideas, how-tos, and gingerbread inspiration! The woman who runs the site, Loreta, is also very helpful if you have questions. She returns my emails promptly and gives helpful suggestions.

Have FUN!

Saturday, December 10, 2011

Old-fashioned Gingerbread


Gingerbread, the cake variety, is dense and spicy, and best served warm and fresh. I like it with just a dollop of whipped cream, but you could top it with a dusting of powdered sugar or a thin milk-and-sugar glaze. The important thing is not to frost it - that would distract from the cake itself, in all its spicy glory.

2 Cups All-purpose flour
1 1/2 teaspoons ground Ginger
1 teaspoon Cinnamon
1 teaspoon ground Cloves
pinch of freshly grated nutmeg
1 teaspoon salt
2 teaspoons baking soda
1 Cup Sugar
1 Cup dark Molasses
1 Cup Vegatable Oil
3 Eggs
1 Cup Boiling Water

Preheat Oven to 350 degrees. Line an 8x8 square pan with parchment.

Mix the flour, spices, salt, and baking soda in a large bowl and set aside. In your KitchenAid mixer, combine the Sugar, eggs, oil, and molasses until well-blended. Add the flour mixture on low until combined. Then add the boiling water last, again mixing on low until well-mixed (the batter will be thin). Bake at 350 for 40 minutes, or until the center is set and springs back when you touch it with your fingertip.